๐Ÿงถ Beautiful โœจ Detailed ๐Ÿ’ Adorable

Niahs Balloon Dog Amigurumi Pattern

Niahs Balloon Dog Amigurumi Pattern
4.7โ˜… Rating
5-7 Hours Time Needed
3.6K Made This
โœ‚๏ธ

Intermediate Level

Ideal for those with basic crochet experience, featuring slightly more advanced stitches and techniques to expand your skills.

โฑ๏ธ

Weekend Treat

Takes 5-7 hours, making it an enjoyable project to finish over a couple of days.

๐Ÿงธ

Cute Companion

An adorable friend to cherish, handcrafted with love to bring comfort and joy for years to come.

About This Niahs Balloon Dog Amigurumi Pattern

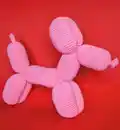
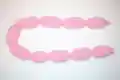
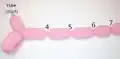
This pattern creates a balloon-dog amigurumi crocheted as a single balloon tube and then shaped into a dog by sewing the balloon joints together. It uses standard cotton yarn 8/4 and works in continuous spirals with simple single crochet shaping. The instructions list every round explicitly and include clear photo-based shaping steps to assemble legs, ears, neck and nose.

Niahs Balloon Dog Amigurumi Pattern crochet pattern - detailed view of completed project

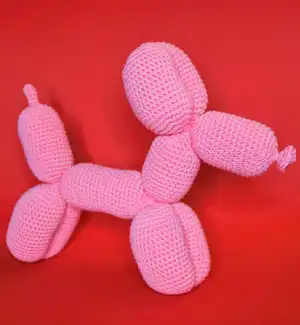
You will crochet one long segmented balloon, stuff at key points, then sew joints together to form the legs, body and head. This design is playful and makes a sweet handmade gift or quirky decor accent.

Why You'll Love This Niahs Balloon Dog Amigurumi Pattern

I absolutely love this pattern because it turns a simple crochet tube into a playful balloon-animal with only basic stitches. I enjoy how the repetitive rounds make it relaxing to crochet while the shaping steps let you be creative when assembling. The design is clever and economical โ€” it uses only about 60 g of yarn yet ends up as a distinct, charming toy. I find it perfect for experimenting with colors and sizes to make a whole family of balloon dogs.

Niahs Balloon Dog Amigurumi Pattern step 1 - construction progress Niahs Balloon Dog Amigurumi Pattern step 2 - assembly progress Niahs Balloon Dog Amigurumi Pattern step 3 - details and accessories Niahs Balloon Dog Amigurumi Pattern step 4 - final assembly and finishing

Switch Things Up

I love how easy it is to customize this pattern by changing colors; you can make multi-colored segments for a festive look or use neutral tones for a modern decor piece.

If you want a larger balloon dog, try a thicker yarn and a bigger hook โ€” the shape will be chunkier and great as a pillow or plush toy.

To make a mini keychain version, use finer yarn and a smaller hook, and reduce the number of rounds in each bump proportionally to keep the shape.

I sometimes embroider small eyes or a smile on the head for added personality, or sew on tiny felt patches for whimsical markings.

Try stuffing the body more firmly for a sturdier toy, or less for a softer, floppy feel; adjust the stuffing to suit how you want the finished piece to pose.

For a playful twist, add a small ribbon collar or a tiny crocheted bow tied around the neck bump for character.

I also recommend experimenting with textured yarns for an interesting surface โ€” just check gauge first as texture changes stitch counts visually.

If you want a posable variant, insert thin wire into the body sections before closing to allow gentle bending of legs and neck.

Group several balloon dogs in different sizes and colors to create a charming display or a set of toys for gifting.

I enjoy making a series with alternating colored bumps; planning your color sequence ahead gives a polished, intentional look to the final piece.

Common Mistakes & How to Fix Them

โœ— Skipping the gauge check leads to a finished size that is too large or too small; check that 24 SC = 10 cm and adjust hook size accordingly. โœ— Forgetting to stuff at the indicated rounds results in flat or misshapen bumps; add stuffing gradually at the specified points to keep each bump rounded. โœ— Counting stitches only occasionally causes mistakes in increases or decreases; count your stitches after rounds with increases and decreases to maintain the correct stitch totals. โœ— Not closing the nose tip properly can leave a visible hole; either sew the tip closed neatly or tie a tight knot around the outside as described. โœ— Sewing joints with uneven spacing will make the dog lopsided; pin and align joints before sewing and check photos for correct joint numbers and placement.

Niahs Balloon Dog Amigurumi Pattern

Make a charming balloon dog amigurumi by crocheting a single long balloon tube and shaping it into a playful dog. This pattern guides you through every round, stuffing points, and the simple sewing steps to form legs, ears, neck, and nose. Perfect for making a whimsical handmade gift or a cute decor piece that brings a smile.

Intermediate 5-7 Hours

Materials Needed for Niahs Balloon Dog Amigurumi Pattern

โ€” Main Fabric

  • 01
    Cotton yarn 8/4 (50 g = about 170 m), approximately 60 g required (sample used pastel pink)
  • 02
    Any brand of yarn matching hook size can be used; using different yarn weight will change final size and yarn requirements

โ€” Tools Required

  • 01
    Crochet hook size 2.0-2.5 mm (US size B-1)
  • 02
    Needle (yarn/tapestry needle) for sewing and weaving ends
  • 03
    Scissor
  • 04
    Stuffing

Progress Tracker

0% Complete

โ€” Crochet pattern :

Info :

The balloon dog is crocheted in the same way as an actual balloon dog, by crocheting the balloon first, and then shaping it as a dog afterwards. The balloon dog is about 20 cm tall, and 23 cm from tail to nose.

โ€” The balloon :

Info :

The balloon itself is made with bumps. It should end up looking like the picture on the right. It is crocheted from the tail to the nose. It is worked in spirals. Start off with a ml.

Round 1 :

6 sc in ml (6)

Round 2-6 :

sc all the way around (6) 65 rounds (tip of the tail)

Round 7 :

*sc inc* x6 (12)

Round 8 :

*1 sc, sc inc* x6 (18)

Round 9 :

*2 sc, sc inc* x6 (24)

Round 10 :

*3 sc, sc inc* x6 (30)

Round 11-25 :

sc all the way around (30) 15 rounds (tail)

Round 26 :

*3 sc, sc dec* x6 (24)

Round 27 :

*2 sc, sc dec* x6 (18)

Info :

Put some stuffing in it.

Round 28 :

*1 sc, sc dec* x6 (12)

Round 29 :

*sc dec* x6 (6)

Round 30 :

sc all the way around (6)

Round 31 :

*sc inc* x6 (12)

Round 32 :

*1 sc, sc inc* x6 (18)

Round 33 :

*2 sc, sc inc* x6 (24)

Round 34 :

*3 sc, sc inc* x6 (30)

Round 35-51 :

sc all the way around (30) - 17 rounds (leg 1)

Round 52-60 :

repeat round 26-34 (30)

Round 61-77 :

sc all the way around (30) - 17 rounds (leg 2)

Round 78-86 :

repeat round 26-34 (30)

Round 87-106 :

sc all the way around (30) - 20 rounds (body)

Round 107-115 :

repeat round 26-34 (30)

Round 116-132 :

sc all the way around (30) - 17 rounds (leg 3)

Round 133-141 :

repeat round 26-34 (30)

Round 142-158 :

sc all the way around (30) - 17 rounds (leg 3)

Round 159-167 :

repeat round 26-34 (30)

Round 168-179 :

sc all the way around (30) - 12 rounds (neck)

Round 180-188 :

repeat round 26-34 (30)

Round 189-203 :

sc all the way around (30) - 15 rounds (ear 1)

Round 204-212 :

repeat round 26-34 (30)

Round 213-227 :

sc all the way around (30) - 15 rounds (ear 2)

Round 228-236 :

repeat round 26-34 (30)

Round 237-249 :

sc all the way around (30) - 13 rounds (nose)

Round 250 :

*3 sc, sc dec* x6 (24)

Round 251 :

*2 sc, sc dec* x6 (18)

Info :

Put some stuffing in it.

Round 252 :

*1 sc, sc dec* x6 (12)

Round 253 :

*sc dec* x6 (6)

Round 254 :

sc all the way around (6)

Round 255 :

*sc inc* x6 (12)

Round 256 :

*1 sc, sc inc* x6 (18)

Info :

Slip st in the next stitch, cut the yarn pull it through and weave in the ends. It should now look like the piece on the picture.

โ€” Shaping the balloon :

Step 1 :

Throughout the picture guide I have given all the joints numbers, like on the picture above.

Step 2 :

For the first pair of legs, you will need to sew joint no 1 and 3 together, as shown on the pictures above.

Step 3 :

When they have been sewn together, it should look like the picture above.

Step 4 :

For the second pair of legs, you will need to sew joint no 4 and 6 together, as shown on the pictures above.

Step 5 :

When they have been sewn together, it should look like the picture above.

Step 6 :

For the ears, you will need to sew joint no 7 and 9 together, as shown on the pictures above.

Step 7 :

When they have been sewn together it should look like the picture above.

Step 8 :

The last thing to do is to close the hole at the tip of the nose. You can either sew it together, or you can tie a tight knot about the outside. You balloon dog is now done!

Assembly Instructions

  • Sew joint no 1 and joint no 3 together to form the first pair of legs, aligning stitches and sewing through both segments securely.
  • Sew joint no 4 and joint no 6 together to form the second pair of legs, checking symmetry with the first pair and adjusting stuffing as needed.
  • Sew joint no 7 and joint no 9 together to form the ears/head assembly, shaping the head and ears so the dog looks balanced.
  • Close the hole at the tip of the nose by sewing the last rounds together neatly or by tying a tight knot around the outside, then weave in the ends.
  • Pin joints before sewing to ensure correct placement and even spacing, then use a yarn needle and matching yarn to sew seams invisibly.

Important Notes

  • ๐Ÿ’กCheck your crochet gauge: 24 single crochets = 10 cm; switch hook size if you have fewer or more stitches to match the pattern gauge.
  • ๐Ÿ’กWork in continuous spirals (no joining) for the balloon tube to keep a smooth, rounded appearance and to match the stitch counts.
  • ๐Ÿ’กStuff each bump gradually at the indicated points to get evenly rounded segments and to avoid lumps or overstuffing.

This sweet Balloon Dog pattern is a fun and quirky project that turns simple single crochet into a playful handmade friend. ๐Ÿงถ Follow the step-by-step rounds and shaping guide to create a little balloon animal that is perfect for gifts or shelf decor. Enjoy the process, be creative with colors, and have fun making your own balloon pack! ๐Ÿพโœจ

You ask,

we answer.

FAQs

What size will the finished piece be?

The finished amigurumi measures approximately 20 cm tall and 23 cm from tail to nose when using cotton 8/4 yarn and a 2.0-2.5 mm hook as recommended.

Can I use different yarn weights for this pattern?

Yes, you can use different yarn weights, but this will change the final size and yarn requirements; adjust your hook size and check gauge to maintain correct proportions.

Do I need prior crochet experience for this pattern?

This pattern is rated intermediate because it requires working in continuous spirals, counting increases/decreases, and basic assembly skills for sewing joints.

How long does this project typically take to complete?

Most crocheters complete this project in 5-7 hours, though time may vary based on experience level, stuffing/sowing time, and pace.

When should I stuff the balloon segments?

Stuff the balloon at the indicated points in the pattern (after round 27 and round 251) and as you progress, adding small amounts to each bump for even shaping.