🧢 Beautiful ✨ Detailed πŸ’ Adorable

Niahs Balloon Dog Amigurumi Pattern

Niahs Balloon Dog Amigurumi Pattern
4.9β˜… Rating
5-7 Hours Time Needed
1.9K Made This
βœ‚οΈ

Beginner Friendly Level

Perfect for those just starting their crochet journey, with clear instructions and simple techniques

⏱️

Weekend Treat

Takes 5-7 hours, making it an enjoyable project to finish over a couple of days.

🧸

Cute Companion

An adorable friend to cherish, handcrafted with love to bring comfort and joy for years to come.

About This Niahs Balloon Dog Amigurumi Pattern

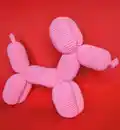
This pattern creates a playful balloon dog amigurumi crocheted from tail to nose using cotton yarn and single crochet in spirals. The finished dog measures about 20 cm tall and 23 cm from tail to nose, making it a perfect pocket-sized companion. You will crochet bumps (segments) and then sew the joints together to shape the dog. The pattern uses a single yarn color and straightforward joining instructions.

Niahs Balloon Dog Amigurumi Pattern crochet pattern - detailed view of completed project

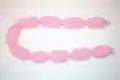
Worked entirely in single crochet and spirals, the balloon is built as a continuous tube with shaped segments. Detailed shaping photos and numbered joints are provided to guide assembly and sewing.

Why You'll Love This Niahs Balloon Dog Amigurumi Pattern

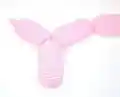
I absolutely love this pattern because it captures the playful look of a balloon dog using simple crochet techniques that anyone can learn. I enjoy how the piece evolves from a long tube of bumps into a recognizable dog by simply sewing a few joints together. The design is forgiving and fun β€” it lets you be creative while still following clear steps. Making these little segmented bumps is oddly soothing and rewarding every time a joint comes together.

Niahs Balloon Dog Amigurumi Pattern step 1 - construction progress Niahs Balloon Dog Amigurumi Pattern step 2 - assembly progress Niahs Balloon Dog Amigurumi Pattern step 3 - details and accessories Niahs Balloon Dog Amigurumi Pattern step 4 - final assembly and finishing

Switch Things Up

I love customizing this pattern by changing the yarn color to create quirky or realistic versions of the balloon dog.

I sometimes use variegated cotton yarn to give the bumps subtle color variation without changing rounds or stitch counts.

I often experiment with different yarn weights and hooks to make both tiny keychain-sized versions and larger plush versions for gifts.

I like adding a small embroidered collar or little felt eyes to give each dog distinct personality and charm.

If I want a more posable piece, I add a thin wire inside the neck or legs before stuffing to allow gentle posing.

I also sometimes tighten or loosen the stuffing in specific bumps to change the silhouette and make the legs look sturdier or more delicate.

For a textured look, I try substituting a slightly thicker hook for a chunkier finish that results in a squishier toy.

I recommend testing one leg or ear placement before sewing permanently, since small adjustments dramatically change the final posture.

I enjoy making sets in different sizes and colors to create playful displays or themed gifts for parties and baby showers.

I always keep notes of any changes I make so I can repeat a favorite variation or scale the pattern consistently next time.

Common Mistakes & How to Fix Them

βœ— Not checking gauge before starting can lead to a finished toy that is too large or too small; measure 24 single crochet over 10 cm and adjust hook size to match the pattern gauge. βœ— Forgetting to stuff as you go will create uneven or collapsed segments; add stuffing gradually at the indicated rounds to maintain smooth, even bumps. βœ— Skipping the repeat counts or misreading combined ranges like "Round 35-51" causes incorrect stitch counts; write down round ranges and mark them off as you complete them to avoid errors. βœ— Trying to close the nose without finishing stuffing first may leave a hollow tip; stuff fully and secure the opening by either sewing it closed or tying a tight knot around the tip as suggested. βœ— Pulling stitches too tight when joining joints creates puckering at seams; use gentle, even tension and pin pieces before sewing to ensure smooth joins.

Niahs Balloon Dog Amigurumi Pattern

Create a charming balloon dog amigurumi using simple single crochet stitches and clear step-by-step shaping instructions. This pattern guides you from the tail to the nose to make a playful, squeezable balloon-dog toy. You will enjoy the quick rhythm of working bumps and joining joints to form the dog shape. Perfect as a handmade gift or a fun decor piece to brighten any room.

Beginner Friendly 5-7 Hours

Materials Needed for Niahs Balloon Dog Amigurumi Pattern

β€” Main Fabric

  • 01
    Cotton yarn 8/4 (standard cotton 8/4), 50 g = approx 170 m; approximately 60 g needed (main color shown in pink)
  • 02
    You can use any brand of yarn that matches the hook size; any color is acceptable

β€” Tools Required

  • 01
    Crochet hook 2.0-2.5 mm (US size B-1)
  • 02
    Yarn needle for sewing and weaving ends (needle listed in materials)
  • 03
    Scissors
  • 04
    Polyester stuffing (or preferred stuffing material)
  • 05
    Optional: stitch markers to mark round starts
  • 06
    Measuring tape to check gauge

Progress Tracker

0% Complete

β€” The balloon :

Info :

The balloon dog is crocheted in the same way as an actual balloon dog, by crocheting the balloon first, and then shaping it as a dog afterwards. The balloon dog is about 20 cm tall, and 23 cm from tail to nose.

Info :

The balloon itself is made with bumps. It should end up looking like the picture on the right. It is crocheted from the tail to the nose.

Info :

It is worked in spirals. Start off with a ml.

Round 1 :

6 sc in ml (6)

Round 2-6 :

sc all the way around (6) – 5 rounds (tip of the tail)

Round 7 :

*sc inc* x6 (12)

Round 8 :

*1 sc, sc inc* x6 (18)

Round 9 :

*2 sc, sc inc* x6 (24)

Round 10 :

*3 sc, sc inc* x6 (30)

Round 11-25 :

sc all the way around (30) – 15 rounds (tail)

Round 26 :

*3 sc, sc dec* x6 (24)

Round 27 :

*2 sc, sc dec* x6 (18)

Info :

Put some stuffing in it.

Round 28 :

*1 sc, sc dec* x6 (12)

Round 29 :

*sc dec* x6 (6)

Round 30 :

sc all the way around (6)

Round 31 :

*sc inc* x6 (12)

Round 32 :

*1 sc, sc inc* x6 (18)

Round 33 :

*2 sc, sc inc* x6 (24)

Round 34 :

*3 sc, sc inc* x6 (30)

Round 35-51 :

sc all the way around (30) - 17 rounds (leg 1)

Round 52-60 :

repeat round 26-34 (30)

Round 61-77 :

sc all the way around (30) - 17 rounds (leg 2)

Round 78-86 :

repeat round 26-34 (30)

Round 87-106 :

sc all the way around (30) - 20 rounds (body)

Round 107-115 :

repeat round 26-34 (30)

Round 116-132 :

sc all the way around (30) - 17 rounds (leg 3)

Round 133-141 :

repeat round 26-34 (30)

Round 142-158 :

sc all the way around (30) - 17 rounds (leg 3)

Round 159-167 :

repeat round 26-34 (30)

Round 168-179 :

sc all the way around (30) - 12 rounds (neck)

Round 180-188 :

repeat round 26-34 (30)

Round 189-203 :

sc all the way around (30) - 15 rounds (ear 1)

Round 204-212 :

repeat round 26-34 (30)

Round 213-227 :

sc all the way around (30) - 15 rounds (ear 2)

Round 228-236 :

repeat round 26-34 (30)

Round 237-249 :

sc all the way around (30) - 13 rounds (nose)

Round 250 :

*3 sc, sc dec* x6 (24)

Round 251 :

*2 sc, sc dec* x6 (18)

Info :

Put some stuffing in it.

Round 252 :

*1 sc, sc dec* x6 (12)

Round 253 :

*sc dec* x6 (6)

Round 254 :

sc all the way around (6)

Round 255 :

*sc inc* x6 (12)

Round 256 :

*1 sc, sc inc* x6 (18)

Info :

Slip st in the next stitch, cut the yarn pull it through and weave in the ends.

Info :

It should now look like the piece on the picture.

β€” Shaping the balloon :

Info :

To shape the balloon, follow the picture guide below. There is a description below each sequence of pictures.

Infos :

1: Throughout the picture guide I have given all the joints numbers, like on the picture above. 2: For the first pair of legs, you will need to sew joint no 1 and 3 together, as shown on the pictures above. 3: When they have been sewn together, it should look like the picture above. 4: For the second pair of legs, you will need to sew joint no 4 and 6 together, as shown on the pictures above. 5: When they have been sewn together, it should look like the picture above. 6: For the ears, you will need to sew joint no 7 and 9 together, as shown on the pictures above. 7: When they have been sewn together it should look like the picture above. 8: The last thing to do is to close the hole at the tip of the nose. You can either sew it together, or you can tie a tight knot about the outside. You balloon dog is now done!

Assembly Instructions

  • Sew joint number 1 and joint number 3 together to form the first pair of legs, aligning the segments carefully before stitching.
  • Sew joint number 4 and joint number 6 together to form the second pair of legs, pinning the pieces together to ensure symmetry before sewing.
  • Sew joint number 7 and joint number 9 together to form the ears/upper head connection, then position and adjust the head and ears for the desired angle.
  • Close the hole at the tip of the nose by either sewing the opening together securely or tying a tight knot around the outside; weave in and hide the yarn ends afterwards.
  • Stuff each segment as indicated in the pattern before closing the decreasing rounds to keep bumps even and smooth.

Important Notes

  • πŸ’‘Work in continuous spirals; do not join rounds with a slip stitch unless you want a visible seam.
  • πŸ’‘Check your gauge: 24 single crochet = 10 cm; change hook size if necessary to match the size of the finished piece.
  • πŸ’‘Stuff segments gradually during the shaping rounds to prevent gaps and to keep the bumps evenly filled.
  • πŸ’‘Pin joints in position before sewing to make sure legs, head and ears are aligned correctly.
  • πŸ’‘Weave in ends securely after finishing and trim any excess yarn for a neat finish.

This playful balloon dog pattern is a delightful project that transforms a long crocheted tube into a charming toy with a few clever joins. It makes a lovely handmade gift or a fun decor piece for nurseries and playrooms. Have fun shaping and sewing the joints β€” each finished dog is unique! 🧢🐢

You ask,

we answer.

FAQs

What size will the finished piece be?

The finished amigurumi measures approximately 20 cm tall and about 23 cm from tail to nose using the recommended cotton 8/4 yarn and hook size.

Can I use different yarn weights for this pattern?

Yes, you can use different yarn weights but the finished size will change; adjust your hook to match the yarn and recheck gauge so segment counts still create proportional bumps.

Do I need prior crochet experience for this pattern?

This pattern is beginner friendly, requiring only single crochet, increases and decreases, but you should be comfortable working in spirals and following repeat instructions.

How long does this project typically take to complete?

Most crocheters finish this pattern in 5-7 hours, though time will vary depending on experience level and how much time you spend on shaping and sewing the joints.