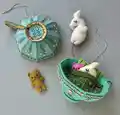
Create a tiny felt teacup ornament featuring a sleepy mouse and a tucking teddy with this detailed hand-sewn pattern. You will love the delicate embroidery, sequins, and sweet finishing touches that make this ornament feel truly special. The pattern includes step-by-step assembly, materials lists, and helpful tips to guide you through each stage. Perfect for gifting or adding a charming handmade touch to your holiday decor.
Progress Tracker
0% Complete
— Supplies :
Infos :
9 x 12 inch (23 x 30.5 cm) sheet of wool or wool-blend felt in teacup color, plus four more 4 x 5 inch (10 x 13 cm) colors for mouse, pillow, quilt, and Teddy. 8 x 5 inch (20 x 13 cm) flat piece of Pellon 70 Peltex (Peltex 71F also works). Matching and contrasting DMC flosses for embroidery, sewing pieces together, and mouse tail/tether. Two 6-inch cotton pipe cleaners for bones/brace. 4 mm or 5 mm sequins in coordinating colors (optional 6-8 mm sequins for teacup flowers). Size 11/0 glass seed beads in coordinating colors. Small amount of polyester or wool stuffing. Gold or silver twisted pearl floss for hanging loop. Gold or silver and white sewing threads. Pink colored pencil for mouse ears/nose/cheeks. Tacky Glue and Fabri-Tac glue. Two 8.5 x 11 inch sheets of Sulky Printable Stick 'n Stitch. Printer/copier (toner recommended). Recommended: Dritz Fray Check for loop knots. Small, sharp scissors, size 5 embroidery needles, small sewing/beading needle, ruler, and usual hand crafting supplies like coffee or tea.
— Get started :
Round 1 :
Please review this helpful resource page: mmmcrafts.blogspot.com/p/twas-night-ornament-series.html It's chock-full of information, links, and tips!
Round 2 :
Plan your colors: The teacup looks great in pastels, cream, or white with nicely contrasting embroidery. White, gray, or tan works well for the mouse—whichever color shows up best against the pillow/quilt color you choose. Repeating embroidery colors between the parts always looks nice, for instance if the teacup has a red design, use a touch of red on the quilt or pillow. Experiment with accents of gold/silver embroidery or metallic felt on the teacup, just like on real fancy china. Pinky out!
Round 3 :
IMPORTANT: Allow a day to preshrink your wool or wool-blend felt before beginning, and test that your sequins/beads are OK to get wet. This will ensure your embroidered pieces don't shrink when you soak away the stabilizer, and that you have no surprises. Soak the wool/wool-blend felts separately in cold water for a few minutes, just until saturated. (100% wools will resist, so roll them a bit and get them at least pretty wet.) Some wool felts are not completely colorfast and you may notice a little dye transfer to the water. This is normal, so keep colors separated. Don't wring out the wet felt! Air dry the sheets flat on towels or blot them on a towel and drape them over rods. Do not use heat or agitation to dry them, as this may greatly shrink/thicken the felt. When the felt is completely dry, give it a quick press to get rid of any wrinkles, if needed. Put a few test sequins and seed beads in a bowl of water and leave them for 20 minutes. If they fade, peel, or curl up, they are not water safe. NOTE: If you are not using the Sulky stabilizer, preshrinking the felt and water testing the beads/sequins is not necessary. See the Resources section for alternate instructions. But! I suggest using the stabilizer if at all possible! It really streamlines the whole process.
Round 4 :
Print all three pattern pages at actual size (no scaling) on regular paper. You may need to turn off the 'fit to page' option. Measure the bold lines on the printed sheets. If all is well, keep those sheets handy for reference later. Print (or copy) Pattern Sheets 1 and 2 (not 3) at the correct size on Sulky Stick 'n Stitch which is compatible with most printers and copiers. See the product package for specific instructions.
— Trace the year on the stabilizer :
Round 5 :
This step is optional. Use PATTERN SHEET 3 and a fine tip permanent pen or a sharp pencil to trace the desired year onto the FOOT BOTTOM stabilizer. A light table or a handy daytime window work well for tracing. (Use this same tracing method to add a name or initials instead, if you'd rather.)
— Apply the stabilizer and embroider :
Round 6 :
Rough cut (not on the outlines) the PILLOW FRONT and BACK away from the stabilizer sheet. Peel the paper backing off and adhere the stabilizer smoothly to pre-shrunk wool felt. DO NOT TRIM AROUND THE PRINTED OUTLINES YET.
Round 7 :
4 strands* of contrasting floss + backstitch (See the Resources section for a backstitch how-to.) Use an embroidery needle (a size 5 needle works well for the embroidery) and four strands of floss* to sew the five bolder lines shown below. Just sew backstitches exactly on the lines, stopping short of the edges. Pull the stitches nicely snug but not so tight that it wrinkles the stabilizer. *That means you'll strip away 2 strands from the 6-strand cotton floss and use 4 strands only.
Round 8 :
2 strands of contrasting floss + backstitch Embroider the remaining thinner lines, this time with only 2 strands. You can use the same color as the bolder lines or a different one. Up to you!
Round 9 :
Use small, sharp scissors to carefully cut out the PILLOW FRONT and PILLOW BACK on the outlines. Set the back aside for later, and follow the steps to soak the front.
Round 10 :
Now to soak away the stabilizer. Place the embroidered piece face down in a bowl of cool water. Leave it there for about twenty minutes. Take it out of the water and hold it face up on your palm. Use the spray nozzle of your faucet to gently shower off any remaining stabilizer with cold water. Don't pull or stretch the felt. If the stabilizer is a little stubborn, let it soak a few more minutes. Never rub or pick it off! You don't want to pull the wet felt or stitches out of shape.
Round 11 :
Place the wet piece face up on a dry folded towel. Let it air dry on the towel completely while you work on the other ones. OK, first piece is done!
Round 12 :
Rough cut the rest of the pattern pieces from Pattern Sheets 1 and 2. Adhere the PELTEX labeled pieces on Pellon 70 Peltex ultrafirm stabilizer (or sub 71F) and set that aside for later. For the rest, adhere them to your chosen colors of wool felt. Use the same color wool felt for all the teacup pieces as shown, unless you'd like to use a contrasting color for the HANDLE and FOOT pieces. Remember you already did the PILLOW in the first steps. If you make this project again, you can just do them all at the same time 'cause you are awesome that way.
Round 13 :
4 strands of contrasting floss + backstitch Embroider the double lines shown below on all eight panels of the OUTER CUP (my diagram only shows three panels, but you'll do them all). *To sub in metallic DMC Diamant see note in Resources section.
Round 14 :
4 strands of contrasting floss + running stitch Embroider the dashed lines on all eight panels.
Round 15 :
3 strands of contrasting floss + backstitch Embroider the sprigs on all seven panels (the panel for the cup handle doesn't have one). Use a single stitch for the littlest branches. If you like, use a different color for just the top three branches of each sprig.
Round 16 :
Seed beads + sequins + metallic sewing thread (See the Resources section for a sequin/bead how-to.) Using either 4 mm or 5 mm sequins, sew a sequin/seed bead combo on each circle as shown. Optional: Use a 6-8 mm sequin for the 'flower' at the top of each sprig, or layer two sizes together.
Round 17 :
4 strands of contrasting floss + backstitch Embroider the decorative midlines on both CUP HANDLES and also the CUP FOOT.
Round 18 :
3 strands of contrasting floss + backstitch Embroider the year on the FOOT BOTTOM. Use very small stitches for nicer result!
Round 19 :
4 strands of contrasting floss + backstitch Embroider the crisscross lines on the QUILT, stopping just short of the edges.
Round 20 :
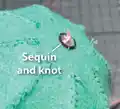
4 strands of contrasting floss + French knots + 5 mm clear or translucent sequins (See the Resources section for a French knot how-to.) Attach sequins snugly by coming up through them at the dots and forming a French knot. Note: You can substitute seed beads for the knots.
Round 21 :
3 & 1 strand(s) of black floss + backstitch Embroider the sleepy lil' eyes on the MOUSE FRONT and MOUSE BACK using 3 strands for the eyes and only 1 strand for the eyelashes. Use very small stitches for the eyes and a single stitch for each eyelash.
Round 22 :
3 strands of black floss + French knots Knots on the dots for TEDDY BEAR eyes.
Round 23 :
2 strands of contrasting floss + single stitches Embroider the tiny little nose and mouth with three or four horizontal stitches for the nose and two single stitches for the mouth.
Round 24 :
Use small, sharp scissors to carefully cut around the outlines of all the embroidered wool felt pattern pieces shown. But don't soak them in water just yet! Set aside all the unembroidered pieces to cut out later. NOTE: There is no need to include the arms/legs of the MOUSE if you are planning to glue the mouse in place permanently on your ornament. Simply trim off the mouse legs at this step.
Round 25 :
Grab the Peltex with pattern pieces stuck to it that you set aside earlier. Carefully cut out all the pieces around the outlines. Peel off the Sulky. You'll use a few pieces in the next steps, and some you'll set aside for later.
Round 26 :
Adding a thin coat of Fabri-Tac on the Peltex (not the felt), glue a PELTEX HANDLE to the wrong side of both felt CUP HANDLES. The straight edges of the felt and Peltex should be flush, as shown.
Round 27 :
Use Fabri-Tac to glue the PELTEX FOOT centered on the wrong side of the embroidered felt CUP FOOT, as shown.
Round 28 :
Flip the OUTER CUP over to the wrong side and use Fabri-Tac to securely glue a PELTEX BOTTOM BRACE to the exact center as shown, being careful to place it accurately. If it helps, make small marks with permanent ink at the end of each cut to help you find the center before you glue. Let it dry.
Round 29 :
OK, now we soak. After the glue is dry, put all the embroidered pieces in plenty of water to soak. Separate brights, reds, or darks from light colors. When rinsing, be sure the Sulky is gone from under the sequins. Lay the pieces all face up on a towel to air dry, just like you did for the PILLOW. Drying usually takes several hours. I just leave them overnight. When dry, the embroidery might feel a little stiff or starched. That's perfectly fine.
Round 30 :
Carefully cut out the rest of the unembroidered wool felt pieces and gently peel off the Sulky. (You already cut out the PILLOW BACK, so just peel it.) Some pieces are really tiny, so keep them in a safe spot where they don't accidentally get swept into your chair and then stuck to your posterior, only to be discovered later by an amused loved one.
Round 31 :
2 strands matching floss + whipstitch Use a minimal seam allowance (2 mm) to sew the felt INNER CUP panels together, keeping all visible knots/tails on the outside of the bowl so they'll be hidden. Start by bringing two of the panels right sides together with the edges aligned as shown. Sew from the rim to the center. Repeat that to sew all the seams so it resembles a floppy bowl.
Round 32 :
Need a mouse tether? If not, skip this step. (Not sure? Err on the side of caution. You can always trim it off later and convert it to a mouse tail.) Use an embroidery needle to pull 9 inches (23 cm) of knotted pink embroidery floss (all 6 strands) through a 5-8 mm sequin, then through the wrong side of the INNER CUP. Pull the knot and sequin snug against the felt. That's it for now.
Round 33 :
Doubled white sewing thread + whipstitch Using the same method as on the INNER CUP, sew the PELTEX CUP LINING into a bowl shape. Peltex is a little firmer than felt, so a slender, sharp needle will save your fingers. This Peltex bowl will be hidden between layers of felt, so it doesn't matter which side your knots/tails are on.
Round 34 :
Use Fabri-Tac to securely glue a PELTEX BOTTOM BRACE inside the bowl of the lining as shown. Make sure it's centered properly, with the points aligned with the seams. Press and hold it firmly against a flat surface so that the lining and octagon are squished tightly and completely together. Let it dry.
Round 35 :
Time for mouse arms! If your mouse will have arms, that is. (You should make the arms if your mouse is not glued in.) Use wire snips or unloved scissors to cut two 3/4 inch (2 cm) pieces of cotton pipe cleaner and curve them a little to match the curve of the arms.
Round 36 :
2 strands matching floss + whipstitch Use minimal smears of Tacky Glue to center the pipe cleaner pieces on top of two opposing mouse arms as shown. Then make two little mouse arm sandwiches by tacking another arm piece on top of the pipe cleaners with a minimal smear of glue. Sew the edges all around. Tada. Tiny mouse arms.
Round 37 :
Add a dot of Tacky Glue near the bottom of a MOUSE EAR and fold it in half. To hold it in place while it dries, spear it with a pin into your pin cushion or a stack of felt or other hapless stable object close by. Let the glue dry. Repeat that to make the other ear.
Round 38 :
2 strands of matching floss + whipstitch Third and final time you will sew a little eight-sided bowl, only this time with your pretty embroidered OUTER CUP. As you sew all the outside seams, keep all knots and tails on the inside of the bowl, where they'll be hidden. Line up the embroidery designs as you sew.
Round 39 :
Test the PELTEX CUP LINING inside the OUTER CUP with all seams aligned. Use gentle pressure from your fingers to smooth/relax the outer felt cup around the liner, pressing the liner firmly into the bottom of the cup. The fit should be snug, and there should be at least 1/8 inch margin (3 mm) of felt showing above the liner. If it's less than that or looks uneven, keep using gentle pressure to smooth the layers together until it looks right.
Round 40 :
Looking good? OK, take the liner back out and add Tacky Glue to the entire Peltex octagon at the bottom of the felt cup and also up the center of the handle panel (the one without the flower). Pop the liner back inside with seams aligned, quickly smoothing and adjusting it again to get an even felt margin like before, firmly pressing the liner against the bottom and the handle panel.
Round 41 :
Snip a 1 1/4 inch (3.2 cm) pipe cleaner piece. Give it a nice haircut so it's pretty slender, as shown.
Round 42 :
We'll add it to the rim of the cup where the hanging loop will be. The cup handle will end up at an angle, so you'll glue the pipe cleaner on the panel to the LEFT of the handle panel as shown below, right at the top of the Peltex liner. This will strengthen the rim and keep it from pulling out of shape when it's hung.
Round 43 :
Now pop the felt INNER CUP inside with the seams aligned, smoothing it down into the bowl with your fingers. The inner felt rim should be fairly even with the outer felt rim. Looking good? Take it back out and add a coat of Tacky Glue inside the Peltex liner on just the octagon. Pop the inner cup back inside with seams aligned and press it firmly down on the glue. Let it dry.
Round 44 :
2 strands of matching floss + whipstitch Hiding your knot in between the layers, neatly sew the outer and inner rims of felt together all the way around, lining up the seams as you go.
Round 45 :
2 strands of matching floss + whipstitch Use Fabri-Tac to glue just the Peltex of the HANDLES together so the double Peltex layers are sandwiched between the felt. Starting with the outside curve, sew the felt margins tightly together, hiding the Peltex. Leave the straight edges (where it will attach to the teacup) unsewn.
Round 46 :
2 strands of matching floss + whipstitch Glue the CUP FOOT BACK to the wrong side of the CUP FOOT so the Peltex is sandwiched between. If the CUP FOOT BACK is a tad too long, just trim the end to match the front. Sew the margins together all the way around.
Round 47 :
Fold it in half, align the straight edges as shown and sew them tightly together.
Round 48 :
Turn the cup upside down on a flat surface. Press it down gently to true it up. Use Fabri-Tac to securely glue the last PELTEX BOTTOM BRACE to the felt bottom of the teacup, aligning the points of the octagon with the cup seams and making sure it's in the center and level. Let it dry.
Round 49 :
Round the CUP FOOT with your fingers so it's more or less circular. Carefully add a thin line of Fabri-Tac all around the cut edges of the Peltex octagon. With the seam centered on the cup handle panel, fit the smaller opening of the foot around the octagon and press it against the felt. Flip the cup over and gently press the foot to set it, making sure the cup sits level. Let the glue dry.
Round 50 :
Use glue to secure the FOOT BOTTOM (with the year embroidered on it) inside the foot as shown below, hiding the Peltex. Orient the numbers with the panel next to the handle panel as shown below, so the year will look straight when the ornament is hung.
Round 51 :
Align the HANDLE ends with your fingers if they're wonky. Coat both raw ends with Fabri-Tac. Carefully press the handle in place on the cup, making sure it's centered side to side. The top end should attach just below the rim. Hold the handle firmly in place until the glue is set, then let it dry completely. Look at that! You made a fancy felt teacup.*
Round 52 :
2 strands of matching floss + whipstitch Gently stretch the PILLOW FRONT to match the back, if needed. Align the PILLOW FRONT and BACK wrong sides together. Sew as shown, pausing to stuff the pillow lightly so it's still pretty squashy. Sew the opening closed.
Round 53 :
2 strands of matching floss + whipstitch Use dots of Tacky Glue to attach the QUILT EDGE aligned with the top edge of the QUILT. The quilt edge is designed to be a tiny bit wider than the quilt, but if it's too much, trim before you sew. Sew around three sides as shown.
Round 54 :
2 strands of matching floss + whipstitch Time to tackle teeny TEDDY. Align the front and back wrong sides together. Starting at the neck, sew around the head and pause to stuff the head lightly, just to add dimension. Continue to sew around the body. Pause after the legs are sewn to add a little stuffing to the body (not to the arms/legs). Then finish sewing. Awww.
Round 55 :
2 strands of matching floss + whipstitch Use tiny dots of Tacky Glue to baste both EARS in place on the back of his head, then secure them with a few single stitches as shown. Follow earlier guides about hiding your knots and tails.
Round 56 :
2 strands of matching floss + whipstitch Unskewer the two little mouse ears and use the dashed guides on the pattern to glue baste them in place on the mouse FRONT and BACK. Use just a dot of glue right at the base of each ear. Sew them only around the ear base to secure, as shown.
Round 57 :
2 strands of matching floss + whipstitch Glue the mouse arms in place on the FRONT and BACK as shown. Use the dashed guides on the pattern sheet to help with placement. Glue and stitches are needed only around the shoulders.
Round 58 :
Snip a 2 inch (5 cm) and also a 2 1/2 inch (6.4 cm) piece of cotton pipe cleaner for mouse bones. Curve them to match the shapes below. Use Tacky Glue to attach them to the wrong side of the MOUSE BACK as shown.
Round 59 :
OPTIONAL TAIL: If your mouse is not tethered, tiny tails are always a cute feature: 6 strands of pink floss + knots + 5 mm sequin Use an embroidery needle to pull a few inches of knotted pink embroidery floss (all 6 strands) through a 5 mm sequin, then through the wrong side of the MOUSE BACK at his lil' caboose, as shown. Add a drop of glue on the knot to secure it. I like the tail to be about 1 1/2 inches (3.8 cm) long, so add an overhand knot somewhere near that length and trim the end neatly. Let the glue set. Done.
Round 60 :
TETHER: If you added a tether to your cup earlier, attach it to Mouse's derriere now. Use an embroidery needle to pull the end of your tether through the MOUSE BACK in the spot marked for his tail. Secure the tether in place on the wrong side of the MOUSE BACK by going through a 5 mm sequin, adding a knot at the end, then trimming the end neatly. Add a drop of glue to the knot.
Round 61 :
2 strands of matching floss + whipstitch Let's sew Mouse together. (Same process with or without legs.) Align the MOUSE FRONT and BACK wrong sides together. Sew as shown, folding the ears and arm out of the way as you go, and pausing to stuff the mouse firmly. Use a dowel or stuffing fork to get some stuffing in his nose and legs first, then stuff the body. Once the body is nicely stuffed, sew the opening closed.
Round 62 :
Use a pink or red colored pencil to lightly color a small nose and rosy cheeks. Then add a blush of color inside both of his ears.
Round 63 :
Use either type of glue to securely attach the pillow in place. It should be centered on the panel next to the handle as shown, with the pillow's top edge just above the cup rim. Let the glue set.
Round 64 :
Use a thin line of either glue on the wrong side to secure just the left edge of the quilt about 1/2 inch (1.2 cm) down from the rim of the cup, as shown. Let dry completely.
Round 65 :
TETHERED OR FREE RANGE: Bend Mouse's legs up and curve his body so he can snuggle properly into the curved bowl of the cup.
Round 66 :
TETHERED: Glue or sew Teddy tucked into Mouse's left arm so he doesn't go missing.
Round 67 :
GLUED: To fix them permanently in place, glue Teddy and Mouse snuggled side by side on the pillow, then tuck them in snugly with Mouse's chin over the quilt edge. Finish by gluing the other quilt edge to the cup on the right side. Tada! Your ornament is done. Skip ahead to the loop attachment.
Round 68 :
TETHERED OR FREE RANGE: Tuck Teddy into Mouse's left arm (if he's not there already), then tuck them both in by placing their heads on the pillow with the mouse body angled into the bowl of the cup. Bunch the tether underneath the mouse, if needed. Tuck the quilt under Mouse's chin and around his body. The natural grabbiness of felt on felt should keep them both tucked in pretty securely, even when the ornament is hung.
Round 69 :
Cut one 9 inch (23 cm) length of silver or gold pearl embroidery floss. Fold it in half and tie an overhand knot near the cut ends by looping it through itself. Trim the tail of the knot so it is neat and even.
Round 70 :
Thread a needle with doubled silver/gold/matching thread. No knot. Go in the teacup from a random spot below and out through the rim at the center of the pillow panel, leaving a tail. Make a couple of small, tight stitches on the spot, then sew on the hanging loop with several more neat stitches in the same spot. (Don't sew through the loop floss, just around it. That way, the loop can slide back and forth to center the knot.)
Round 71 :
To finish, go back inside the loop spot and out again at another random spot further down the teacup. Pull both the tails taut, then carefully trim them so they disappear inside the cup.
Round 72 :
Recommended: Add a tiny drop of Fray Check on the loop attachment and the overhand knot on the loop to keep them from raveling with use.
Finish a charming teacup ornament that will brighten a tree or make a thoughtful handmade gift. This pattern walks you from preshrinking felt to final assembly with clear steps and useful tips. Enjoy the cozy process and the tiny details that make this piece special. 🧵✨