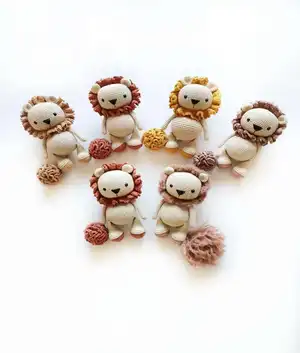
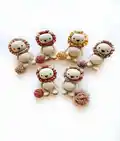
Make your own adorable Ollie the Lion with this charming crochet pattern. You'll enjoy clear step-by-step rounds, photo guidance, and playful details like a ruffled mane and tail. Perfect for gifting or decorating, this pattern results in a sweet handmade companion with plenty of personality. Gather your yarn and hook and start stitching Ollie today!
Progress Tracker
0% Complete
— ARMS :
Round 2 :
2sc in all sts around (10)
Round 3-19 :
(17rnds) Sc in all sts around (10)
Round 20 :
Flatten the piece and close the opening by making sc stitches through both layers of remaining sts (5)
Infos :
** Crochet the second arm in the same way. ** DO NOT stuff the arms.
— FEET AND LEGS :
Info :
** Start with color code 0437
Round 2 :
2sc in all sts around (10)
Round 3 :
(1sc,1inc)- 5 times (15)
Round 4 :
(2sc,1inc)- 5 times (20)
Round 5 :
(3sc,1inc)- 5 tekrar (25)
Round 6 :
(4sc,1inc)- 5 times (30)
Round 7 :
WORK BLO: Scin all sts around (30)
Info :
** Change to Color Code 0404
Round 8-10 :
(3 rnds) Sc in all sts around (30)
Round 11 :
9sc, 6dec, 9sc (24)
Round 12 :
9sc, 3dec, 9sc (21)
Round 13 :
8sc, 2dec, 7sc, 1dec (18)
Round 14-19 :
(6 rnds) Sc in all sts around (18)
Round 20 :
Flatten the piece and close the opening by making sc stitches through both layers of remaining sts (9)
Infos :
** Crochet the second piece in the same way. ** Sew the legs between Round 9 and 10 on the body. Please look through the pictures below 😊
— BODY :
Round 2 :
2sc in all sts around (12)
Round 3 :
(1sc,1inc)- 6 times (18)
Round 4 :
(2sc,1inc)- 6 times (24)
Round 5 :
(3sc,1inc)- 6 times (30)
Round 6 :
(4sc,1inc)- 6 times (36)
Round 7 :
(5sc,1inc)- 6 times (42)
Round 8 :
(6sc,1inc)- 6 times (48)
Round 9 :
(7sc,1inc)- 6 times (54)
Round 10-18 :
(9 rnds) Sc in all sts around (54)
Round 19 :
11sc, (1dec,4sc x 5 times), 1dec, 11sc (48)
Round 20 :
Sc in all sts around (48)
Round 21 :
11sc, (1dec,3sc x 5 times), 1dec, 10sc (42)
Round 22 :
Sc in all sts around (42)
Round 23 :
11sc, (1dec,2sc x 5 times), 1dec, 9sc (36)
Round 24 :
Sc in all sts around (36)
Round 25 :
11sc, (1dec,1sc x 5 times), 1dec, 8sc (30)
Round 26 :
Sc in all sts around (30)
Round 27 :
(3sc,1dec)- 6 times (24)
Round 28-29 :
(2 rnds) Sc in all sts around (24)
Info :
** Break the yarn leaving a long tail for sewing.
— HEAD :
Round 2 :
2sc in all sts around (14)
Round 3 :
(1sc,1inc)- 7 times (21)
Round 4 :
(2sc,1inc)- 7 times (28)
Round 5 :
(3sc,1inc)- 7 times (35)
Round 6 :
(4sc,1inc)- 7times (42)
Round 7 :
(5sc,1inc)- 7 times (49)
Round 8 :
(6sc,1inc)- 7 times (56)
Round 9 :
(7sc,1inc)- 7 times (63)
Round 10-22 :
(13 rnds) Sc in all sts around (63)
Round 23 :
(7sc,1dec)- 7 times (56)
Round 24 :
(6sc,1dec)- 7 times (49)
Round 25 :
(5sc,1dec)- 7 times (43)
Round 26 :
(4sc,1dec)- 7 times (35)
Round 27 :
(3sc,1dec)- 7 times (28)
Round 28 :
(5sc,1dec)- 4 times (24)
Info :
** Break the yarn short and fasten off.We will not use this end to sew.
Info :
NOTE: Insert the safety eyes between Round 16 and 17 with a distance of 13 sts (visible 10 sts) 😊
— EARS :
Round 2 :
2sc in all sts around (12)
Round 3 :
(1sc,1inc)- 6 times (18)
Round 4-5 :
(2 rnds) Sc in all sts around (18)
Round 6 :
(1sc,1dec)- 6 times (12)
Infos :
** DO NOT stuff the ears. ** Sew the ears between rounds 6 and 8. Please look through the pictures below.
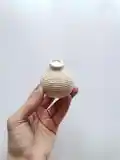
— MANE :
Round 1 :
Ch64 and and join with a sl st into the first ch st to form a ring.
Round 2 :
Ch2; 3dc in each st around and sl st into the first st of the round.
Round 3 :
Ch2; 1hdc in each st around and sl st into the first st of the round.
Round 4 :
Ch3 and 1sc into the same st that we made sl st, (3sc, ch3 and 1sc into the same st) repeat until the end of the round.
Info :
** Break the yarn leaving a long tail for sewing.
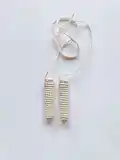
— TAIL :
Round 2 :
Work BLO; sc in all sts around (12)
Round 3 :
Work BLO; (1sc,1inc)- 6 times (18)
Round 4-5 :
(2 rnds) Work BLO; Sc in all sts around (18)
Round 6 :
Work BLO; (1sc,1dec)- 6 times (12)
Round 7 :
Work BLO; (1dec)- 6 times (6)
Round 8-27 :
(20 rnds) Sc in all sts around (6)
Info :
**Break the yarn leaving a long tail for sewing.
— RUFFLES OF THE TAIL :
Infos :
** Using the yarn with color code 0437; starting from the second round of the tail and using the remaining loops of sts (we will work into the BLO sts between Rounds 2 and 7 of the tail): work 2hdc in each st between Round 2 and 7 (including Round 7) After completing hdc sts, ch2 and turn, this time we will work 3dc sts into each hdc st from the previous rounds. ** Sew the tail between Round 11 and 12 on the body.
Ollie the Lion is a sweet little amigurumi designed to bring smiles and cozy vibes to any shelf or nursery. The ruffled mane and textured tail add playful character and charm to each handmade piece. Make a set in different colors for a delightful gift collection. 🧶🧡