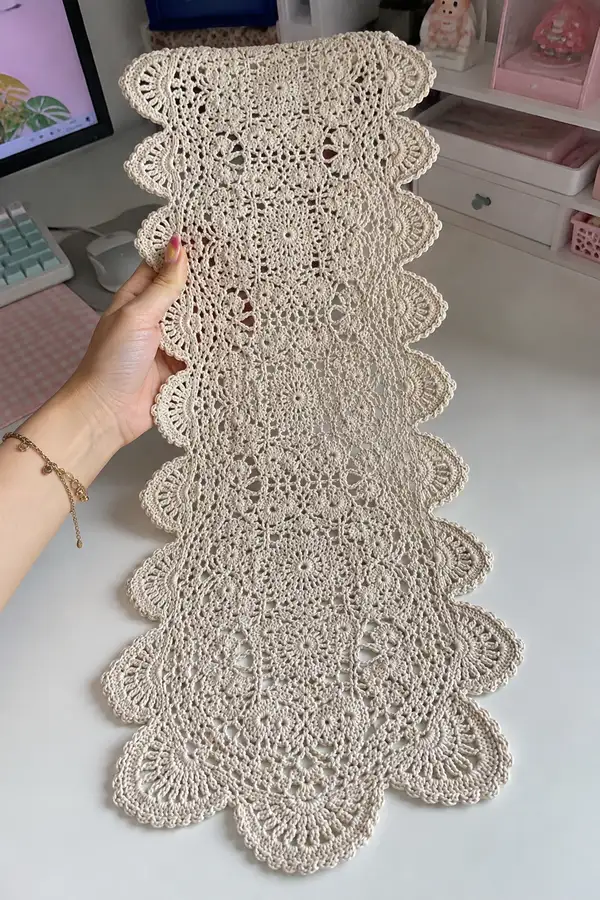
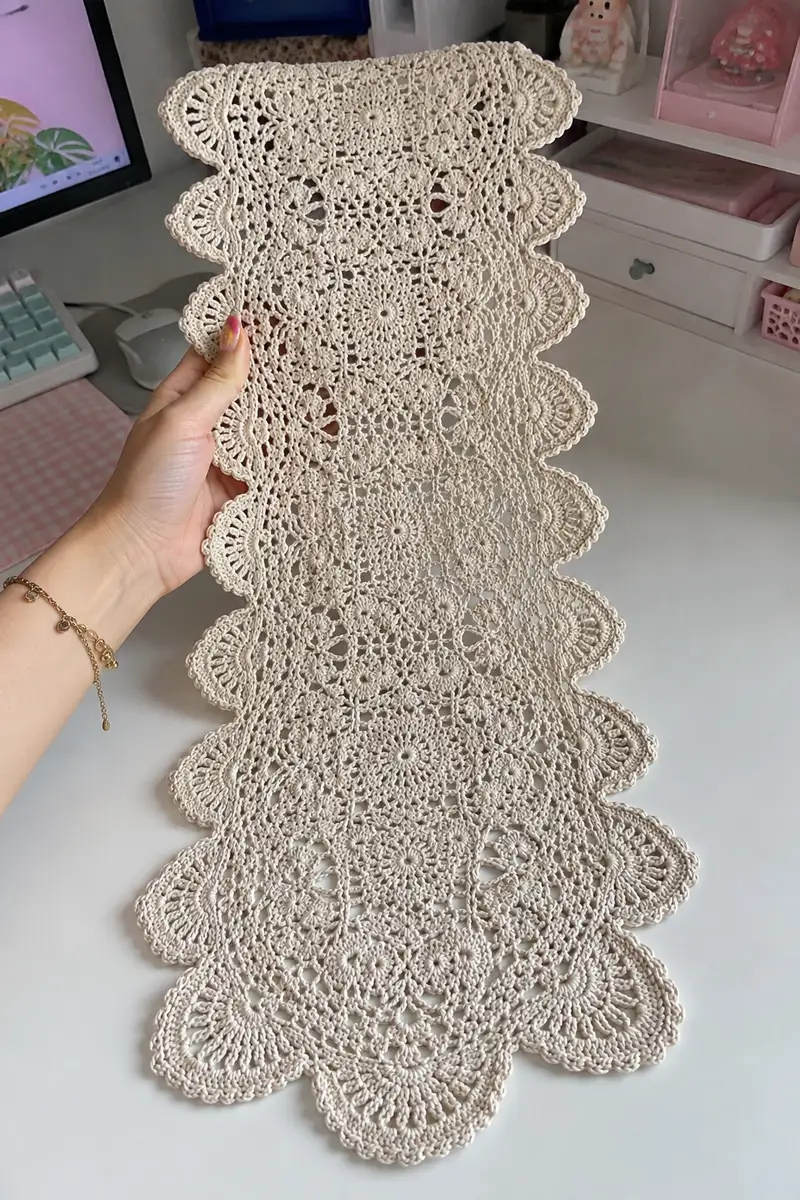
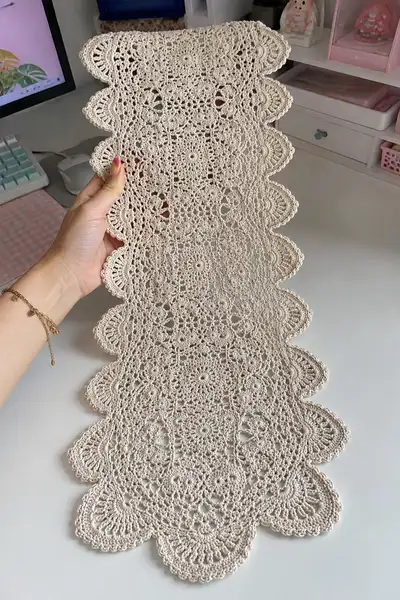
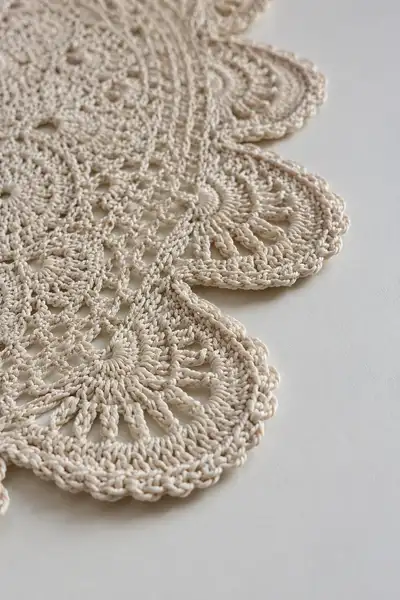
This elegant Victorian-inspired lace table runner is worked in fine cotton thread to create delicate medallions, airy mesh connectors and a scalloped shell edge. The runner in the images shows an ivory palette with layered circular motifs joined into a long strip and finished with a deep scalloped border. The pattern uses thread-weight yarn and small hooks to achieve crisp, lacy definition—perfect for dressing a dresser, dresser tray or narrow dining table. Includes detailed motif rounds, joining instructions and an extended scalloped edging for a professional finish.
Progress Tracker
0% Complete
— Overview :
Info :
This pattern is composed of repeating circular medallion motifs joined in a straight length to create a narrow table runner. Each medallion is worked in the round and finished with a small scallop that becomes part of the deep scalloped border when motifs are joined. The pattern uses size 10 mercerized cotton thread and a 1.75mm hook for crisp definition. Make 12 medallions (or adjust the number for desired length) and join with mesh connectors before working a layered scalloped border. The rounds below list the full medallion and extended connector/border instructions. All rounds are counted and math-checked; work loosely on joins to avoid puckering.
— Individual Medallion (Make 12) :
Round 1 :
Ch 6, sl st to first ch to form ring, ch 3 (counts as dc), work 15 dc into ring, sl st to top of ch 3 to join (16 dc)
Info :
Maintain even tension; ch3 counts as first dc. This round forms the central disc of 16 dc total.
Round 2 :
Ch 1, sc in same st, ch 5, sk next dc, sc in next dc, ch 5, rep around until you have 8 sc separated by ch-5 loops. Join with sl st to first sc (8 sc, 8 ch-5 sps)
Round 3 :
Sl st into first ch-5 sp, ch 3 (counts dc), (3 dc, ch 3, 4 dc) in same ch-5 sp (shell made), *sk next sc, (4 dc, ch3, 4 dc) in next ch-5 sp; rep from * around. Join to top of ch3 (8 shells; each shell is 8 dc separated by ch-3)
Info :
Round 3 builds an eight-petal shell ring. Keep shell height even by placing your stitches into the same ch-5 spaces.
Round 4 :
Ch 1, sc in same st, *ch 7, sc in center of next shell (into ch-3 sp), rep around (8 sc, 8 ch-7 sps). Join with sl st (8 ch-7 loops)
Round 5 :
Working into each ch-7 sp: sl st, ch 3, 11 dc in ch-7 sp, ch 3, sl st to same ch-7 sp to create a taller fan (12 dc per fan including ch3 start). Join to first dc (8 fans, each 12 dc)
Info :
Fans in round 5 create the large outer petal of the medallion. Keep tracker for stitch count: 8 fans x 12 dc = 96 dc distributed in groups around the round.
Round 6 :
Ch 1, sc in same st, *ch 4, sc between each fan at the neat join point (there are 8 sc and 8 ch-4 sps), rep around. Join with sl st to first sc (8 ch-4 spaces)
Round 7 :
Working into each ch-4 sp: (sc, ch 3, 2 dc, ch 3, sc) to form small picot-arched petals between fans. Rep into all 8 ch-4 sps. Join with sl st (8 small petals)
Info :
Round 7 is decorative; keep petals symmetrical. These small arches will help the lace read evenly when joined to other motifs.
Round 8 :
Ch 2 (counts as hdc), 3 hdc in next 3 sts across the side of the nearest fan worked along the curve, *ch 2, sk two small sts to position for next grouping, 4 hdc along the side of the next fan; rep around so each fan side receives two groups of 4 hdc separated by ch-2 sps. Join with sl st to top of ch2 (total approx 64 hdc depending on spacing)
Round 9 :
Ch 1, sc in each hdc across, working 1 sc in each ch-2 sp; when you reach center top of a fan, work (sc, ch 5, sc) in the fan apex to create mesh loop for joining later. Repeat around. Join with sl st (count depends on previous round but maintain evenness)
Info :
Round 9 introduces mesh loops for later joining. Count and mark the (sc,ch5,sc) loop positions around the medallion—there are 8 of them spaced evenly; these are vital for alignment when joining motifs.
Round 10 :
Working in each sc, *ch 3, skip 2 sc, 1 dc in next sc; rep creating a lacy mesh row working into the sc round. At each mesh loop (sc,ch5,sc) work: (1 dc, ch 5, 1 dc) into the ch5 loop to maintain openwork. Join with sl st (lacy mesh formed)
Round 11 :
Ch 1, sc in each dc across, when you reach a ch5 mesh rep, work (sc, ch7, sc) into the ch5 to expand the connector loop. Repeat around and join with sl st (creates larger connector loops; note total sc will equal previous dc count)
Info :
These expanded loops will be the anchor points for joining motifs. Mark one of them as the top if you plan orientation alignment across motifs.
Round 12 :
Sl st into first ch7 sp, ch 3 (counts dc), (2 dc, ch 2, 3 dc) into same ch7 sp to form a small shell; *sk next block of sc and in next ch7 sp repeat (3 dc, ch2, 3 dc). Repeat around (8 small shells). Join with sl st to top of ch3.
Round 13 :
Ch 1, sc in same st, ch 4, sc into the center of the next small shell (into ch-2 sp), *ch 4, sc into next shell center; rep around. Join (8 ch-4 loops)
Info :
Round 13 forms short chain loops that later become scallop bases when you deepen the border. Count 8 loops and place a removable marker at the top loop.
Round 14 :
In each ch-4 loop work: sl st, ch3, 9 dc, ch3, sl st (10 dc per scallop base). Join with sl st. (8 scallop bases)
Round 15 :
Ch 1, sc across, placing 3 sc evenly across the top of each scallop base (3 sc centered on each 10-dc shell), and between scallops work ch 5, sc to make a decorative openwork spacer. Join with sl st.
Info :
Round 15 starts forming the individual decorative scallops that will be linked when you join medallions into a strip. Keep stitch count even so each scallop base holds 3 sc centered.
Round 16 :
Final round of medallion: Work picot-trimmed edge around each scallop: *(sc, ch3, picot, sc) across the 3 sc group on each scallop; then sl st into the ch-5 spacer between scallops. Repeat around and finish with sl st to first sc. Fasten off and weave in tail. Block medallion flat, pinning scallops smoothly.
Info :
Make 12 medallions total (or more/less for desired length). Wet-block each medallion and pin scallops to identical measurements so they join evenly. Allow to dry completely.
— Joining Medallions (Connector Strip) :
Info :
Decide the layout: the runner in the photo shows 12 medallions joined one after another in a straight line with their scallops forming the long scalloped sides. Join using the ch-5 or ch-7 connector loops you created in rounds 9-11 and 13. Use a join-as-you-go or slip-stitch join; the rounds below describe a slip-stitch join-as-you-go method across a joining pass that creates a continuous mesh between medallions.
Round 17 (Joining pass, first motif row) :
Place two medallions with RS facing and align them so scallops match. Insert hook into the first connector ch7 loop (round 11) of Motif A, pull up a loop, then into the corresponding connector of Motif B make a sl st to join. Ch 3, sk next join point and sl st into next connector pair. Repeat across each pairing of connector loops to join motifs along one side until all three interior connector points are joined. Work a continuous row joining motifs pairwise across the entire runner. Fasten off and weave ends.
Info :
When joining three or more motifs (a long strip), stagger your join so that the scallops become the outer edge; join interior connectors and leave outermost scallops free for the scalloped border. Keep tension loose so the seam lies flat.
Round 18 :
After joining motifs in the main strip, work a mesh stabilization row across the length: With RS up, join thread to any ch-5 spacer at the center of a medallion edge, ch 1, sc into same spacer, ch 4, sc into next spacer across the seam area (through both motifs where applicable). Repeat along the full length to create a uniform connecting mesh. When you reach the end of the runner, fasten off and weave ends. This pass evens out any tension differences and forms the inside line beneath the scallops.
Info :
Check runner periodically to ensure straightness. Pin lightly on blocking board as you work this row to keep edges aligned.
— Reinforcing Centre Panel and Open Mesh Fillers :
Round 19 :
With RS facing, join thread at a center top mesh space between two medallions (the small diamond-shaped open mesh visible in the photo) and work alternating rows of mesh to deepen the central connecting web: ch 3 (counts as dc), (2 dc, ch 2, 3 dc) in same space to make a small shell, sk next open chain, dc into next, ch 2, dc in next—repeat to create a narrow filet-like running lattice. Work all the way from one end to the other in one pass. Join and fasten off.
Info :
This lattice gives structural stability and the subtle vertical band visible in the center of the runner. Make sure shells align vertically along the seam line so a subtle raised ridge appears as in the photos.
Round 20 :
Work a second stabilization round: join thread to any dc in round 19 and work 1 sc in each dc and 1 sc in every ch-2 space across the lattice; where shells occur work (sc, ch3, sc) over the shell apex to emphasize the vertical join. Repeat along length and fasten off.
Info :
These two rounds ensure the central band is stable and will support the weight of the scalloped border without pulling the medallions inward.
— First Border Pass (Prepare for Deep Scallops) :
Round 21 :
With RS facing and working around the entire runner perimeter, join thread at any scallop base at one end. Work 1 sc evenly across the top of the scallop base and in the ch-spaces between base scallops work (sc, ch 5, sc) to create loop anchors. Continue around the entire runner performing the same, including across seam joins where scallops meet; finish with sl st to first sc. This creates uniform ch-5 loop anchors at every scallop position around both long sides and both ends.
Info :
Keep counts equal on both long sides so scallops will match when you add the deep shells. Count loops as you go; there should be 12 scallops per long side if you used 12 medallions (confirm by counting medallion scallops).
Round 22 :
Into each ch-5 anchor around the entire edge work: sl st, ch 3, 11 dc, ch 3, sl st (12 dc shells). These form the first deep layer of scallops; join with sl st and fasten off. Each deep scallop has 12 dc (this dimension will give a large scallop like the photo).
Info :
At the ends of the runner you will have more scallops close together; adjust spacing by distributing scs evenly across short ends so scallops appear symmetrical.
— Second Border Pass (Layer and Sculpt Scallops) :
Round 23 :
Rejoin thread at the base of any large shell. Ch 1, sc in same st, ch 2, *working into the top of the 12-dc shell work (2 tr, ch1, 2 tr) evenly across the shell to create a raised shell profile; between scallops work (sc, ch3, sc) in the spacer ch3 from previous round. Repeat around. Join with sl st and fasten off. (Each shell receives 4 tall stitches creating a raised scallop pattern.)
Info :
Using taller stitches in this pass adds height and the layered look visible in the photo. Place stitches evenly to avoid pointy scallop tips.
Round 24 :
Rejoin and work a decorative picot trim into the outer edge for definition: Into each tr group on a raised scallop work *(sc, ch 3, picot, ch 3, sc) across the outer top of the scallop; repeat around. At short ends work the same to enclose the runner. Finish with a final sl st and weave in all ends. Block the entire runner carefully to open the stitches and flatten the scallops.
Info :
Picot trim sharpens the border; if you prefer a softer edge, replace picots with sc-only edging (sc around). Blocking now is crucial for final shape.
— Optional Decorative Surface Embellishment (Raised Lines) :
Round 25 :
For the slight raised vertical ridges visible in the photo, use front-post dc lines worked along the join seams. With RS facing, join thread at the join seam center, ch 1, *fpdc around the post of the dc that sits beside the seam (work 6–8 fpdc to create a short rib), sk next st, then continue with sc across until next seam; rep along all seam lines down the length. Finish and fasten off.
Info :
Front-post lines should be subtle; use them sparingly to achieve the same slender raised columns visible in the photo. Work on RS only for consistent direction.
— Finishing Passes and Edge Reinforcement :
Round 26 :
Work a final reinforcement round: join thread at any point and sc evenly around the entire runner working 1 sc into each outer-most stitch and 2 sc in scallop valleys where needed to maintain flatness. This evens tension and tidies the edge. Join and fasten off.
Info :
Check the perimeter for gaps or puckering. Add or remove an extra sc in valley spaces to smooth the outline before final trimming.
Round 27 :
Weave in all ends using a yarn needle, hiding tails into the nearest shell work. Trim excess. Block entire runner again if desired to perfect scallop edges and medallion spacing. Press lightly with steam if needed but avoid flattening shells.
Info :
When weaving ends, keep them on WS and secure by stitching tails through several rounds' threads to prevent slippage during laundering.
— Pattern Notes and Size Adjustments :
Info :
To make a shorter runner, reduce the number of medallions (each medallion module yields one scallop per long side). To widen the runner, work motifs in two parallel rows and join side-by-side with the same joining technique. If you use thinner thread, expect smaller medallions; thicker thread makes the runner wider and may require larger hook to preserve lacy openness.
Info :
If you prefer to join motifs with a more invisible seam, use mattress stitch with a thin cotton sewing thread through the back loops only to hide the seam on the RS. Alternatively, join-as-you-go slip-stitch works quickly and looks decorative.
— Care and Blocking Instructions :
Info :
To block: soak runner in lukewarm water with a touch of gentle soap, squeeze out excess water without wringing, pin out to desired dimensions on foam board using rust-proof pins and allow to dry fully. For cotton thread, a light steam press can be used after blocking at a distance. Avoid bleach. Store flat or rolled to prevent creasing of scallops.
Info :
Routine laundering: gentle hand wash and flat dry to maintain shape. If machine washing is necessary, place in a mesh bag on a delicate cold cycle and re-block afterwards.
Completing this ornate Victorian lace runner is a wonderfully satisfying process — the repeated medallions, careful joining and scalloped edging create a showstopping heirloom. Each scallop and mesh stitch contributes to an intricate, vintage-inspired look that will grace your table for years. I hope you enjoy blocking and finishing as much as the crocheting — the transformation at the end is magical! 🧶✨