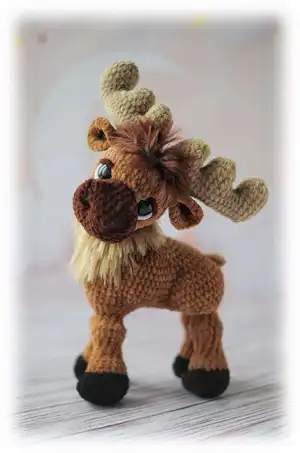
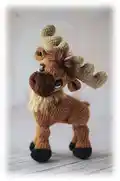
Make your own charming Ostin the Reindeer with this step-by-step crochet pattern. You will create a cuddly, detailed amigurumi with horns, expressive eyes, and hooves. The pattern includes full stitch-by-stitch instructions, materials list, and shaping tips so you can follow along with confidence. Perfect for gifting or adding a whimsical handmade friend to your collection.
Progress Tracker
0% Complete
— Pattern notes :
Info :
The pattern does not include any crochet lessons; you will need to have basic crochet skills to finish the pattern. Final size of the work is 30x15cm. Final size of your work may differ even if you choose recommended materials and tools. Size of your toy will depend on how tight you crochet and the way how you grab working yarn. You may choose your favorite yarn but in this case you might need to adapt your crochet hook size and all materials too.
— Materials and tools :
Info :
1. Himalaya Dolphin baby 100gr/120m (80337) - 1 skein of main color. (80311) - some black yarn for the hooves. (80336) - some dark-brown yarn for the muzzle. (80317) - some yarn for the horns. 2. Yarn lanosso Single (995 and 924) - for the bangs and the chest. 3. Size 3.5mm crochet hook - main. 4. Safety eyes d. 20 mm. 5. Any polyfill stuffing. 6. Sewing needle, stitch markers, scissors, sewing threads, some hard cardboard or plastic material for the soles.
— Abbreviations :
Infos :
MR - magic ring. SC - single crochet. DEC - single crochet decrease (close 2 SC together). SL ST - slip stitch. TR - treble crochet. INC - single crochet increase (work 2 SC into one stitch). DC - double crochet. HDC - half double crochet. CH - chain stitch. BLO/FLO - into back/front loops only.
— Legs (make 4) and body :
Info :
Size 3.5mm crochet hook. Start making the legs. Stitch marker should go through the middle of back part of the leg. If you notice that stitch marker shifts to the sides, crochet stitches to adjust its location. Stuff the legs and the body as you go.
Round 1 :
Start 8 sc in a MR
Info :
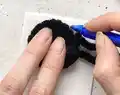
Place a piece of hard cardboard or plastic material (it may help to use a plastic jar cap), place the crocheted part as pictured and outline it. Outline 4 circles and cut them out.
Round 3 :
(3 sc, inc)*4 = (20)
Round 4 :
7 sc, 2 inc making 3 dc, 1 dec, 2 inc making 3 dc, 7 sc = (27)
Round 5 :
7 sc, 2 dec grabbing 3 dc, 1 sc, 2 dec grabbing 3 dc, 7 sc = (19)
Info :
Watch a helpful video to know how to crochet the hooves: https://youtu.be/-J6JyuQ4VAE
Round 6 :
Dec, 17 sc = (18)
Info :
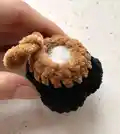
Place cardboard circle inside the hoof.
Info :
Change yarn color to main.
Round 8 :
(1 sc, dec)*6 = (12)
Round 9-12 :
12 sc - 4 rounds
Round 13 :
(1 sc, inc)*6 = (18)
Round 15 :
(1 sc, dec)*6 = (12)
Round 16-17 :
12 sc - 2 rounds
Round 18 :
(1 sc, inc)*6 = (18)
Round 20 :
(2 sc, inc)*6 = (24)
Info :
Cut and fasten off the yarn. Crochet 3 more legs. Do not cut the yarn when you finish the 4th leg. This leg is right back leg. Connect right back and left back legs. Insert hook from the inside of the left leg into last stitch, then into next stitch from outside of the right leg and crochet sc. Crochet this way to make 10 sc, connecting back legs together. Now make CH 5. It is time to connect front legs. Insert your crochet hook from inside into last stitch of left front leg, then into next stitch of right leg from outside and crochet sc. Crochet this way to make 10 sc, connecting front legs together.
Info :
Move stitch marker to the middle between two front legs. New round will start here. Watch a helpful video on how to connect the legs: https://youtu.be/53pyImnBIIs
Round 21 :
14 sc into the unused stitches of right front leg, 5 sc along the chain, 14 sc into the unused stitches of right back leg, 14 sc into the unused stitches of left back leg, 5 sc work into the unused loops on the opposite side of the chain, 14 sc into the unused stitches of left front leg = (66)
Round 22 :
(10 sc, inc)*6 = (72)
Round 23 :
(11 sc, inc)*6 = (78)
Round 24 :
(12 sc, inc)*6 = (84)
Round 25 :
(1 sc, dec)*3, 2 sc, dec, 12 sc, dec, 28 sc, dec, 12 sc, dec, 2 sc, dec, (1 sc, dec)*3 = (73)
Round 26 :
(1 sc, dec)*2, 2 sc, dec, 11 sc, dec, (2 sc, dec)*6, 3 sc, dec, 11 sc, dec, 2 sc, (1 sc, dec)*2 = (59)
Round 27 :
(1 sc, inc)*3, dec, 10 sc, dec, 20 sc, dec, 10 sc, dec, (inc, 1 sc)*2, 1 inc = (61)
Round 28 :
(2 sc, inc)*3, 10 sc, (dec, 2 sc)*5, 1 sc, dec, 10 sc, (2 sc, inc)*3 = (61)
Round 29 :
9 sc, dec, (5 sc, dec)*6, 8 sc = (54)
Round 30 :
(2 sc, inc)*2, 42 sc, (2 sc, inc)*2 = (58)
Round 31 :
10 sc, dec, (4 sc, dec)*6, 10 sc = (51)
Round 32 :
10 sc, dec, (3 sc, dec)*6, 9 sc = (44)
Round 33 :
9 sc, dec, (2 sc, dec)*6, 9 sc = (37)
Round 34 :
9 sc, dec, (1 sc, dec)*6, 8 sc = (30)
Round 35 :
9 sc, 6 dec, 9 sc = (24)
Round 37 :
(2 sc, dec)*6 = (18)
Round 38 :
(1 sc, dec)*6 = (12)
Info :
Pull the opening closed, cut and fasten off the yarn.
— Mouth :
Info :
Size 3.5mm crochet hook. Work in flat rows in muzzle yarn color.
Round 1 :
Start 5 sc in a MR, ch1, turn
Info :
Cut and fasten off the yarn. Put the mouth aside.
— Head :
Info :
Size 3.5mm crochet hook. Start working in muzzle yarn color. Stuff the head tight as you go.
Round 1 :
Make ch6, crochet from the 2nd stitch from hook: 4 sc, 3 sc into the 1st stitch, 3 sc, 2 sc into last stitch = (12)
Round 2 :
Inc, 3 sc, 3 inc, 3 sc, 2 inc = (18)
Round 3 :
1 sc, inc, 3 sc, (1 sc, inc)*3, 3 sc, (1 sc, inc)*2 = (24)
Round 4 :
2 sc, inc, 3 sc, (2 sc, inc)*3, 3 sc, (2 sc, inc)*2 = (30)
Round 5 :
Inc, 6 sc, (3 sc, inc)*3, 3 sc, (inc, 3 sc)*2 = (36)
Round 6-7 :
36 sc - 2 rounds
Round 8 :
(4 sc, dec)*6 = (30)
Round 9 :
(3 sc, dec)*6 = (24)
Info :
Change yarn color to main. Connect the mouth and the body in next round.
Round 10 :
1 hdc, 10 hdc inc, 1 hdc, 4 sc, crochet 5 sc connecting the mouth (grab stitches of flat side of the mouth and the head simultaneously), 3 sc = (34)
Info :
Watch a helpful video on how to connect the mouth and the body: https://youtu.be/9Q3v9OSh7Tw
Info :
Make sure that the mouth is placed symmetrically to the middle of the head, the first round and the increases in the 11th round. Crochet stitches to shift if it is necessary.
Round 11 :
1 hdc, (3 hdc, hdc inc)*5, 1 hdc, 12 sc = (39)
Round 12 :
1 hdc, (4 hdc, hdc inc)*5, 1 hdc, (2 sc, inc)*4 = (48)
Round 13-18 :
48 sc - 6 rounds
Info :
Install the eyes d. 20mm between the 11th and the 12th rounds of the head with the distance 10 stitches between the eyes (count in the 12th round of the head).
Round 19 :
(6 sc, dec)*6 = (42)
Round 20 :
(5 sc, dec)*6 = (36)
Round 21 :
(4 sc, dec)*6 = (30)
Round 22 :
(3 sc, dec)*6 = (24)
Round 23 :
(2 sc, dec)*6 = (18)
Round 24 :
(1 sc, dec)*6 = (12)
Info :
Pull the opening closed, cut and fasten off the yarn.
— Head sculpting :
Info :
Place 2 pins between the 10th and the 11th rounds in the middle of the mouth (points 1 and 6). Insert the needle into point 1 and pull out of point 2, now insert the needle into point 3 and pull out of point 4, insert into point 5 and pull out of point 6. Repeat sculpting one more time to strengthen, pull and tie knots. Click the link to watch a helpful video: https://youtu.be/dmMnVHa4Q9Y
— Eyes decoration :
Info :
Embroider white lines to decorate the eyes and brown eyelids as pictured. Click the link to watch a helpful video: https://youtu.be/dRhTTD51rQ8
— Tongue :
Info :
Size 3.5mm crochet hook. Work in pink color.
Info :
Cut and fasten off the yarn, leaving a long yarn tail to sew. Sew the tongue inside the mouth. Click the link to watch a helpful video: https://youtu.be/zhHg8QRbdRY
— Nostrils :
Info :
Place pins as pictured to mark the nostrils location. 8 top pins are placed between the 5th and the 6th rounds of the muzzle. 6 middle pins are placed between the 3rd and the 4th rounds of the muzzle. 2 lower pins are placed in the 1st round of the muzzle. Place the pins symmetrically to each other. Thread velvet yarn additional color and a needle; insert the needle into the top of the head, leaving a short yarn tail and pull out of top edge point of the nostril.
Info :
Now embroider a nostril, grabbing 2 rounds of the muzzle, go down along the pins, do not pull the yarn. At the end pull the needle out of the top of the head, pull a little and tie a knot. Click the link to watch a helpful video on how to embroider the nostrils: https://youtu.be/G6hxG3gkyR0
— Ears (make 2) :
Info :
Size 3.5mm crochet hook. Work in main yarn color.
Round 1 :
Start 6 sc in a MR
Round 3 :
(1 sc, inc)*6 = (18)
Round 4 :
(2 sc, inc)*6 = (24)
Info :
Put the ear together and crochet 2 sl st through the stitches on both sides. Cut and fasten off the yarn, leaving a long yarn tail to sew. Sew the ears in the 17th round with the distance 13 or 14 stitches between the ears. Click the link to watch a helpful video: https://youtu.be/gRymUQMF0Zc
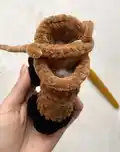
— Horns (make 2) :
Info :
Size 3.5mm crochet hook. Stuff the work tight as you go. Make 3 pieces for each horn: small, middle and big.
Item Name (Piece 1 small) :
start 5 sc in a MR. 5 inc = (10). 10 sc. Cut and fasten off the yarn, leaving a long yarn tail to sew.
Item Name (Piece 2 middle) :
Start 6 sc in a MR. 6 inc = (12). 3-4. 12 sc - 2 rounds. Cut and fasten off the yarn.
Item Name (Piece 3 big) :
start 7 sc in a MR. 7 inc = (14)
This delightful Ostin the Reindeer pattern is a cozy, detailed amigurumi project that makes a heartwarming gift or a special keepsake. The plush velvet yarn and sculpted features give Ostin a lovable, expressive face and charming hooves that stand with confidence. Enjoy stitching every little detail and watching this friendly reindeer come to life! 🧶✨