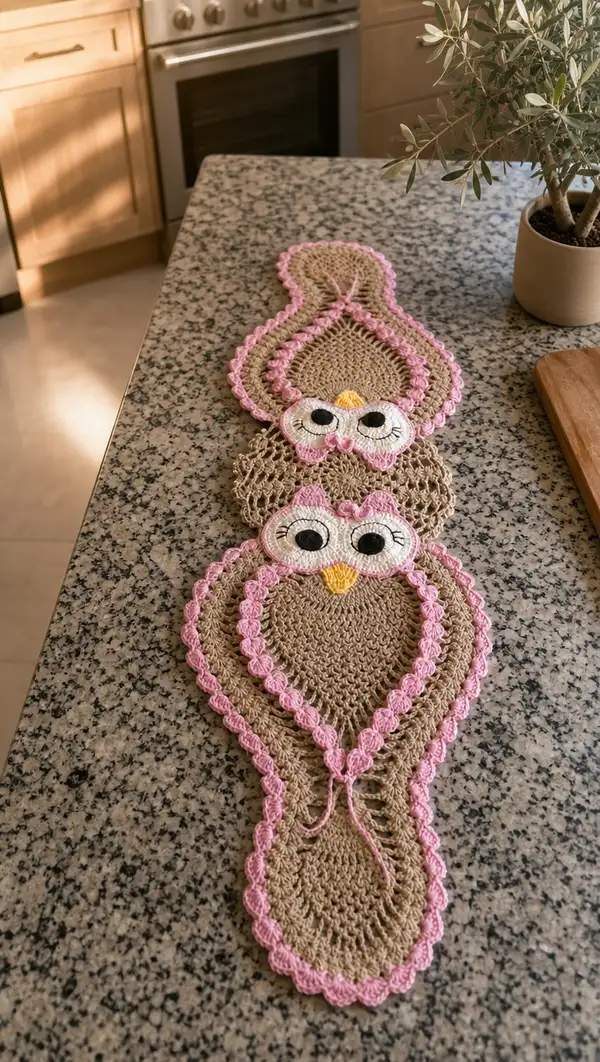
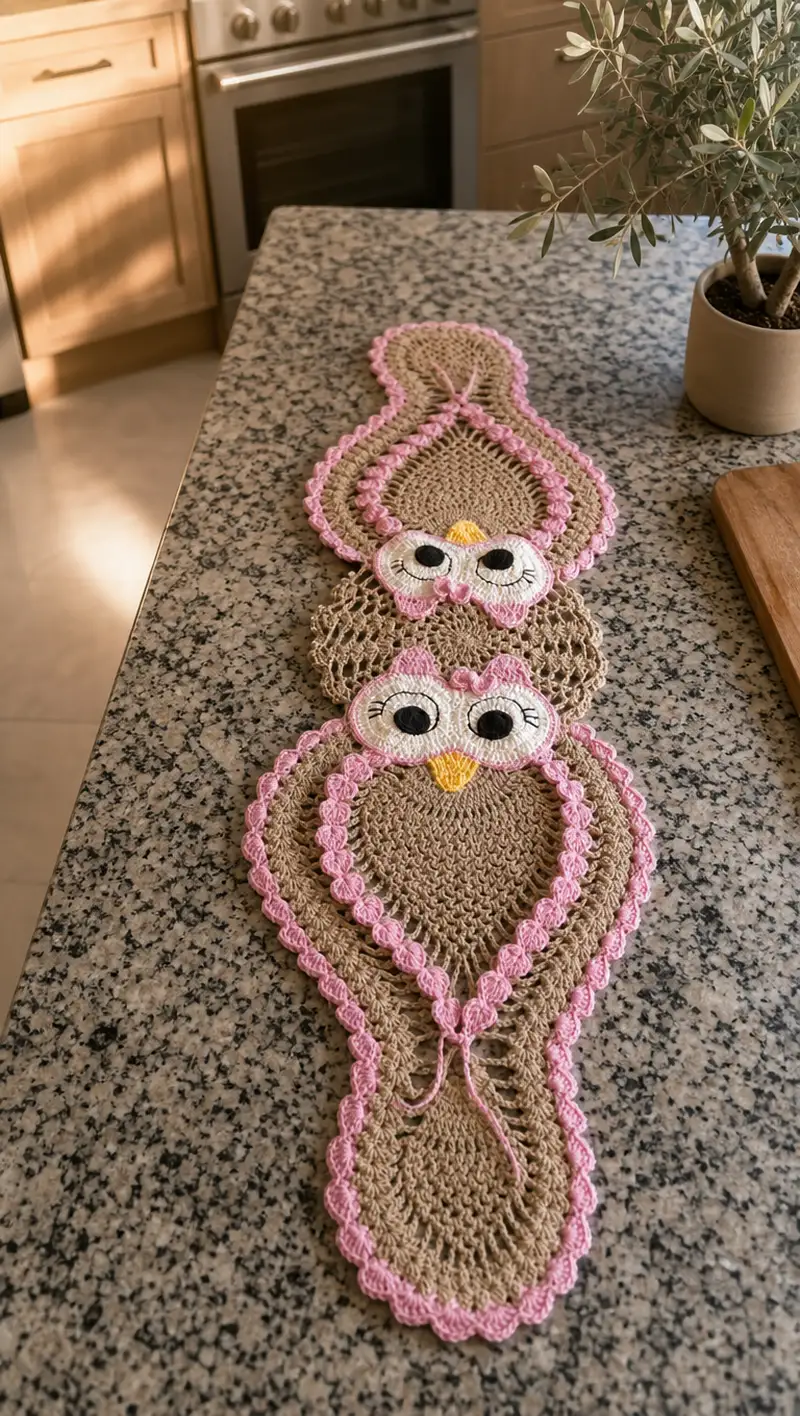
Create a charming three-owl table runner featuring delicate lace connectors and scalloped pink edging. This pattern reproduces the layered owl faces with white eye appliques, black pupils, and tiny yellow beaks, all set on a warm tan body with a soft pink shell border. The runner is worked motif by motif and joined with airy mesh panels for a graceful, vintage-inspired look. Perfect for a decorative kitchen or dining table centerpiece.
Progress Tracker
0% Complete
— Notes & Gauge :
Info :
This runner is worked motif by motif and joined by crochet mesh panels. Gauge is not critical, but for reference the main owl motif should measure approximately 18-20 cm (7-8 in) wide at the widest point when using worsted weight yarn and a 4.0 mm hook. Blocking will enlarge motifs slightly and even out stitches.
Info :
Work tightly enough that your eye appliques sit neatly on the owl face without holes showing. Keep consistent tension throughout the project. Use stitch markers at the start of each round to help keep track of counts.
— Abbreviations & Color Key :
Info :
Colors used in instructions: MC = Main Color (Tan/Beige), PC = Pink Color (Light Pink), WH = White (Eye Base), BLK = Black (Pupil & Lashes), YW = Yellow (Beak). Substitute colors freely.
— Owl Eye Applique (Make 6 per motif - 2 per owl, 3 owls total) :
Round 1 :
With WH, MR, 6 sc in ring (6)
Round 2 :
Inc in each st around (6 inc) (12)
Round 3 :
(1 sc, inc) x 6 (18)
Round 4 :
(2 sc, inc) x 6 (24)
Round 5 :
(3 sc, inc) x 6 (30)
Info :
These rounds create the flat white eye base. Keep stitches relaxed but even—if the circle cupped, block flat before continuing. If you want a slightly larger eye, do one more increase round: (4 sc, inc) x 6 = 36.
Round 6 :
1 sc in each st around (30)
Round 7 :
1 sc in each st around (30)
Round 8 :
Start shaping eyelid edge: [BLO] (1 sc in next 2 sts, 1 hdc in next st) around to create slight raised rim (30)
Info :
Use BLO on Round 8 to create a defined rim where the colored eye border will sit. Fasten off, leaving a 20 cm tail for sewing to the face. Make 6 of these per runner (two for each owl).
— Eye Pupil (Make 3 per motif) :
Round 1 :
With BLK, MR, 6 sc in ring (6)
Round 2 :
Inc in each st around (6 inc) (12)
Round 3 :
(1 sc, inc) x 6 (18)
Round 4 :
1 sc in each st around (18)
Info :
Make pupils slightly smaller or larger depending on desired expression. Fasten off leaving a long tail for sewing. Position pupils centered on the white eye bases and sew through all layers with matching black thread making a very small whip stitch several times for security.
— Decorative Pink Eye Border (Make 6 per motif) :
Round 1 :
With PC, join to rim of white eye with sl st, ch1, sc evenly around (30)
Round 2 :
(Sk1, 5 dc in next st, sk1, sl st in next) repeat around to create small shells; adjust spacing to work 10 shells around (10 shells)
Round 3 :
Sl st to first shell, ch1, sc around base to tidy (work 30 sc evenly distributed) (30)
Info :
These shells create the playful pink scalloped rim seen around each eye cluster. Make 6 total for each owl grouping. Fasten off but leave tails for sewing the eye set onto the owl face.
— Eyelash Embroidery :
Info :
Using embroidery needle and BLK yarn, stitch three simple curved lash lines on the outer edge of each white eye at top-left or top-right depending on orientation. Use backstitch or satin stitch for compact lashes. Secure tails on the wrong side with a few tying stitches and weave in ends.
— Small Beak (Make 3 per motif) :
Round 1 :
With YW, ch4, sc into 2nd ch from hook, hdc in next ch, sc in next ch. (3 st triangular piece) Fasten off leaving long tail (~20 cm)
Info :
Sew beaks to the center of the two eye cluster joint between the eyes as shown in photo—position so the beak tip points downward and tucks between the lower lash shells. Secure with several small stitches using tail and hide the end through the face top.
— Owl Face Cluster (Assemble 2 eyes + beak) :
Info :
Pin two finished white eyes (with pink shells attached and pupils sewn) side-by-side leaving 2 stitches gap between them. Center a beak between and slightly below the eyes. Tack into place with a few tiny invisible stitches, then sew all the way around through shells and white base to secure. Repeat for top, center, and bottom owl faces (3 face clusters per runner).
— Owl Body Motif (Main Tan Body) - Single Motif (Make 3 and join) :
Round 1 :
With MC, MR, 6 sc in ring (6)
Round 2 :
Inc in each st around (6 inc) (12)
Round 3 :
(1 sc, inc) x 6 (18)
Round 4 :
(2 sc, inc) x 6 (24)
Round 5 :
(3 sc, inc) x 6 (30)
Info :
These rounds form a base circle that will be elongated into a teardrop / oval body with farther increases on one side of the rounds. Maintain a consistent marker for round start.
Round 6 :
(4 sc, inc) x 6 (36)
Round 7 :
(5 sc, inc) x 6 (42)
Round 8 :
1 sc in each st around (42)
Round 9 :
Change to shaping for teardrop elongation: 1 sc in next 21 sts, inc in next st, inc in next st, 1 sc in remaining 20 sts (44)
Info :
Round 9 adds two increases on the long side to begin the oval lengthening—this will gradually make the circular piece more pear-shaped. Place your stitch marker at the original round start and note the long-side increases for future rounds so you always orient the increases to the elongated tip.
Round 10 :
1 sc in each st (44)
Round 11 :
On the long side only: 1 sc in next 22 sts, inc, inc, 1 sc in remaining 20 sts (46)
Round 12 :
1 sc in each st (46)
Round 13 :
On the long side only: 1 sc in next 23 sts, inc, inc, 1 sc in remaining 22 sts (48)
Round 14 :
1 sc in each st (48)
Info :
At this point the motif should feel pear-shaped. Continue alternating 1-2 rounds of even stitches with localized increases on the long side until you reach a stable width and length similar to the photo. For our runner the body will reach a working circumference around 60-72 sts depending on desired size—we will increase gradually.
Round 15 :
Long side increase: 1 sc in next 24 sts, inc, inc, 1 sc in remaining 22 sts (50)
Round 16 :
1 sc in each st (50)
Round 17 :
Long side: 1 sc in next 25 sts, inc, inc, 1 sc in remaining 24 sts (52)
Round 18 :
1 sc in each st (52)
Round 19 :
Long side: 1 sc in next 26 sts, (inc, 1 sc) in next 2 spots, 1 sc in remaining 24 sts (54)
Round 20 :
1 sc in each st (54)
Info :
Check that your long side increases are always centered on the same arc of the motif so it extends evenly into an oval. If your work begins to twist, gently flatten and re-orient start point. Keep the stitch counts exact; these numbers are tuned for a balanced motif roughly 18-20cm wide.
Round 21 :
Begin textured rows for body: ch1, *dc in next 2 sts, ch1, sk1* repeat around (maintain 54 st foundation but patterning creates airy texture)
Round 22 :
1 sc in each st around to stabilize pattern (54)
Round 23 :
(1 sc, 1 hdc) across long side for a gentle curve: work 54 sts total distributed—1 sc in each st (54)
Round 24 :
Even round: 1 sc in each st (54)
Info :
This section builds the flat surface and subtle texture of the owl body. If you prefer a denser body, substitute sc in rounds 21-23 for continuous sc. Keep the center top free of additional shells until eye cluster is attached.
Round 25 :
Begin inner decorative loop placement: mark points for where inner pink loop will sit. Ch1, *3 sc, ch3, sk3* repeat around to make small loops that will hold the inner decorative chain later. Maintain 54 stitch anchor points.
Round 26 :
1 sc in each st (54)
Round 27 :
For the tapered tip of the teardrop: on the tip arc do (sc, dec, sc) to reduce slightly and form a pointed bottom: 1 sc in next 20, (sc, dec, sc), 1 sc in remaining 32 (53)
Round 28 :
1 sc in each st (53)
Info :
At this stage pin your two-eye face cluster to the narrower top section of the motif where it will be attached. The face cluster should sit centered across the width of the motif near the round where the inner decorative loop sits. Pin and test placement before sewing.
Round 29 :
Fasten off leaving long tail for sewing face cluster. Weave in short ends but keep long tail available for secure attachment of face piece.
Info :
Sew the completed eye clusters to the top face of the body motif using the tails left earlier. Make sure the pupils are centered and eyelashes are oriented upward. Use neat, small stitches through the white eye base only so the pink shells remain visible on the surface.
— Inner Pink Decorative Loop (Make 1 per motif) :
Round 1 :
With PC, join where marked on Round 25 loop, ch35 (adjust length to sit inside main shell), sl st back along chain to make a cord (35)
Round 2 :
Attach both ends to body with sc and then work 1 round of sc around the cord edges to create a raised pink inner loop: 1 sc evenly on both sides (approx 70 sc total around both sides)
Round 3 :
Work small shell edging: *sk1, 5 dc in next st, sk1, sl st in next* around the cord to form textured bubbles similar to the photograph (work shells evenly to match count, approx 12 shells)
Info :
The inner loop is decorative and visible as a raised pink ring. Adjust chain length (Round 1) to sit snugly within the tan body. Securely tack both ends and weave in tail on wrong side to avoid showing knots through the openwork.
— Scalloped Outer Pink Border Around Whole Motif (Finish motif) :
Round 1 :
With PC, join at any outermost edge st, ch1, sc evenly around the entire motif following outer edge shape; work into rounds across curved edges to keep shape neat (approx 120 sc—adjust to fit motif perimeter)
Round 2 :
Shell round: *sk1, (3 dc, ch1, 3 dc) in next st (shell), sk1, sl st in next* around to create scallop edge. Space shells evenly—aim for shells every 4-6 sts depending on scale (approx 30 shells)
Round 3 :
Sl st in center of each shell, ch1, sc in the center to embellish shell centers for a raised look (approx 30)
Info :
Make sure shells are distributed symmetrically around the motif. If you notice uneven shell spacing, adjust by adding or removing single crochet spacer stitches in the prior round to equalize. Fasten off and weave in ends on the wrong side.
— Lace Connector Panel (Make 2 panels to join the 3 motifs) :
Panel R1 :
With MC, ch28, join with sl st to form ring, ch3 (counts as dc), 23 dc into ring working flat to create long oval panel base (24 dc)
Panel R2 :
Ch1, turn, 1 sc in each dc across (24)
Panel R3 :
Ch4 (counts as tr + ch1), *tr in next st, ch1* repeat across to give open mesh vertical bars (24 tr with ch1 spaces)
Panel R4 :
Ch1, sc in each ch-1 space across (24)
Panel R5 :
Repeat R3 and R4 until panel reaches length roughly equal to gap between motifs (for this runner work R3-R4 rep 10 times to build a taller airy panel)
Info :
These mesh panels are the open lacework seen between the owl motifs. Make two identical panels and block them flat. When joining motifs sew at the top and bottom edges of each panel to the undersides of the adjacent motifs, keeping the mesh centered so the runner lies flat.
— Assembly Preparation & Blocking :
Info :
Block each motif flat after finishing and before joining. Use pins to pin to desired shape and spray lightly with water or use steam to set stitches. Let dry fully on blocking mat to prevent shifting. Block both lace panels and all three motifs together so they align before joining.
— Joining Motifs with Lace Panels (Sewing/Join-As-You-Go Option) :
Method 1 (Sewing) :
Pin motif 1 and motif 2 in place and pin one lace connector panel between them aligning center points; whip stitch panel edges to underside of each motif with matching MC yarn using long tail and invisible whip stitch, securing with multiple passes for durability.
Method 2 (Join-As-You-Go) :
With MC working from edge of motif 1, sc along edge then sc through corresponding top edge of mesh panel to join, continue along panel and join to motif 2 the same way. Work slowly and keep corner stitches aligned to avoid skewing motifs.
Info :
When joining, ensure that scalloped edges of adjacent motifs match and that mesh panels sit centered. Use blocking pins to pin the assembly flat and adjust as you join. Fasten off and weave in all tails neatly into wrong side of runner.
— Additional Center Lace Accent (Optional) :
Round 1 :
With MC, ch30, sc back along chain, create looped cord and attach to center between motifs as shown in photo; secure both ends with a few sc stitches on motifs to hold in place
Info :
This center cord detail adds a little braided tie down the centerline of the runner. Adjust length to preference and tack in place through small secure stitches to keep it flat.
— Final Outer Border (All Combined Runner) :
Round 1 :
With PC, join at any outer edge of the assembled runner and sc evenly around entire outer perimeter to create a stable join (work additional sc in corners to prevent puckering). Count total sc; typical total will be around 400-500 sc depending on spacing of motifs.
Round 2 :
Shell round: *sk1, 5 dc in next st, sk1, sl st in next* repeat around to create a continuous scallop edge. Space shells evenly—aim for pleasing symmetry across the length (approx 80-100 shells depending on perimeter).
Round 3 :
Embellish shells: sl st to center of each shell, ch1, sc in center, fasten off and weave in all tails
Info :
For the long runner be mindful of keeping consistent shell spacing across curved lengths. Place pins every 5-10 cm while working to maintain a smooth edge. After finishing, block the entire runner flat again to set the outer border shells evenly.
— Optional Embellishments & Finishing Touches :
Info :
You can add small embroidered eyebrow ridges or a small crocheted bow at the top owl crown using PC to mimic the decorative top seen in the photo. If you add small bows, make tiny 1: ch6, sc back, fold and secure to form a bow and stitch to head. For extra stability at the joins, run a single crocheted line along the seam inside the stitches to reinforce.
Info :
Weave in all loose ends on the wrong side using a yarn needle and trim carefully. Consider adding a tiny bit of fabric glue under each pupil for extra security if making as a decorative piece that will be moved frequently.
— Blocking & Care Instructions :
Info :
Block the finished runner to final dimensions by pinning to a blocking board or towel, lightly steaming with an iron on a low setting held above the fabric or using a spray bottle. Avoid direct, heavy steaming which can distort shells. Hand-wash gently in cool water if needed and reshape on a flat surface to dry.
Info :
To preserve delicate shells avoid machine washing and keep runner away from direct heat. Store flat or rolled to prevent scallop flattening.
Completing this owl table runner is such a rewarding project—watching three whimsical owl faces come together on an elegant lace connector is a delight! The pink scallops and layered eyes give each motif personality and charm, and blocking the finished runner brings everything into crisp, graceful shape. Whether you place it on a dining table or a dresser, this handmade accent adds warm, playful style to your home. 🧶🦉💕