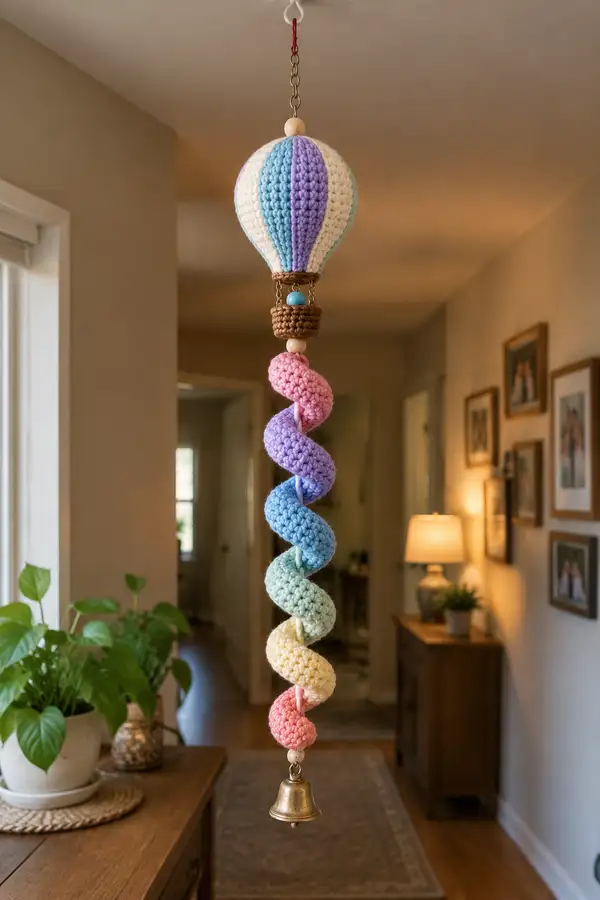
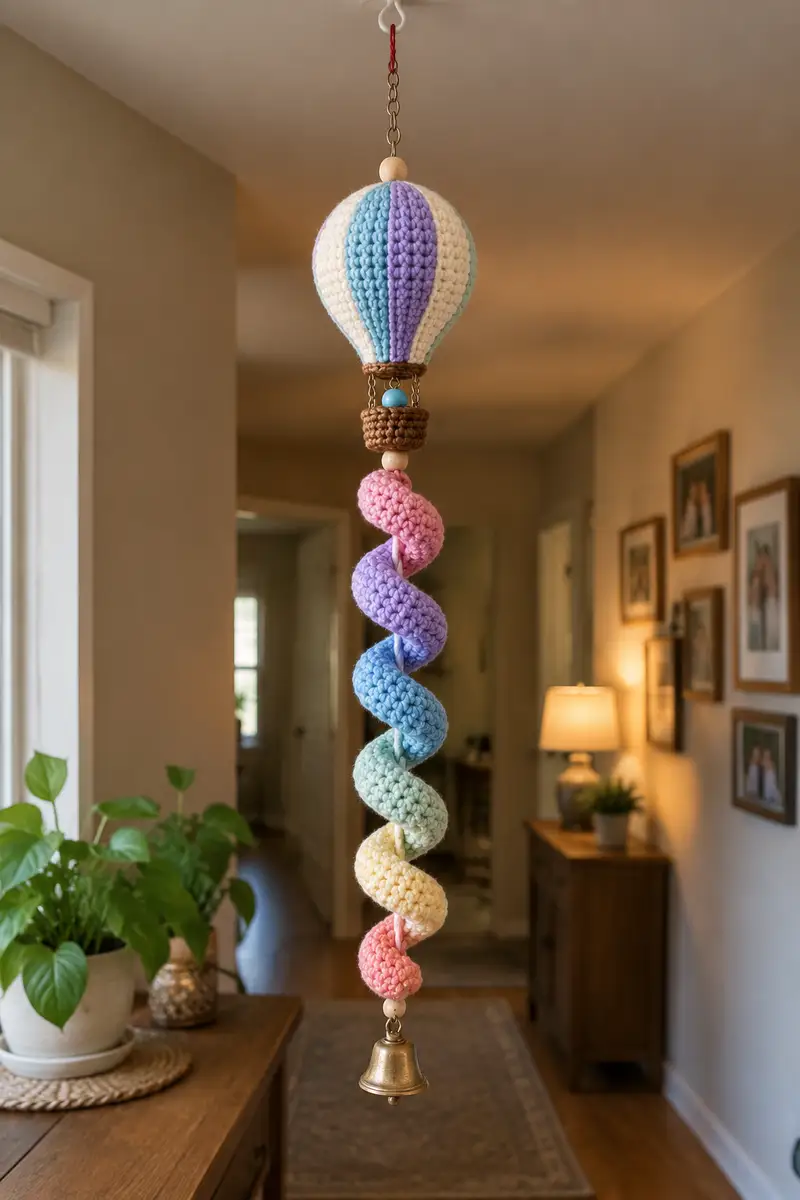
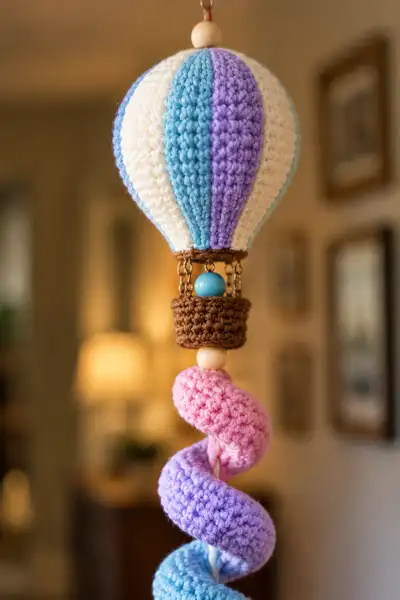
Create a dreamy pastel hot air balloon mobile with a striped cream-and-pastel balloon, a little crocheted basket with wooden bead details, and a long spiral of rainbow coils finishing with a bell. This hanging amigurumi is perfect for nurseries, gift-giving, or as a whimsical home accent. The pattern uses basic amigurumi construction, color changes for panels, and a spiral tube technique wrapped around a central cord for the long hanging spiral.
Progress Tracker
0% Complete
— Balloon (Head) :
Round 1 :
6 sc in magic ring (6)
Round 3 :
(1 sc, inc) x 6 (18)
Round 4 :
(2 sc, inc) x 6 (24)
Round 5 :
(3 sc, inc) x 6 (30)
Round 6 :
(4 sc, inc) x 6 (36)
Round 7 :
(5 sc, inc) x 6 (42)
Round 8 :
(6 sc, inc) x 6 (48)
Info :
We will work with 48 sts as the main circumference for the balloon. The balloon uses 8 vertical panels (48/8=6 sts per panel). Change colors every 6 sts to create panels: cream will be the base and alternate with pastel stripes. Prepare all pastel colors as separate small balls or carry yarn inside by twisting at color change points.
Round 9 :
1 sc in each st (48)
Round 10 :
1 sc in each st (48)
Round 11 :
1 sc in each st (48)
Info :
Begin color paneling now: Place color changes so each 6-stitch block forms a vertical panel. Carry unused yarn up the inside and twist at the color join to prevent long floats. Lock each color join neatly with a sl st or carry inside if you plan to hide ends in stuffing later.
Round 12 :
1 sc in each st (48)
Round 13 :
1 sc in each st (48)
Round 14 :
1 sc in each st (48)
Round 15 :
1 sc in each st (48)
Info :
At rounds 9-16 you are building the balloon height. If you prefer a more elongated balloon, add 2-4 extra even rounds here. Keep track of color block boundaries so panels remain aligned vertically.
Round 16 :
1 sc in each st (48)
Round 17 :
(6 sc, inc) x 6 (54)
Round 18 :
1 sc in each st (54)
Info :
Round 17 introduces a small increase to create the bulbous midline. Because we use 8 panels, increases are distributed evenly between panel seams to keep vertical stripes symmetrical. If your color panels look slightly off, shift increases to sit at the middle of cream panels for a smoother look.
Round 19 :
(7 sc, inc) x 6 (60)
Round 20 :
1 sc in each st (60)
Round 21 :
1 sc in each st (60)
Info :
Begin stuffing lightly from the bottom of the balloon now. Use small amounts of fiberfill and press firmly but not overly tight — the balloon should keep its softness but retain shape. Continue stuffing between rounds, adding more as the top closes.
Round 22 :
(7 sc, dec) x 6 (54)
Round 23 :
(6 sc, dec) x 6 (48)
Round 24 :
1 sc in each st (48)
Round 25 :
(5 sc, dec) x 6 (42)
Info :
Work decreases carefully so panel lines remain visible — aim to decrease inside the panel centers rather than across color joins so the vertical ridges stay crisp. Keep stuffing as you decrease to maintain round shape.
Round 26 :
(4 sc, dec) x 6 (36)
Round 27 :
(3 sc, dec) x 6 (30)
Round 28 :
(2 sc, dec) x 6 (24)
Round 29 :
(1 sc, dec) x 6 (18)
Info :
Fasten off leaving a long tail for sewing to the topcap/ring. Make sure the balloon is well-stuffed and round before closing — a slightly teardrop bottom (where the basket attaches) improves the overall silhouette. We'll use a top ring to secure the basket and connectors.
— Top Cap / Ring (Balloon Collar) :
Round 1 :
6 sc in magic ring (6)
Round 3 :
(1 sc, inc) x 6 (18)
Round 4 :
(2 sc, inc) x 6 (24)
Round 5-6 :
1 sc in each st (24)
Info :
This top cap forms the ring that visually separates balloon from basket. Work in brown or trimmed color. Leave a long tail for sewing. After Round 6, fold the ring so it sits flat and sew it around the balloon opening (the small closed hole) using the long tail and a yarn needle to create a neat collar.
Round 7 :
1 sc in each st BLO (24)
Round 8 :
Fasten off leaving long tail for sewing to basket connectors
— Basket (Body) :
Round 1 :
6 sc in magic ring (6)
Round 3 :
(1 sc, inc) x 6 (18)
Round 4 :
(2 sc, inc) x 6 (24)
Round 5 :
(3 sc, inc) x 6 (30)
Round 6-9 :
1 sc in each st (30)
Info :
Basket will be a short cylinder. Work tightly to create a sturdy texture. If you want a firmer basket, use a 3.0mm hook or add a slip-stitched round for rigidity. Leave a long tail after Round 9 for sewing.
Round 10 :
1 sc in each st (30)
Round 11 :
1 sc in each st (30)
Round 12 :
1 sc in each st (30)
Round 13 :
1 sc in each st BLO (30)
Round 14 :
1 sc in each st BLO (30)
Round 15 :
Fasten off leaving long tail for attaching to balloon and for adding decorative bead at top
Info :
After finishing basket, fold top edge slightly outward and sew the top cap (ring) to the balloon, then attach short chains or string connectors between top cap and basket edge. Use jump rings or a small metal chain if you want a more realistic look. Add a medium wooden bead inside the basket for decoration before fully closing the bottom if desired.
— Basket Suspension (Chains / Connectors) :
Round 1 :
Cut 4 equal lengths of small chain or strong cord, approx. 3-4 cm each (or more, depending on desired spacing). Attach each end to the top cap and to the basket rim using jump rings or by sewing through the stitches using the long tail
Info :
If you are crocheting the chain connectors instead of metal chain, make 4 small crocheted cords: ch 15, sl st back along the chain to make a rope tube, fold and sew each end securely through the basket top and ring. Make sure connectors are evenly spaced — mark positions at 0, 12, 24 and 36 sts on the cap and basket rim.
— Spiral Core Cord :
Info :
The long spiraled hanging element is built on a central cord (thin cotton cord or macrame cord). Cut a cord approx. 55-70 cm long (final length depends on desired hang length). Tie a small knot at the top end and add a large wooden bead to create the decorative top anchor between balloon and coils.
Info :
We will crochet short tubes (coils) and slide them over this cord. Tubes are closed at one end then left open on the other so they can be threaded. After sliding each tube onto the cord, twist them into a spiral and pin them in position before securing with a few stitches through the cord and tube base to prevent sliding.
— Spiral Coil 1 (Topmost pastel - Pink) :
Round 1 :
6 sc in magic ring (6)
Round 3-12 :
1 sc in each st (12) — repeat for 10 rounds to make a tubular length (Rounds 3-12)
Info :
After Round 12, fasten off leaving a 20 cm tail. Make the tube slightly flatter at the top (sew 2-3 sts together on one side) so it hugs the cord. Slide onto the core cord and position about 2 cm below the top wooden bead. Use pins to hold the tube in a spiral orientation before securing.
— Spiral Coil 2 (Lavender) :
Round 1 :
6 sc in magic ring (6)
Round 3-12 :
1 sc in each st (12)
Info :
Make two identical lavender coils. Slide each on after the pink tube and space them so that when twisted the colors interlock slightly. You can slightly stuff the tube with tiny amounts of fiberfill if you prefer a more rounded coil. Sew through the cord and a few stitches along the tube base to secure position once in place.
— Spiral Coil 3 (Light Blue) :
Round 1 :
6 sc in magic ring (6)
Round 3-12 :
1 sc in each st (12)
Info :
Repeat the same tube-length strategy for every coil. For a strong spiral shape, keep tubes relatively firm and stitch them to the cord in 2-3 places per tube: top edge, middle and bottom edge. This prevents tubes from sliding and retains spiral uniformity.
— Spiral Coil 4 (Mint) :
Round 1 :
6 sc in magic ring (6)
Round 3-12 :
1 sc in each st (12)
Info :
To achieve the spiral pitch seen in the photo, alternate how you slide each tube: rotate each subsequent tube 180 degrees relative to the previous tube before pinning. This ensures an even helix instead of stacked rings.
— Spiral Coil 5 (Pale Yellow) :
Round 1 :
6 sc in magic ring (6)
Round 3-12 :
1 sc in each st (12)
Info :
If you choose to slightly stuff the coils, use tiny pinches of fiberfill so the coil is plump but flexible. Avoid overstuffing as it will make the helix rigid and less elegant. Secure each coil with 2-3 small invisible stitches through cord and tube base.
— Spiral Coil 6 (Peach/Coral) :
Round 1 :
6 sc in magic ring (6)
Round 3-12 :
1 sc in each st (12)
Info :
Work identical coils for visual consistency. When you finish the last coil, leave a long tail of cord extending beyond the final coil to thread a small bead and the bell. Use a wooden bead between coil and bell to hide the knots and create the same look as shown.
— Spiral Coil 7 (Bottom Accent - Rose) :
Round 1 :
6 sc in magic ring (6)
Round 3-12 :
1 sc in each st (12)
Info :
Make sure the bottom-most coil sits flush with the wooden bead you will add at the base. Secure with a few stitches through cord and coil. This bottom coil may need a little more stitching to prevent the bell from pulling the coils up if the bell is heavy.
— Bottom Bead & Bell :
Info :
Thread a small wooden bead onto the cord under the last coil, tie a secure knot, then add the decorative bell using a small metal jump ring or by threading through the bell loop. Tie a final knot and add a dab of fabric glue if desired to protect knot from loosening.
— Assembly Preparation :
Info :
Lay out all parts: balloon with sewn top-cap, basket, 4 connectors, wooden beads, spiral core with tubes threaded and secured, and bell. Pin pieces together first so you can adjust spacing and balance. A well-balanced mobile will hang straight; adjust bead and coil spacing as necessary.
— Final Stitching and Finishing Touches :
Round 1 :
Sew top cap ring to balloon opening by matching the cap sts to the final closure stitches on the balloon. Use long tail from cap and whip stitch evenly around.
Round 2 :
Sew basket connectors to the basket rim and top cap positions marked earlier. Reinforce each connection with 6-8 small discreet stitches for strength.
Round 3 :
Thread top wooden bead onto core cord and knot securely above the bead; this bead acts as an anchor inside the balloon collar (sew in place if desired).
Round 4 :
Adjust spiral coils, twist into final spiral shape, and tack coils to cord using matching yarn with small stitches through the tube base and the cord so the coils do not slide.
Info :
Weave in all loose ends into the inside of the balloon and basket or hide within coils. For hanging, add a jump ring or small loop to the top wooden bead or the cap so you can attach a hook or cord to suspend the mobile from the ceiling.
Round 5 :
Final check: hang mobile and check balance. If one side dips, slide a coil up or down slightly, or adjust connector lengths. Ensure all knots are secure and add glue if the mobile will be hung in a breezy space.
This pastel hot air balloon mobile pattern transforms simple yarn and a few beads into a charming hanging piece full of personality and color. The combination of clean striped panels, a sweet crocheted basket, and cascading spiral coils makes it a unique nursery accent or heartfelt handmade gift. I hope you enjoy the meditative rhythm of crocheting the coils and the delight of seeing it float in your space. 🧶✨ Hang it with pride and share a photo — handmade magic deserves to be celebrated! 🎈