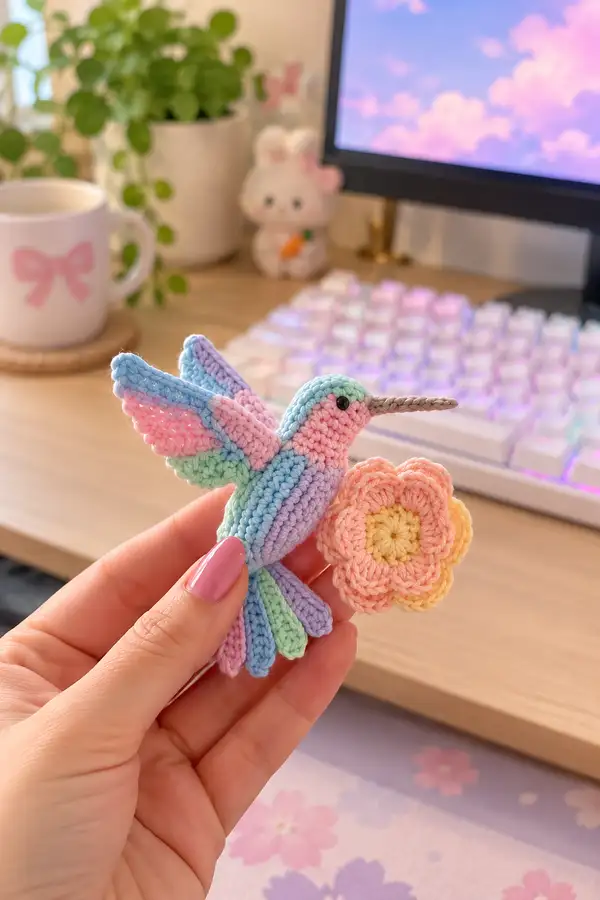
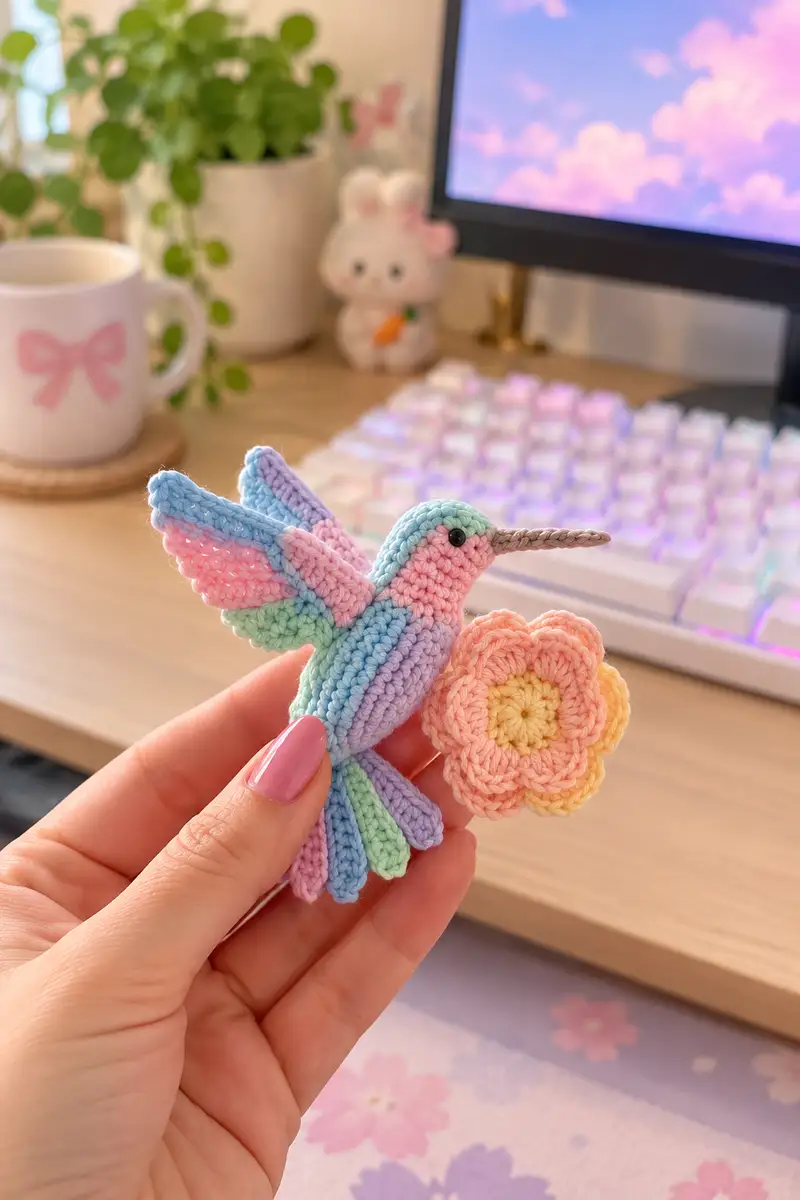
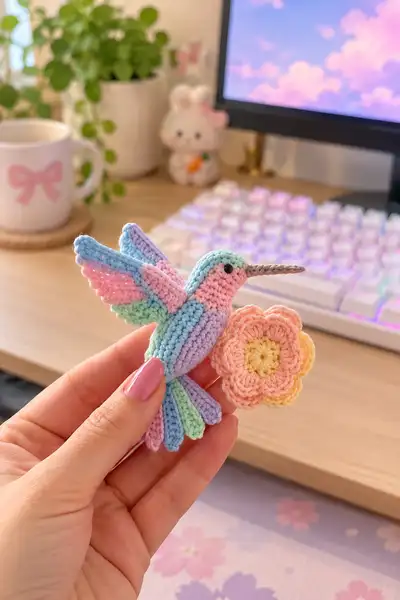
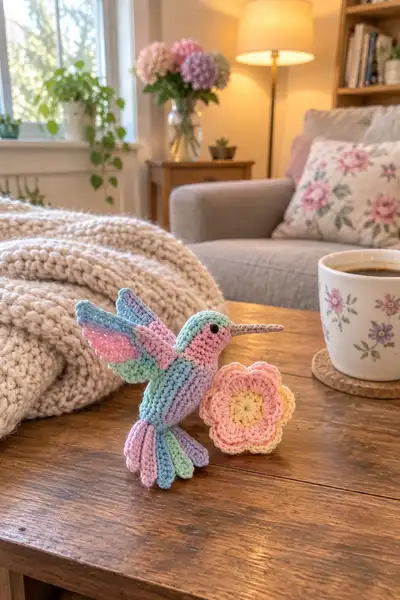
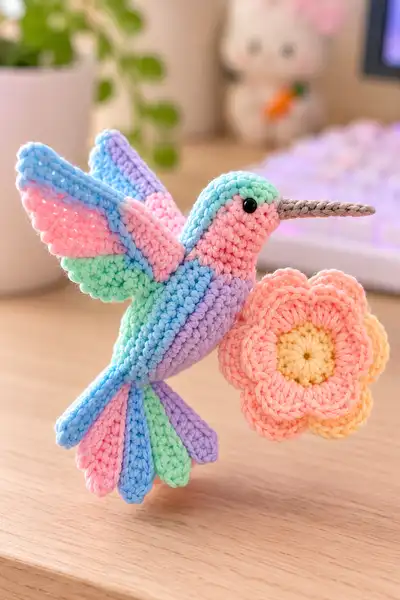
Create a tiny pastel hummingbird holding a soft scalloped flower — a sweet, detailed amigurumi perfect for gift-giving or a pretty shelf accent. This pattern uses variegated pastel yarn and simple shaping to reproduce the delicate wings, layered tail feathers, and long beak. Detailed round-by-round instructions, stuffing and assembly tips are included so experienced crocheters can recreate the charm shown in the photos.
Progress Tracker
0% Complete
— Head :
Round 1 :
6 sc in magic ring (6)
Round 3 :
(1 sc, 1 inc) x 6 (18)
Round 4 :
(2 sc, 1 inc) x 6 (24)
Round 5 :
(3 sc, 1 inc) x 6 (30)
Round 6 :
(4 sc, 1 inc) x 6 (36)
Round 7 :
(5 sc, 1 inc) x 6 (42)
Round 8 :
(6 sc, 1 inc) x 6 (48)
Round 9-12 :
1 sc in each st around (48)
Info :
Place safety eyes between rounds 11-12, approximately 8-10 stitches apart for a compact, sweet expression. If using 6mm eyes, measure spacing by eye and adjust 1-2 stitches to preference. Mark the stitch for beak placement (front center stitch) which will be used later when attaching the beak.
Round 13 :
(6 sc, 1 dec) x 6 (42)
Round 14 :
1 sc in each st around (42)
Round 15 :
(5 sc, 1 dec) x 6 (36)
Info :
Begin gentle stuffing now using small amounts of fiberfill. Stuff gradually to keep a smooth surface. Use a stuffing tool or blunt end of crochet hook to push fill into the front area near the beak so the head keeps shape when the beak is attached.
Round 16 :
1 sc in each st around (36)
Round 17 :
(4 sc, 1 dec) x 6 (30)
Round 18 :
(3 sc, 1 dec) x 6 (24)
Round 19 :
1 sc in each st around (24)
Round 20 :
(2 sc, 1 dec) x 6 (18)
Info :
As you decrease, continue stuffing firmly but not over-stuffed. The head should be rounded but still allow a little give so the neck will attach neatly to the body. Ensure the face area remains slightly fuller than the back of the head.
Round 21 :
(1 sc, 1 dec) x 6 (12)
Round 23 :
Fasten off leaving a long tail for sewing. Finish closing remaining hole by threading tail through remaining 6 stitches and pull tight; weave in end into head interior (6)
Info :
The neck formation will be produced by a separate short tube worked onto the body to which you will sew the head. We keep the head slightly closed so a neat seam forms when attaching; the long tail is important for sewing and will be hidden inside when the head is stitched down later.
— Neck Tube (worked into body later) :
Round 1 :
6 sc in magic ring (6)
Round 2 :
1 sc in each st (6)
Round 3 :
1 sc in each st (6)
Info :
This short tube will be used when you start the body so you can insert and sew the head over it for a stronger seam. Do NOT fasten off yet; you will join this tube into the top of the body when indicated.
— Body :
Round 1 :
6 sc in magic ring (6)
Round 3 :
(1 sc, 1 inc) x 6 (18)
Round 4 :
(2 sc, 1 inc) x 6 (24)
Round 5 :
(3 sc, 1 inc) x 6 (30)
Round 6 :
(4 sc, 1 inc) x 6 (36)
Round 7-9 :
1 sc in each st around (36)
Info :
If you plan to use a variegated pastel yarn that changes color gradually, work these rounds in that yarn for the body. If not, change to your chosen main body color now. Work in rounds, keeping fabric tight to avoid stuffing showing through.
Round 10 :
(5 sc, 1 inc) x 6 (42)
Round 11-14 :
1 sc in each st around (42)
Info :
At the end of Round 14 you will begin shaping the body taper towards the tail and also prepare to attach the neck tube. Use a stitch marker to mark the front center stitch of round 11-14 that will align with the head center so you can match pieces during assembly.
Round 15 :
(6 sc, 1 dec) x 6 (36)
Round 16 :
1 sc in each st around (36)
Round 17 :
(5 sc, 1 dec) x 6 (30)
Round 18 :
1 sc in each st around (30)
Info :
Begin moderate stuffing at Round 18. Fill the body enough to give a sturdy shape but not so firm that sewing pieces becomes difficult. Reserve some stuffing to add later after tail and wings are attached.
Round 19 :
(4 sc, 1 dec) x 6 (24)
Round 20 :
1 sc in each st around (24)
Round 21 :
(3 sc, 1 dec) x 6 (18)
Round 22 :
1 sc in each st around (18)
Round 23 :
(2 sc, 1 dec) x 6 (12)
Info :
Stop increasing/decreasing here to attach the neck tube: fold open the top edge and place the neck tube inside the opening aligning the front center markers. Use the long tail from the neck tube to whip stitch through body and tube to create a flush seam that keeps head alignment straight.
Round 24 :
Sew neck tube to top opening now, then continue 1 sc in each st around (12)
Round 25 :
(1 sc, 1 inc) x 6 (18)
Round 26 :
(2 sc, 1 inc) x 6 (24)
Round 27-28 :
1 sc in each st around (24)
Info :
Round 25-28 create a gentle hip area that helps the tail and wing attachments have room. If you want the bird to stand on a flat surface, leave the bottom slightly flattened when stuffing and add a small disc of felt inside to help stability.
Round 29 :
(3 sc, 1 dec) x 6 (18)
Round 30 :
1 sc in each st around (18)
Round 31 :
(2 sc, 1 dec) x 4, 2 sc (14)
Round 32 :
(1 sc, 1 dec) x 4, 2 sc (10)
Round 33 :
1 sc in each st around (10)
Info :
Stuff the body firmly now, shaping to a teardrop profile with the narrower end being the tail join. Leave top opening ready for head seam; head will be stitched to the neck tube and top of body for secure join.
Round 34 :
Fasten off leaving long tail for sewing; finish closing any remaining gap by weaving long tail through front loops and tightening neatly (10)
— Beak :
Info :
We will create a slender tubular beak which will be sewn into the face front. Using warm grey or taupe yarn and a smaller 2.5mm hook makes a neat tube. You can optionally add a short piece of floral wire inside if you want the beak to be very rigid; fold wire ends and conceal inside stuffing.
Round 1 :
6 sc in magic ring (6)
Round 3-8 :
1 sc in each st around (12) - work 6 rounds to create length (12)
Round 9 :
(2 sc, 1 dec) x 3 (9)
Round 10 :
1 sc in each st around (9)
Round 11 :
Fasten off leaving long tail for sewing. If you added wire, bury ends inside before stuffing slightly to hold shape (9)
Info :
Position the beak centered on the front of the head where you placed the front marker. Use long tail to sew neatly through head rounds 11-13 area so the seam is even. If the beak is slightly floppy, adding a tiny stitch along bottom of beak to head helps anchor it.
— Wing (Make 2 - Outer Layer) :
Info :
Each wing has two layers: outer scalloped edge layer and inner plate layer. Work outer layer first (this creates the visible scalloped border). Use main pastel yarn or matching colors by changing yarn every few rows for stripe effect. Work wings flat in rows and leave long tail for sewing.
Round 1 :
Ch 10, sc in 2nd ch from hook and across (9)
Round 2 :
Ch 1, turn, sc in first 3 sts, (2 sc, ch 1, 2 sc) in next st (creates scallop), sc in next 3 sts, sc 2 in last st (increase at tip) (14)
Round 3 :
Ch 1, turn, sc across first 4 sts, sc 3 in center of scallop, sc across remaining sts (14)
Round 4 :
Ch 1, turn, (1 sc in each st) across (14)
Round 5 :
Ch 1, turn, sc in first 2 sts, (2 sc, ch 1, 2 sc) in scallop center, sc across, sc 2 in last st (18)
Round 6-8 :
1 sc in each st around (18)
Info :
Fold wings slightly along centre line to create natural wing curve when sewing to body. If using multiple pastel colors, change color at the beginning of Round 5 for a layered look. Carry unused yarn on underside to avoid many ends.
Round 9 :
sc in next 6 sts, dec twice across tip area to create tapered wing end (16)
Round 10 :
1 sc in each st around (16)
Round 11 :
Work picots along outer edge for delicate scalloped rim: *ch 3, sl st in 3rd ch from hook into next st* around 8 times, finishing at wing base
Round 12 :
Fasten off leaving long tail for sewing
Info :
Make a second identical outer wing. When assembling, place outer wing so scallops show and inner wing (next section) tucks under to create layered depth.
— Wing (Make 2 - Inner Layer) :
Round 1 :
Ch 8, sc in 2nd ch from hook and across (7)
Round 2 :
Ch 1, turn, sc in first 2, (2 sc, ch 1, 2 sc) in next st, sc across remaining sts (11)
Round 3 :
Ch 1, turn, sc across (11)
Round 4 :
Ch 1, turn, 1 sc in each st BLO (11) - creates a subtle ridge at inner edge
Round 5 :
Ch 1, turn, sc across, fasten off leaving long tail for sewing
Info :
Sew inner layer onto body first aligning with wing base area (body rounds 24-28). Then place outer layer on top and stitch together through both layers and body for a secure seam. Use slight shaping with fingers to curve wing as you sew.
— Tail Feathers (Make 6 - 3 large + 3 small) :
Info :
The tail is composed of individual feather-shaped petals worked flat and stuffed lightly at the base. Use alternating pastel colors for each feather to reproduce the striped fan effect. Make 3 large feathers (longer) and 3 smaller feathers for a layered fan.
Large Feather - Round 1 :
Ch 8, sc in 2nd ch from hook and across (7)
Round 2 :
Ch 1, turn, sc across first 3 sts, 3 sc in next st (tip increase), sc across remaining 3 sts (10)
Round 3 :
Ch 1, turn, 1 sc in each st BLO (10) to create ribbed look (10)
Round 4 :
Ch 1, turn, sc across (10)
Round 5 :
Ch 1, turn, sc 2, (2 sc, ch1, 2 sc) in tip center to create scallop, sc rest (14)
Round 6 :
Ch 1, turn, 1 sc in each st around (14)
Round 7 :
Fasten off leaving long tail. Lightly stuff base only; do not overfill feathers (14)
Small Feather - Round 1 :
Ch 6, sc in 2nd ch from hook and across (5)
Round 2 :
Ch 1, turn, sc across, 3 sc in center st for tip (7)
Round 3 :
Ch 1, turn, 1 sc in each st BLO (7)
Round 4 :
Ch 1, turn, sc across, fasten off leaving long tail, stuff base lightly (7)
Info :
Make 3 large feathers and 3 small feathers. When sewing, arrange the feathers on the lower back in a fan shape with large feathers centered and small feathers layered behind or between large ones for fullness. Use pins to arrange symmetrically, then whip stitch the feather bases into the bottom opening of the body at rounds 31-33 area.
— Eye Embellishment :
Info :
Safety eyes were placed earlier at head rounds 11-12. If you used beads or embroidered eyes, stitch small French knots or use tiny black yarn for embroidered shine. Make sure eyes are secured before finishing the head stuffing; safety eyes have washers that prevent removal but must be positioned before heavy stuffing.
— Flower Center :
Round 1 :
6 sc in magic ring (6)
Round 3 :
1 sc in each st around (12)
Info :
This small disc will be the flower center (pale yellow). Make two rounds to get a sturdy center before attaching petal layer. Fasten off and weave tail to the back to avoid showing through petals.
— Flower Petals (Make 6 and attach around center) :
Round 1 :
Join petal color to any stitch on disc, *ch 4, sl st in 2nd ch from hook, (hdc, dc, hdc) in next ch, sl st into next disc stitch*; rep from * to * around for 6 petals (6 petals)
Round 2 :
Round 2 (optional scallop): In each petal work (sl st, sc, hdc, dc, hdc, sc) across to create a fuller scallop edge. Fasten off and weave ends (6 petals)
Info :
Make the flower in a soft coral/peach color with a pale yellow center to match the photos. Sew flower to a small felt circle if you want extra stiffness, then stitch the flower to the bird's beak or hold separately as a prop. The flower may be sewn to the side of the body near the tail for composition or held by the bird's beak using a very small stitch at beak tip.
— Assembly Steps (Head, Beak, Wings, Tail, Flower) :
Info :
Use the long tails left on each piece to sew them securely. Sew with a yarn needle and mattress or whip stitch; take small passes through both joined pieces for an invisible seam. Always pin placement before sewing and check symmetry visually from all angles.
Round 1 :
Attach head to neck tube by aligning front center markers and sewing through the neck tube into the top round of the body. Use whip stitch around the seam to secure (use long tail from head)
Round 2 :
Sew beak to head front centered on face marker; place a few anchoring stitches down the beak sides to secure (use long tail from beak)
Round 3 :
Arrange inner wing layer on body sides aligning with body rounds 24-27; tack in three places and then sew firmly along base to body (use inner wing tail)
Round 4 :
Place outer wing layer over inner wing and sew through both layers and body for a secure seam. Make gentle shaping stitches along edge to curve wing outward (use outer wing tail)
Round 5 :
Sew tail feathers into the rear opening: position large feathers centered and evenly spaced, then sew in small feathers in-between. Stitch bases through body rounds 31-33 and secure tightly. Trim excess yarn and weave tails inside body (use feather tails)
Round 6 :
Sew flower to beak tip or side of body per preference. If sewing to beak, use invisible small stitches around a single petal base so flower appears held. Secure well and weave ends inside body piece (flower tail)
Info :
After everything is sewn in place, check seams and add a small dab of fabric glue inside each seam for extra strength if the item will be handled frequently. Blend any visible ends into the body interior and trim off closely; use a yarn needle to bury ends in stuffing so they won’t come loose.
This pastel hummingbird pattern combines fun shaping with delicate decorative details to create a truly charming handmade friend. The layered wings, fan tail, and scalloped flower make it a standout small gift or shelf accent. Each element is worked as a small motif and sewn together, so you can mix pastel shades freely and end up with a personalized piece. I hope this project brings you as much joy stitching it as it will to anyone who receives it! 🧶🌸