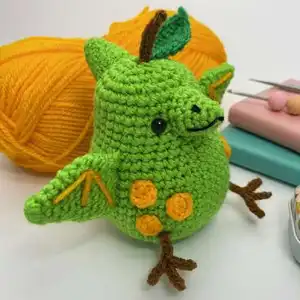
Make a delightful Pearodactyl amigurumi with this friendly crochet pattern. You will create a pear-shaped little dragon with wings, crest, beak, stem, leaf and cheerful spots using DK yarn. The pattern includes step-by-step rounds, assembly instructions and helpful techniques so you can finish a charming toy to gift or display. Perfect when you want a small, whimsical handmade companion.
Progress Tracker
0% Complete
— Techniques :
Info :
How to close amigurumi invisibly 1. Insert needle in the FLO of each stitch around 2. Pull tight to close 3. Insert needle through centre exiting a few rounds down 4. Weave in the end and admire your work!
Info :
How to decrease invisibly 1. Insert hook into FLO of first stitch 2. Insert hook into FLO of next stitch 3. Yarn over and pull through two loops 4. Yarn over and pull through two loops again. Invisible decrease complete!
Info :
How to fold and stitch together 1. Fold piece in half, insert hook through next stitch and corresponding stitch on the other side 2. Yarn over and pull through both stitches 3. Complete sc as normal and repeat for all stitches 4. Finished piece folded and stitched together!
— Body :
Round 2 :
inc each st around (12)
Round 3 :
*1sc, inc* rep 6 times (18)
Round 4 :
*2sc, inc* rep 6 times (24)
Round 5 :
*3sc, inc* rep 6 times (30)
Round 6 :
*4sc, inc* rep 6 times (36)
Round 7 :
*5sc, inc* rep 6 times (42)
Round 8 :
*6sc, inc* rep 6 times (48)
Round 9-16 :
sc each st around (48) (8 rnds)
Round 17 :
*6sc, dec* rep 6 times (42)
Round 18 :
sc each st around (42)
Round 19 :
*5sc, dec* rep 6 times (36)
Round 20 :
sc each st around (36)
Round 21 :
*4sc, dec* rep 6 times (30)
Round 22-27 :
sc each st around (30) (6 rnds)
Info :
Insert safety eyes between rnds 24 - 25 five visible sts apart.
Info :
Start adding stuffing and continue to stuff as we decrease.
Round 28 :
*3sc, dec* rep 6 times (24)
Round 29 :
*2sc, dec* rep 6 times (18)
Round 30 :
*1sc, dec* rep 6 times (12)
Round 31 :
dec 6 times (6)
Info :
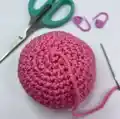
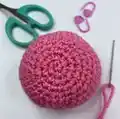
Fasten off and leave a long tail. Complete invisible close. Weave in ends. (photo 1)
— Wings :
Round 2 :
sc each st around (6)
Round 3 :
*sc, inc* rep 3 times (9)
Round 4 :
sc each st around (9)
Round 5 :
*2sc, inc* rep 3 times (12)
Round 6 :
sc each st around (12)
Round 7 :
*3sc, inc* rep 3 times (15)
Round 8 :
sc each st around (15)
Round 9 :
dec, 5sc, inc, 5sc, dec (14)
Round 10 :
dec, 4sc, 2inc, 4sc, dec (14)
Info :
Fold and stitch together. Cut yarn leaving a long tail.
Info :
Using sunshine make three long sts on each wing making sure they are only visible on the front (photo 2)
— Crest :
Round 2 :
*sc, inc* rep 3 times (9)
Round 3 :
sc each st around (9)
Round 4 :
*2sc, inc* rep 3 times (12)
Round 5 :
sc each st around (12)
Round 6 :
5sc, 2inc, 5sc (14)
Round 7 :
sc each st around (14)
Info :
Cut yarn leaving a long tail.
— Beak :
Round 2 :
*sc, inc* rep 3 times (9)
Round 3 :
sc each st around (9)
Round 4 :
3sc, 3inc, 3sc (12)
Round 5 :
5sc, 2inc, 5sc (14)
Info :
Cut yarn leaving a long tail.
Info :
Using black embroidery floss, stitch two nostrils and a mouth to the beak. Crest and beak shown in (photo 3)
— Legs (Make two) :
Item :
Using Gingerbread Ch8, *slst in 2nd ch from hook, 2slst, ch4* rep 2 times. Slst in 2nd ch from hook, 2slst, now working back up the original ch, 4slst. Cut yarn leaving a long tail (photo 4)
— Stem :
Item :
Using Gingerbread Ch7, slst in 2nd ch from hook, 5slst (6)
— Leaf :
Round 1 :
Using Kelly Green ch10, sc in 2nd ch from hook, 2hdc, dc, dcinc, dc, 2hdc, work the following sts in the final st (sc, ch2, slst in 2nd ch from hook, sc)
Round 2 :
Now working down the other side of the ch, 2hdc, dc, dcinc, dc, 2hdc, sc, slst to join (20)
Info :
Cut yarn leaving a long tail. Stem and leaf shown in (photo 5)
— Spots (Make five) :
Round 1 :
Using Sunshine 6sc in MR, slst to join
Info :
Cut yarn leaving a long tail (photo 6)
— Assembly :
Infos :
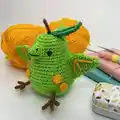
We will use the long tails to attach everything to the body. Lightly stuff the beak then sew between the eyes over rnds 23 - 27 (photo 7). Lightly stuff the crest then sew to the back of the head directly opposite the beak over rnds 26 - 30 (photo 7). Attach the stem and leaf to the centre/top of head (photo 8). Join the wings either side of the body over rnds 15 - 21 (photo 9). Attach the legs between rnds 11 - 12 approx 10 sts apart (photo 9). Finally, sew the spots to the sides near each wing, three on one side, two on the other (photos 10 and 11).
This playful Pearodactyl brings together charming details like wings, spots and a tiny leaf to delight makers and giftees alike. 🧶
The pattern is compact and satisfying, perfect for a weekend project or a thoughtful handmade gift. 🌿
Have fun customizing colors and small details to make your Pearodactyl truly unique. 🐣