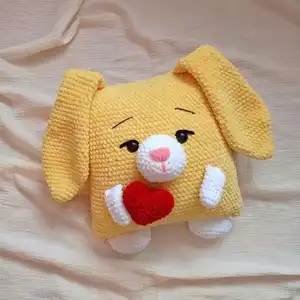
Create a cuddly pillow-shaped bunny that doubles as a cute decorative accent and a lovable companion. This pattern guides you through crocheting a soft square pillow with floppy ears, embroidered eyelids, a plush nose, arms, legs and an optional tail. You will enjoy detailed step-by-step instructions and clear assembly directions so you can finish a charming handmade gift for friends or family.
Progress Tracker
0% Complete
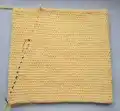
— Pillow :
Round 2 :
connect with the first loop crocheting 1 sc (it will be the first sc of the second row) and crochet 89 sc {90}
Info :
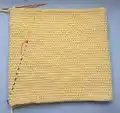
In the end of the last row crochet 10-11 sc more to the edge of the pillow.
Info :
Tighten the thread, leave the long end for sewing. Sew the top of the pillow using a needle.
— Nose :
Round 2 :
from the second loop from the hook: 2 sc, 3 sc in one loop. On the other side of the chain: 2 sc, 3 sc in one loop {10}
Round 3 :
2 sc, inc, inc, inc, 2 sc, inc, inc, inc {16}
Round 4 :
(3 sc, inc) –repeat 4 times {20}
Round 5 :
(4 sc, inc) – repeat 4 times {24}
Round 6 :
(4 sc, inc) – repeat 5 times {30}
Round 7 :
(5 sc, inc) – repeat 5 times {35}
Info :
Tighten the loop, leave the long thread for sewing. Embroider the nose with pink plush (or semi-cotton) thread. Tie a knot and hide the thread inside.
Info :
Fill the detail and sew on it between the rows 16 and 26, counting from the bottom of the pillow. Secure the thread, hide it inside the pillow.
Info :
Insert the safety eyes (or sew on them if you have buttons) between the rows 24 and 25. The distance between the eyes is 9 sc.
Info :
Embroider the eyelids with black plush yarn. Secure the thread inside the pillow. Optional you can glue the eyelids to the pillow.
— Ears (2 details) :
Round 1 :
6 sc in magic ring {6}
Round 2 :
(inc) – repeat 6 times {12}
Round 3 :
(5 sc, inc) – repeat 2 times {14}
Round 4 :
(6 sc, inc) – repeat 2 times {16}
Round 5 :
(7 sc, inc) – repeat 2 times {18}
Round 6 :
(8 sc, inc) – repeat 3 times {20}
Round 7 :
inc, 8 sc, inc, inc, 8 sc, inc {24}
Round 8 :
inc, 9 sc, inc, inc, 10 sc, inc, inc {29}
Round 9 :
12 sc, inc, inc, 15 sc {31}
Round 16 :
14 sc, dec, 13 sc, dec {29}
Round 18 :
13 sc, dec, 12 sc, dec {27}
Round 21 :
12 sc, dec, 11 sc, dec {25}
Round 23 :
1 sc, dec, 11 sc, dec, 9 sc {23}
Round 25 :
1 sc, dec, 10 sc, dec, 8 sc {21}
Round 27 :
2 sc, dec, 8 sc, dec, 7 sc {19}
Info :
Tighten the thread, leave the long thread for sewing.
— Arms (2 details) :
Round 1 :
6 sc in magic ring {6}
Round 2 :
(inc) – repeat 6 times {12}
Round 3 – 9 :
Rows 3 – 9 (7 rows): 12 sc {14}
Info :
Do not fill the arms. Sew two halves, crocheting 6 sc. Leave the long thread for sewing.
— Legs (2 details) :
Round 1 :
6 sc in magic ring {6}
Round 2 :
(inc) – repeat 6 times {12}
Round 3 :
(1 sc, inc) – repeat 6 times {18}
Round 4 :
(2 sc, inc) – repeat 6 times {24}
Round 5 :
(11 sc, inc) – repeat 2 times {26}
Round 7 :
(11 sc, dec) – repeat 2 times {24}
Info :
Fill the leg a little, not tightly. Sew two halves crocheting 12 sc. Leave the long thread for sewing.
— Assembling of the pillow :
Info :
Fill the pillow evenly (slowly, fill the corners especially well) and sew the bottom of the pillow using the needle. Give an even shape.
Info :
Sew on the ears to the top of the pillow (count 3-4sc from the edge of the pillow)
Info :
Sew on the arms a little diagonally between rows 14 and 17. The distance between the arms is about 18-19 sc
Info :
Sew on the legs to the bottom of the pillow, counting 2-3 sc from the edge of the pillow.
Info :
Take the black semi-cotton thread and embroider the eyebrows.
— Tail :
Round 1 :
6 sc in magic ring {6}
Round 2 :
(inc) – repeat 6 times {12}
Round 3 :
(1 sc, inc) – repeat 6 times {18}
Round 4 :
(2 sc, inc) – repeat 6 times {24}
Round 5 :
(3 sc, inc) – repeat 6 times {30}
Round 7 :
(3 sc, dec) – repeat 6 times {24}
Info :
Leave the long thread for sewing. Fill the tail and sew on it to the pillow from behind. Secure the thread, hide it inside.
This sweet Pillow Bunny pattern turns plush yarn into a cozy, huggable accent that brightens any room. It makes a perfect handmade gift for kids, friends, or your own special nook. Enjoy crocheting and customizing every detail to make it uniquely yours! 🧶🐰