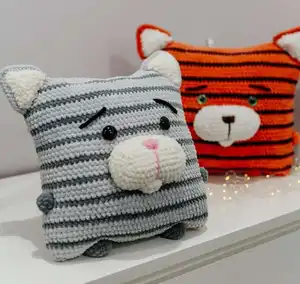
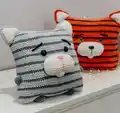
Create an irresistibly soft pillow cat using plush yarn and simple crochet techniques. This pattern walks you through making a striped square pillow with ears, nose, lip, legs and arms — perfect as a cozy decorative piece or a heartfelt handmade gift. Youll love how quickly the striped body comes together and how customizable the face details are. Suitable for makers who know basic stitches and enjoy a satisfying assembly.
Progress Tracker
0% Complete
— Symbols :
Infos :
Do not forget to fix the beginning of each new circle with a pin or thread. sc - single crochet: inc - increase: dec - decrease hdc - half double crochet dc - double crochet sl st - slip stitch: ch – chain
— Pillow :
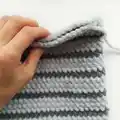
Info :
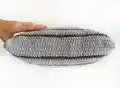
Use light gray plush yarn
Round 1 :
90 ch, connect with the first loop
Info :
We will change colors
Round 4 :
gray: 90 sc {90}
Round 5 – 7 :
(3 rounds): light gray: 90 sc {90}
Round 8 :
gray: 90 sc {90}
Round 9 – 11 :
(3 rounds): light gray: 90 sc {90}
Round 12 :
gray: 90 sc {90}
Round 13 – 15 :
(3 rounds): light gray: 90 sc {90}
Round 16 :
gray: 90 sc {90}
Round 17 – 19 :
(3 rounds): light gray: 90 sc {90}
Round 20 :
gray: 90 sc {90}
Round 21 – 23 :
(3 rounds): light gray: 90 sc {90}
Round 24 :
gray: 90 sc {90}
Round 25 – 27 :
(3 rounds): light gray: 90 sc {90}
Round 28 :
gray: 90 sc {90}
Round 29 – 31 :
(3 rounds): light gray: 90 sc {90}
Round 32 :
gray: 90 sc {90}
Round 33 – 35 :
(3 rounds): light gray: 90 sc {90}
Round 36 :
gray: 90 sc {90}
Round 37 – 39 :
(3 rounds): light gray: 90 sc {90}
Info :
Leave a long thread and sew the top of the pillow. We fasten the thread and hide inside the pillow. Fill tightly and evenly. Fill the angle of the pillow well. Sew the bottom of the pillow and fasten the thread and hide inside the pillow.
— Ear (2 details) :
Info :
Use white plush yarn
Row 2 :
we begin to work from the second loop from the hook: 10 sc, 1 ch, turn
Row 3 :
we begin to work from the second loop from the hook: dec, 6 sc, dec, 1 ch, turn
Row 4 :
we begin to work from the second loop from the hook: dec, 4 sc, dec, 1 ch, turn
Row 5 :
we begin to work from the second loop from the hook: dec, 2 sc, dec, 1 ch, turn
Row 6 :
we begin to work from the second loop from the hook: dec, dec, 1 ch, turn
Row 7 :
we begin to work from the second loop from the hook: dec
Info :
We crochet around the ear.
Info :
Make 7 cs, make inc in the left bottom angle, then make 8 sc, inc in the right bottom angle, 8 sc, sl st
Info :
We fasten the thread and cut it off
Info :
Use light gray yarn
Row 2 :
we begin to work from the second loop from the hook: 10 sc, 1 ch, turn
Row 3 :
we begin to work from the second loop from the hook: dec, 6 sc, dec, 1 ch, turn
Row 4 :
we begin to work from the second loop from the hook: dec, 4 sc, dec, 1 ch, turn
Row 5 :
we begin to work from the second loop from the hook: dec, 2 sc, dec, 1 ch, turn
Row 6 :
we begin to work from the second loop from the hook: dec, dec, 1 ch, turn
Row 7 :
we begin to work from the second loop from the hook: dec
Info :
We crochet around the ear.
Info :
Make 7 cs, make inc in the left bottom angle, then make 8 sc, inc in the right bottom angle, 8 sc, sl st
Info :
We fasten the thread and cut it off
Info :
We put together white and light gray details and crochet ears together (use light gray yarn).
Info :
We start from the bottom right corner and make: 10 sc, inc (in the upper corner), inc, 10 sc (hide all the ends inside ears). Leave a long thread for sewing.
Info :
We put ears on the angles of the pillow and sew ( the angle of the pillow should be inside the ear). Fasten the thread and hide it inside the pillow
— Nose :
Info :
Use white plush yarn
Round 2 :
we begin to work from the second loop from the hook: 12 sc, 3 sc in 1 loop, 12 sc {27}
Round 3 :
3 in 1 loop, 12 sc, inc, inc, inc, 12 sc {33}
Round 4 :
inc, inc, inc, 13 sc, inc, sc, inc, sc, inc, 12 sc {39}
Round 5 :
sc, inc, sc, inc, sc, inc, 13 sc, inc, 2 sc, inc, 2 sc, inc, 13 sc {45}
Round 6 :
8 sc, hdc, (dc) – repeat 5 times, hdc, sc, hdc, (dc) – repeat 5 times, hdc, 22 sc {45}
Round 7 :
10 sc, inc, 10 sc, inc, 23 sc {45}
— Lip :
Info :
Use white plush yarn
Round 1 :
6 sc in magic Ring {6}
Round 2 :
( inc ) – repeat 6 times {12}
Info :
Sew 2 halves with 6 sc
Info :
Leave a long thread for sewing
— Leg ( 2 details) :
Info :
Use brown plush yarn
Round 1 :
6 sc in magic Ring {6}
Round 2 :
( inc ) – repeat 6 times {12}
Round 3 :
(1 sc, inc) – repeat 6 times {18}
Info :
Leave a long thread for sewing
— Arm ( 2 details) :
Info :
Use brown plush yarn
Round 1 :
6 sc in magic Ring {6}
Round 2 :
(inc) – repeat 6 times {12}
Info :
Leave a long thread for sewing
— Assembly :
Info :
Sew nose between 12 and 22 rounds and fill. Use pink yarn and make pink nose.
Info :
Sew lip, fasten the thread and hide it inside the pillow.
Info :
Fill arms and sew (between 11 and 15 rounds). Nd seq legs. Fasten the thread and hide inside the pillow.
Info :
Sew eyes between 24 and 25 rounds. Distance between eyes 11 sc). Use black yarn and make eyebrows.
Info :
Fasten all threads and hide inside the pillow. Your pillow is ready!
This sweet Pillow-Cat pattern makes a delightful home accent or a thoughtful handmade present. It combines plush yarn textures with playful striped colorwork for a cozy finish. Perfect for gifting or decorating a nursery or living room — happy stitching! 🧶🐱