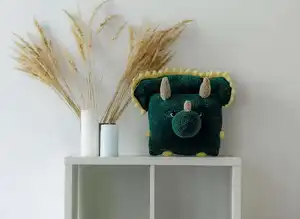
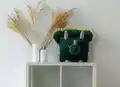
Make a soft, playful Dino pillow using plush yarn and simple crochet techniques. This pattern guides you through making a square pillow body, a rounded nose, horns, legs, arms and a frilled crest so you can create a charming dinosaur cushion for children or as a gift. Materials are easy to source and the step-by-step instructions include assembly notes so you can finish with professional-looking details.
Progress Tracker
0% Complete
— Pillow :
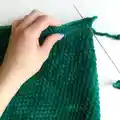
Round 1 :
90 ch, connect with the first loop
Round 2 - 37 :
90 sc (work 36 rounds total including Round 2 to 37 with 90 sc each round)
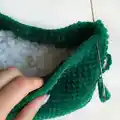
Info :
Leave a long thread and sew the top of the pillow. We fasten the thread and hide inside the pillow. Fill tightly and evenly. Fill the angle of the pillow well. Sew and fasten the thread and hide inside the pillow.
— Nose :
Round 1 :
6 sc in magic ring (6)
Round 2 :
(inc) - repeat 6 times (12)
Round 3 :
(1 sc, inc) - repeat 6 times (18)
Round 4 :
(2 sc, inc) - repeat 6 times (24)
Round 5 :
(3 sc, inc) - repeat 6 times (30)
Round 6 :
(4 sc, inc) - repeat 6 times (36)
Round 7 :
(5 sc, inc) - repeat 6 times (42)
Round 8 - 14 (7 rounds) :
42 sc
Info :
Leave a long thread for sewing
— Leg (2 details) :
Round 1 :
6 sc in magic ring (6)
Round 2 :
(inc) - repeat 6 times (12)
Round 3 :
(1 sc, inc) - repeat 6 times (18)
Info :
Leave a long thread for sewing
— Arm (2 details) :
Round 1 :
6 sc in magic ring (6)
Round 2 :
(inc) - repeat 6 times (12)
Info :
Leave a long thread for sewing
— Brow horn (2 details) :
Round 1 :
6 sc in magic ring (6)
Round 4 :
(3 sc, inc) - repeat 2 times (10)
Round 5 :
(4 sc, inc) - repeat 2 times (12)
Round 6 :
(5 sc, inc) - repeat 2 times (14)
Round 7 - 12 (6 rounds) :
14 sc
Info :
Fill. Leave a long thread for sewing.
— Nose horn :
Round 1 :
6 sc in magic ring (6)
Info :
Fill. Leave a long thread for sewing.
— Frilled crest (2 details) :
Row 2 :
We begin to work from the second loop from the hook: dec, 10 sc, inc, 42 sc, inc, 10 sc, dec, 1 ch
Row 3 :
We begin to work from the second loop from the hook: dec, 9 sc, inc, 44 sc, inc, 9 sc, dec, 1 ch
Row 4 :
We begin to work from the second loop from the hook: dec, 9 sc, inc, 44 sc, inc, 9 sc, dec, 1 ch
Row 5 :
We begin to work from the second loop from the hook: dec, 9 sc, inc, 44 sc, inc, 9 sc, dec, 1 ch
Row 6 :
We begin to work from the second loop from the hook: dec, 9 sc, inc, 13 sc, hdc, 16 dc, hdc, 13 sc, inc, 9 sc, dec, 1 ch
Row 7 :
We begin to work from the second loop from the hook: dec, 9 sc, inc, 13 sc, hdc, 16 dc, hdc, 13 sc, inc, 9 sc, dec, 1 ch
Row 8 :
We begin to work from the second loop from the hook: dec, 9 sc, inc, 12 sc, hdc, 18 sc, hdc, 12 sc, inc, 9 sc, dec, 1 ch
Row 9 :
We begin to work from the second loop from the hook: dec, 9 sc, inc, 11 sc, hdc, 20 sc, hdc, 11 sc, inc, 9 sc, dec, 1 ch
Row 10 :
We begin to work from the second loop from the hook: dec, 9 sc, inc, 12 sc, hdc, 18 sc, hdc, 12 sc, inc, 9 sc, dec
Info :
Add two parts. Use green yarn and sew two parts with sc. Fill tightly and sew bottom of frilled crest with sc. Leave a long thread for sewing.
Info :
Use yellow yarn and crochet top part. The "scallop": make 4 ch. We begin to work from the second loop from the hook: sc, hdc, dc. We skip one loop of the previous row and make 1 sc. Then we do 2 sc. And again: 4 ch, we begin to work from the second loop from the hook: sc, hdc, dc. We skip one loop of the previous row and make 1 sc, 2 sc. Repeat this way to the end of the top of the frilled crest.
— Assembly :
Info :
Sew frilled crest to top of pillow.
Info :
Fill and sew nose (between rounds 12 and 22). Sew eyes between rounds 22 and 23 (distance between eyes 12 sc)
Info :
Use white yarn and make eyes. Insert the needle through the bottom of the nose. Leave the thread for the node. Do not pull the thread around the eye. Make a knot and hide the thread inside the nose with a hook.
Info :
Sew nose horn and brow horn. Fill arms and legs and sew. Use black yarn and make eyebrows.
This cute Dino pillow combines plush yarn with simple amigurumi techniques to make a unique, huggable decorative piece. Perfect as a gift for children or as a playful accent for your couch or nursery. Make one in your favorite colors and enjoy the compliments it brings! 🧶🦖