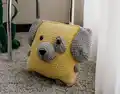
Create a soft, cuddly pillow-dog that doubles as a decorative cushion and a playful toy. This pattern guides you through making a square plush pillow with adorable ears, nose, spots, and little legs using plush yarn. You can personalize colors and size to suit your home or gift recipient. Clear photos and step-by-step rounds make assembly straightforward and fun for crocheters.
Progress Tracker
0% Complete
— Materials & Symbols :
Info :
I use Kamtex Velor yarn. (95 m /100 g.). Colors: yellow, gray. (You can crochet any other plush yarn - Himalaya Dolphin Baby or YarnArt Dolce). Acryl yarn (for sewing). Colors: yellow, gray, black. Filler (I use hollofayber). Hook № 4-5 mm (The size of the hook is specified on the package of yarn.) black beads for eyes (20-22 mm). Needle. Do not forget to fix the beginning of each new circle with a pin or thread.
Infos :
sc - single crochet. inc - increase. dec - invisible decrease (single crochet 2 together): (We knit two loops together behind the front wall of the loop). sl st - slip stitch. ch - chain.
— Pillow :
Info :
Use yellow plush yarn
Round 1 :
90 ch, connect with the first loop
Info :
Sew the pillow top with 45 sc (or sew with acryl yellow yarn and needle). We fasten the thread and hide inside the pillow
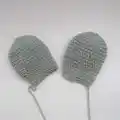
— Ear (2 details) :
Info :
Use gray plush yarn
Round 1 :
6 sc in magic Ring {6}
Round 2 :
(inc) – repeat 6 times {12}
Round 3 :
(1 sc, inc) – repeat 6 times {18}
Round 4 :
(2 sc, inc) – repeat 6 times {24}
Round 5 :
(3 sc, inc) – repeat 6 times {30}
Round 6 :
(4 sc, inc) – repeat 6 times {36}
Round 12 :
19 sc, dec, 13 sc, dec {34}
Round 14 :
19 sc, dec, 11 sc, dec {32}
Round 15 :
18 sc, dec, 10 sc, dec {30}
Round 17 :
17 sc, dec, 9 sc, dec {28}
Info :
Sew two halves with 14 sc and Leave a long thread for sewing.
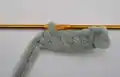
— Leg (2 details) :
Info :
Use gray plush yarn
Round 1 :
6 sc in magic Ring {6}
Round 2 :
( inc) – repeat 6 times {12}
Round 3 :
(1 sc, inc) – repeat 6 times {18}
Info :
Leave a long thread for sewing.
— Arm (2 details) :
Info :
Use gray plush yarn
Round 1 :
6 sc in magic Ring {6}
Round 2 :
(inc) – repeat 6 times {12}
Info :
Leave a long thread for sewing.
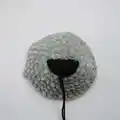
— Nose :
Info :
Use gray plush yarn
Round 1 :
6 sc in magic Ring {6}
Round 2 :
(inc) – repeat 6 times {12}
Round 3 :
(1 sc, inc) – repeat 6 times {18}
Round 4 :
(2 sc, inc) – repeat 6 times {24}
Round 5 :
(3 sc, inc) – repeat 6 times {30}
Round 6 :
(4 sc, inc) – repeat 6 times {36}
Round 7 :
(5 sc, inc) – repeat 6 times {42}
Info :
Leave a long thread for sewing.
Info :
Use black acryl yarn and embroider the nose and leave a long thread.
— Spot :
Info :
Use gray plush yarn
Round 1 :
9 ch, we begin to knit from the second loop from the hook 7 sc, in the first loop of the chain we knit 3 sc. Continue to crochet on the other side of the chain: 7 sc, inc.
Round 2 :
inc, 6 sc, (inc) – repeat 3 times, 7 sc, inc, 1 sc
Round 3 :
inc, 9 sc, inc, 2 sc, sl st.
Info :
Leave a long thread for sewing.
— Assembly :
Info :
Fill the pillow loosely. Sew the nose to the 12-22 rounds (see photo) in the center of the pillow, fill it. make the seam of the black thread down and fasten it and hide inside the nose. Sew a spot to the right of the nose.
Info :
We fix the eyes (or sew) on the 24 round, the distance between the eyes is 13 sc (we sew one eye on the spot). (See photo)
Info :
Fill the pillow tightly, evenly, so that there are no "balls". Sew one edge of the ear to 6 sc from the beginning of the pillow, and bend the other edge back. Hands sew between 10-13 rounds from the side. We fill, sew the bottom of the pillow with a yellow acryl yarn and needle. Sew legs at a distance of 17-18 sc. (see photo)
This adorable Pillow-dog is soft, squishy, and full of personality — perfect for cuddles and decor. 🧸🧶
Handmade details like floppy ears and an embroidered nose make it extra charming and gift-ready. Give it a try and enjoy a cozy, creative project that finishes into a lovable little companion. ✨