๐Ÿงถ Beautiful โœจ Detailed ๐Ÿ’ Adorable

Pillow-unicorn Amigurumi Pattern

Pillow-unicorn Amigurumi Pattern
4.9โ˜… Rating
5-7 Hours Time Needed
1.6K Made This
โœ‚๏ธ

Intermediate Level

Ideal for those with basic crochet experience, featuring slightly more advanced stitches and techniques to expand your skills.

โฑ๏ธ

Weekend Treat

Takes 5-7 hours, making it an enjoyable project to finish over a couple of days.

๐Ÿงธ

Cute Companion

An adorable friend to cherish, handcrafted with love to bring comfort and joy for years to come.

About This Pillow-unicorn Amigurumi Pattern

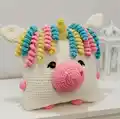
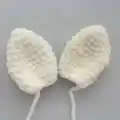
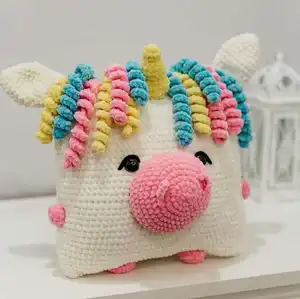
This pattern creates a soft, square unicorn pillow with a curly mane, horn, ears, nose, nostrils, legs and arms using plush baby yarn. It combines basic amigurumi construction with simple textured mane chains to add playful detail. The pattern uses rounds and small motifs which are sewn onto the pillow for a polished finish.

Pillow-unicorn Amigurumi Pattern crochet pattern - detailed view of completed project

Clear round-by-round instructions and assembly photos help you place each detail accurately. Finished size depends on yarn and hook, and the pattern is adaptable for different yarn weights.

Why You'll Love This Pillow-unicorn Amigurumi Pattern

I absolutely love this pattern because it transforms simple stitches into a whimsical, huggable pillow that delights both kids and adults. I enjoyed designing the curly mane โ€” those textured spiral chains add so much personality. The pattern uses familiar amigurumi techniques, but the assembly brings everything together into a charming finished piece. I find it satisfying to see small motifs like the nose and ears turn into a character when sewn in place.

Pillow-unicorn Amigurumi Pattern step 1 - construction progress Pillow-unicorn Amigurumi Pattern step 2 - assembly progress Pillow-unicorn Amigurumi Pattern step 3 - details and accessories Pillow-unicorn Amigurumi Pattern step 4 - final assembly and finishing

Switch Things Up

I love changing up the mane colors to create different personalities; try pastel shades for a soft nursery-friendly look or bright neons for a playful pop.

You can make the pillow larger or smaller by swapping yarn weight and hook size; bulky yarn with a bigger hook creates a giant cuddly version while thinner yarn makes a smaller keepsake.

I sometimes replace the bead eyes with safety eyes or embroider larger expressions using black yarn to change the character's mood.

If you want a flatter pillow, use less stuffing and press corners gently while sewing; for a firmer cushion, add more hollofayber and firm stuffing.

Try making a set in coordinated colors for a themed nursery โ€” matching blanket, toy and pillow make a sweet gift set.

I often add tiny felt accents or appliques to the pillow surface for seasonal looks like hearts, stars or initials.

To make the mane more textured, vary chain lengths or add extra spirals and cluster them closer together for a fuller effect.

Consider adding a zipper or opening row if you want the pillow to have a removable cover for washing; adapt the edge joining accordingly.

I sometimes add a small ribbon loop at one corner to hang the pillow as wall decor or to attach a name tag for gifts.

For a child-safe version, embroider eyes and features instead of using beads or buttons, and make sure all ends are securely woven inside.

Common Mistakes & How to Fix Them

โœ— Skipping to sew the pillow top securely can cause stuffing to escape; leave a long thread, sew the top firmly and weave in the ends inside the pillow. โœ— Failing to fix the beginning of each round will cause misaligned stitches; always secure the start of each new circle with a pin or thread as instructed. โœ— Not stuffing evenly makes corners and angles look flat or lumpy; fill tightly and evenly and shape the angles of the pillow before closing. โœ— Placing features without measuring distances results in uneven face placement; follow the rounds guidance (for example eyes between rounds 21 and 22, 12 sc apart) and pin parts before sewing. โœ— Using inconsistent tension changes finished size and stitch count; maintain steady tension and check your stitch counts after each round to match the pattern.

Pillow-unicorn Amigurumi Pattern

Create an irresistibly soft unicorn pillow using plush baby yarn and simple crochet techniques. This pattern guides you through crocheting the pillow body, ears, nose, horn, mane, legs and arms with clear rounds and assembly steps. Perfect as a gift or cozy decor, you will enjoy making the textured mane and cute facial details. Follow the instructions and photos for a charming finished unicorn pillow.

Intermediate 5-7 Hours

Materials Needed for Pillow-unicorn Amigurumi Pattern

โ€” Main Fabric

  • 01
    Himalaya Dolphin Baby plush yarn (120 m / 100 g) - White (2 skeins)
  • 02
    Himalaya Dolphin Baby plush yarn - Pink (small amount for nose, nostrils, feet and cheeks)
  • 03
    Himalaya Dolphin Baby plush yarn - Yellow (small amount for horn and mane accents)
  • 04
    Himalaya Dolphin Baby plush yarn - Blue (small amount for mane accents)
  • 05
    Black yarn or black thread for eyelids and eye details
  • 06
    Hollofayber filler (polyester stuffing), amount to firmly fill a 31x31 cm pillow

โ€” Tools Required

  • 01
    Crochet hook size 3.5 - 4.5 mm (pattern used 3.5 mm)
  • 02
    Black beads or buttons for eyes (22 mm) or black yarn for embroidered eyelids
  • 03
    Needle for sewing pieces and weaving ends
  • 04
    Pins to fix beginning of rounds or to pin pieces for sewing
  • 05
    Scissors
  • 06
    Stitch markers (optional)
  • 07
    Polyester stuffing (hollofayber)

Progress Tracker

0% Complete

โ€” Pillow :

Round 1 :

90 ch, connect with the first loop

Round 2 6 39 (38 rounds) :

90 sc

Info :

Leave a long thread and sew the top of the pillow. We fasten the thread and hide inside the pillow.

Info :

Fill tightly and evenly. Fill the angle of the pillow well. Sew and fasten the thread and hide inside the pillow.

โ€” Ear (2 details) :

Info :

Use white plush yarn

Round 1 :

6 sc in magic Ring {6}

Round 2 :

(inc) 6 repeat 6 times {12}

Round 3 :

12 sc

Round 4 :

(1 sc, inc) 6 repeat 6 times {18}

Round 5 :

18 sc

Round 6 :

(2 sc, inc) 6 repeat 6 times {24}

Round 7 :

24 sc

Round 8 :

(2 sc, dec) 6 repeat 6 times {18}

Round 9 6 11 (3 rounds) :

18 sc

Round 12 :

(1 sc, dec) 6 repeat 6 times {12}

Info :

Leave a long thread for sewing

โ€” Nose :

Info :

Use pink yarn

Round 1 :

6 sc in magic Ring {6}

Round 2 :

(inc) 6 repeat 6 times {12}

Round 3 :

(1 sc, inc) 6 repeat 6 times {18}

Round 4 :

(2 sc, inc) 6 repeat 6 times {24}

Round 5 :

(3 sc, inc) 6 repeat 6 times {30}

Round 6 :

(4 sc, inc) 6 repeat 6 times {36}

Round 7 :

(5 sc, inc) 6 repeat 6 times {42}

Round 8 :

(6 sc, inc) 6 repeat 6 times {48}

Round 9 6 11 (3 rounds) :

48 sc

Info :

Leave a long thread for sewing

โ€” Nostrils (2 details) :

Info :

Use pink yarn

Row 1 :

make 5 ch

Row 2 :

we begin to work from the second loop from the hook: sc, hdc, hdc, sl st

Info :

Leave a long thread for sewing

โ€” Horn :

Info :

Use yellow yarn

Round 1 :

6 sc in magic Ring {6}

Round 2 :

(inc) 6 repeat 6 times {12}

Round 3 :

(dec) 6 repeat 6 times {6}

Round 4 :

work through front loop: (inc) 6 repeat 6 times {12}

Round 5 :

12 sc

Round 6 :

(1 sc, inc) 6 repeat 6 times {18}

Round 7 :

(1 sc, dec) 6 repeat 6 times {12}

Round 8 :

work through front loop: (1 sc, inc) 6 repeat 6 times {18}

Round 9 6 10 (2 rounds) :

18 sc

Round 11 :

(1 sc, dec) 6 repeat 6 times {12}

Info :

Leave a long thread for sewing

โ€” Mane :

Info :

I made 5 yellow, 5 pink 5 blue manes. You can do more. If you want to make the mane longer, then make more chain.

Row 1 :

make 25 ch

Row 2 :

we begin to work from the second loop from the hook: make 3 sc in 1 loop, repeat with all loops (in each loop we do 3 sc)

โ€” Leg (2 details) :

Info :

Use pink yarn

Round 1 :

6 sc in magic Ring {6}

Round 2 :

(inc) 6 repeat 6 times {12}

Round 3 :

(1 sc, inc) 6 repeat 6 times {18}

Round 4 :

18 sc

Info :

Leave a long thread for sewing

โ€” Arm (2 details) :

Info :

Use blue yarn

Round 1 :

6 sc in magic Ring {6}

Round 2 :

(inc) 6 repeat 6 times {12}

Round 3 :

12 sc

Info :

Leave a long thread for sewing

โ€” Assembly :

Info :

Sew nose between 10 and 22 rounds

Info :

Sew ears. We put ears on the angles of the pillow and sew (the angle of the pillow should be inside the ear). Fasten the thread and hide it inside the pillow

Info :

Sew horn between 2 and 6 rounds (we count on top of the pillow)

Info :

Sew eyes between 21 and 22 rounds (distance between eyes 12 sc)

Info :

Sew nostrils. Distance between nostrils 4 rounds. We hide the ends of the threads inside the nose.

Info :

Use black yarn and make eyelid. We hide the ends of the threads inside the nose.

Info :

Sew arms between 11 and 15 rounds and sew legs (distance between legs 12 sc)

Info :

Sew mane

Assembly Instructions

  • Sew nose between 10 and 22 rounds, centering it on the pillow surface and securing with tight stitches; hide and knot the thread inside the pillow.
  • Position ears on the pillow angles so that the pillow corner is inside each ear, then sew them securely and fasten the thread hidden inside.
  • Sew the horn to the top center of the pillow between rounds 2 and 6, fastening firmly and hiding the yarn ends inside the pillow.
  • Attach eyes between rounds 21 and 22 with a distance of 12 sc between them; use beads or embroider with black yarn and hide ends inside the pillow.
  • Sew nostrils onto the nose with a distance of 4 rounds between them and hide the ends of the threads inside the nose.
  • Sew arms between rounds 11 and 15 and sew legs at the bottom with a distance of 12 sc between legs; stuff and secure parts firmly.

Important Notes

  • ๐Ÿ’กDo not forget to fix the beginning of each new circle with a pin or thread to keep rounds aligned.
  • ๐Ÿ’กFill the pillow tightly and evenly, shaping the angles for a crisp square finish before closing.
  • ๐Ÿ’กLeave long threads on small parts like nose, ears, and limbs for easier sewing and secure attachment.
  • ๐Ÿ’กHide and fasten all thread ends inside the pillow or pieces to keep the outside neat and child-safe.

This delightful unicorn pillow pattern turns plush yarn into a cuddly, decorative friend you can be proud of. ๐Ÿงถ Perfect for nurseries, playrooms, or as a heartfelt gift that brings smiles and comfort. โœจ Enjoy the process and share your magical creation with loved ones! ๐Ÿฆ„

You ask,

we answer.

FAQs

What size will the finished piece be?

The finished pillow was approximately 31 x 31 cm (with horn) when made with Himalaya Dolphin Baby yarn and a 3.5 mm hook; sizes will vary with different yarns and hooks.

Can I use different yarn weights for this pattern?

Yes, you can use different plush or standard yarns; changing yarn weight and hook size will affect the final size, so adjust materials and expect different stitch counts per inch.

Do I need prior crochet experience for this pattern?

This pattern is rated intermediate because it uses magic ring, increases, decreases and several small motifs that need assembly; basic amigurumi experience is helpful.

How long does this project typically take to complete?

Most crocheters complete this project in 5-7 hours, though time may vary based on experience, the number of mane pieces you make, and assembly time.

How should I attach the mane so it looks neat?

Make the spiral mane chains, then pin them in place along the top/front of the pillow and sew securely into the seam or top stitches, hiding ends inside the pillow.