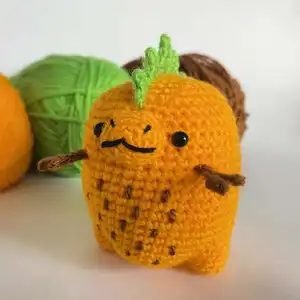
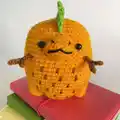
Make a cute Pineapple Rex amigurumi with clear step-by-step rounds and charming details. This pattern guides you through legs, body, tail, snout, arms and spikes so you can create a compact, poseable friend. Perfect for gifting or keeping on your desk, the design features embroidered details and a freestanding tail for balance. Follow the full instructions and photos to finish a lovable 11cm tall character.
Progress Tracker
0% Complete
— Materials :
Info :
Stylecraft Special DK in the following colours: Sunshine. Grass Green. Gingerbread. 2.5 mm Crochet Hook. Two 6mm safety eyes. Stitch markers. Yarn needle. Fibrefill. Black embroidery floss.
— Size :
Info :
If made using the suggested yarn and hook size, the finished product is 11cm tall.
— Abbreviations :
Infos :
Stitches are in US terms. MR = magic ring. ch = chain. st = stitch. sts = stitches. sc = single crochet. hdc = half double crochet. dc = double crochet. tr = treble crochet. inc = increase. dec = decrease. FLO = front loop only. BLO = back loop only. slst = slip stitch. rep = repeat.
— Techniques :
Info :
How to close amigurumi invisibly 1. Insert needle in the FLO of each stitch around 2. Pull tight to close 3. Insert needle through centre exiting a few rounds down 4. Weave in the end and admire your work!
Info :
How to decrease invisibly 1. Insert hook into FLO of first stitch 2. Insert hook into FLO of next stitch 3. Yarn over and pull through two loops 4. Yarn over and pull through two loops again. Invisible decrease complete!
— Legs (Make two) :
Round 2 :
inc each st around (12)
Round 3 :
in BLO sc each st around (12)
Round 4 :
sc each st around (12)
Info :
Cut yarn and weave in ends. Legs shown in (photo 1).
— Body :
Round 1 :
sc in second ch from hook, 6sc, 3sc in next st, working down the other side of the ch, 6sc, inc (18)
Round 2 :
inc, 6sc, 3inc, 6sc, 2inc (24)
Round 3 :
sc, inc, 6sc, *sc, inc* rep 3 times, 6sc, *sc, inc* rep 2 times (30)
— Body Cont... :
Info :
In the next round we will join the legs to the body.
Round 4 :
2sc, inc, 2sc, with the body still on your hook insert hook through any st in leg 1 and through the next st of rnd 3 complete sc, complete a further 2sc in this way, sc, *2sc, inc* rep 3 times, 2sc, 3sc through leg 2, sc, *2sc, inc* rep 2 times (36)
Info :
Both legs should now be attached to the body (photo 4).
Round 5 :
6sc, 9sc around leg 1, 15sc, 9sc around leg 2, 9sc (48)
Round 6-22 :
sc each st around (48) (17 rnds)
Round 23 :
*6sc, dec* rep 6 times (42)
Round 24 :
*5sc, dec* rep 6 times (36)
Info :
Insert safety eyes between rnds 19 - 20 six visible sts apart.
Info :
Although at this stage it does not matter which is the front or back, please use the legs as a guide to ensure the eyes are in the correct place.
Info :
Start stuffing and continue to stuff while we decrease.
Round 25 :
*4sc, dec* rep 6 times (30)
Round 26 :
*3sc, dec* rep 6 times (24)
Round 27 :
*2sc, dec* rep 6 times (18)
Round 28 :
*1sc, dec* rep 6 times (12)
Round 29 :
dec 6 times (6)
Info :
Fasten off and leave a long tail. Complete invisible close and weave in ends. Completed body shown (photo 6).
— Tail :
Round 2 :
*sc, inc* rep 3 times (9)
Round 3 :
sc each st around (9)
Round 4 :
*2sc, inc* rep 3 times (12)
Round 5 :
sc each st around (12)
Round 6 :
*3sc, inc* rep 3 times (15)
Round 7 :
sc each st around (15)
Round 8 :
6sc, 3inc, 6sc (18)
Round 9 :
sc each st around (18)
Info :
Cut yarn leaving a long tail.
— Snout :
Round 2 :
sc, 3sc in same st, 2sc, 3 sc in same st, sc (10)
Round 3 :
2sc, 3sc in same st, 4sc, 3 sc in same st, 2sc (14)
Round 4-5 :
sc each st around (14) (2 rnds)
Info :
Cut yarn leaving a long tail. Using black embroidery floss, stitch a mouth and nostrils onto the snout. Completed snout and tail shown (photo 7).
— Arms (make 2) :
Row 1 :
Ch6, slst in 2nd ch from hook, slst, ch3, slst in 2nd chain from hook, slst, now working up the original ch, 3slst
Info :
Cut yarn leaving a long tail. Arms shown in (photo 8).
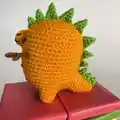
— Spikes :
Info :
Special stitches: Large Spike (LS) = Ch5, sc in 2nd ch from hook, hdc, dc, tr. Medium Spike (MS) = ch4, sc in 2nd ch from hook, hdc, dc. Small Spike (SS) = ch3, sc in 2nd ch from hook, hdc.
Info :
Using Grass green Row 1 SS, MS, 4LS, MS, SS, ch2, 3SS
Info :
Cut yarn leaving a long tail. If you want your spikes extra pointy you can block them as I have done, but this is optional. Spikes shown in (photo 9).
— Assembly :
Info :
We will use the long tails to attach everything to the body. Please use photos on the following page for reference.
Info :
Attach the arms between rounds 16 - 17 eleven visible sts apart. Lightly stuff the tail and join over rnds 3 - 10. The tail should allow your Pineapple Rex to be freestanding so make any adjustments to your positioning if necessary. Lightly stuff the snout and sew between the eyes over rnds 17 - 21. Starting from the centre of the snout, attach the spikes over the top of the head, down the back and onto the tail. The ch2 should fall where the body meets the tail. Finally, using Gingerbread add five rows of stitches to the belly for added detail.
This Pineapple Rex pattern blends fruity charm with dinosaur delight, creating a sweet little companion you will adore. Perfect for gifting or a playful desk buddy, it stands freestanding and wears its spikes proudly. Enjoy the stitching journey and show off your handmade Pineapple Rex! 🧶🧸