🧢 Beautiful ✨ Detailed πŸ’ Adorable

Plush Backpack Unicorn Amigurumi Pattern

Plush Backpack Unicorn Amigurumi Pattern
4.0β˜… Rating
8-10 Hours Time Needed
2.4K Made This
βœ‚οΈ

Intermediate Level

Ideal for those with basic crochet experience, featuring slightly more advanced stitches and techniques to expand your skills.

⏱️

All-Day Adventure

Requires 8-10 hours, ideal for a full day of immersive crocheting.

🧸

Cute Companion

An adorable friend to cherish, handcrafted with love to bring comfort and joy for years to come.

About This Plush Backpack Unicorn Amigurumi Pattern

This pattern creates a plush unicorn backpack made with super bulky velvet yarn for a soft, squishy finish. You will crochet the backpack body, flap, straps, handle and a sweet unicorn head with mane, horn and legs. The design includes full round-by-round instructions, helpful photos and assembly steps so you can sew everything together with confidence.

Plush Backpack Unicorn Amigurumi Pattern crochet pattern - detailed view of completed project

Intermediate skills are recommended β€” basic crochet stitches, increases and decreases are used throughout. The finished backpack measures approximately 21 cm wide by 24 cm high with the recommended yarn and hook sizes.

Why You'll Love This Plush Backpack Unicorn Amigurumi Pattern

I absolutely love this pattern because it transforms plush velvet yarn into a playful, wearable toy that kids adore. I love the mix of functional design and whimsical details β€” the curly mane, tiny horn and little legs really bring the unicorn to life. As a maker, I enjoy how quickly the super bulky yarn works up while still allowing for charming detail work with thinner yarn for the horn and facial features. The pattern is satisfying to assemble and the result is a handmade gift that feels special and keeps well. I especially appreciate that it teaches useful techniques like working in rows and rounds, joining flaps, and attaching parts neatly.

Plush Backpack Unicorn Amigurumi Pattern step 1 - construction progress Plush Backpack Unicorn Amigurumi Pattern step 2 - assembly progress Plush Backpack Unicorn Amigurumi Pattern step 3 - details and accessories Plush Backpack Unicorn Amigurumi Pattern step 4 - final assembly and finishing

Switch Things Up

I love how many ways you can personalize this pattern β€” try swapping the pastel mane colors for bold neon shades to create a fun statement backpack.

You can change the size by using a different yarn weight and hook: bulky yarn with a larger hook will create a chunkier, larger backpack while DK yarn with a smaller hook will give you a mini version.

I often add embroidered cheeks or blushing with pastel yarn to change the unicorn's expression and charm.

Try adding a lining fabric inside the bag for more structure and durability β€” sew or glue a cotton lining after assembly.

You could replace the wooden button and cord with a snap or magnetic clasp for easier opening and closing for younger children.

I sometimes make the mane curls longer or shorter depending on the look I want; experiment with different chain lengths for the strands.

For a waterproof option, use a sprayed-on fabric protector on the lining or choose a washable yarn and test for colorfastness first.

I like to mix yarn textures β€” a faux-fur tail or eyelash yarn mane adds extra tactile interest and a luxe feel.

If you want a more durable strap, braid multiple strands of worsted cotton yarn together and cover the ends with the plush yarn for a comfy look.

Try creating a matching set by making a small unicorn keychain from leftover yarn to match the backpack β€” it's a cute finishing touch I always add.

Common Mistakes & How to Fix Them

βœ— Skipping stitch markers at the beginning of rounds makes it easy to lose track of the starting stitch; place a marker or contrasting thread at the beginning of each round to maintain correct stitch placement. βœ— Not stuffing the head and legs evenly will result in lumpy or misshapen parts; stuff gradually and evenly, shaping as you go and checking the silhouette before finishing. βœ— Changing colors without securing ends or weaving them in may cause loose fibers or visible tails; cut and weave ends into the next row stitches as indicated and crochet over tails when switching to dark pink. βœ— Using an incorrect hook size will change the finished size and tension and can make the plush bag either too loose or too stiff; use the recommended hooks (3.75, 3.0 and 2.25 mm) and check gauge by feel for plush yarn. βœ— Sewing parts without pinning first can lead to misaligned ears, horn or legs; pin or clip pieces in place and compare both sides before stitching for symmetry.

Plush Backpack Unicorn Amigurumi Pattern

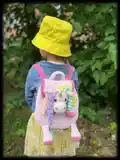
Make a charming plush unicorn backpack that doubles as a cuddly toy and a functional bag. This pattern guides you step-by-step through crocheting the backpack body, flap, straps, handle, cord and the unicorn head with cute mane and legs. You will enjoy working with plush velvet yarn and adding colorful curls for a playful finish. Perfect as a handmade gift or a delightful project to practice intermediate amigurumi skills.

Intermediate 8-10 Hours

Materials Needed for Plush Backpack Unicorn Amigurumi Pattern

β€” Main Fabric

  • 01
    Super Bulky / Super Chunky (14 ply) velvet yarn HIMALAYA DOLPHIN BABY - Pink main color: 2 skeins
  • 02
    Super Bulky / Super Chunky velvet yarn HIMALAYA DOLPHIN BABY - Dark pink accent: approx 1/4 skein
  • 03
    Super Bulky / Super Chunky velvet yarn HIMALAYA DOLPHIN BABY - Cream: small amount for the head
  • 04
    Assorted super bulky/velvet colors (pastels) - small amounts for mane and tail strands (multiple colors)
  • 05
    Sport weight / 4 ply yarn YarnArt JEANS or Alize Cotton Gold - yellow color for the horn (small amount)
  • 06
    Dark pink chenille thread for embroidered nostrils and lashes (small amount)

β€” Tools Required

  • 01
    Crochet hook size 3.75 mm (recommended for main plush yarn)
  • 02
    Crochet hook size 3.0 mm (for some details and overall work)
  • 03
    Crochet hook size 2.25 mm (for horn and tighter details)
  • 04
    Crochet hook size 3 mm (used for ears in pattern)
  • 05
    Safety eyes 15 mm (2 pieces)
  • 06
    Wooden button (1)
  • 07
    Sewing needle and yarn needle for sewing pieces
  • 08
    Scissors
  • 09
    Stitch markers or contrasting thread to mark round starts
  • 10
    Polyester stuffing (toy stuffing)
  • 11
    Pins for assembly

Progress Tracker

0% Complete

β€” Notes :

Infos :

Recommended materials and tools: Super Bulky/Super Chunky/14ply velvet yarn HIMALAYA DOLPHIN BABY - 2 skeins of the pink color, 1/4 of dark pink color, a little of cream color for the head and different colors for the mane and tail. Sport weight/4ply yarn YarnArt JEANS or Alize Cotton Gold of yellow color for the horn. Sewing needle. Hook size 3.75, 2.25 & 3 mm by Clover. Wooden button. Safety eyes 15 mm. Stuffing toy material.

Infos :

Note: Work in continuous rounds, in rows and in a spiral. The size of the backpack - 21 cm wide (8.2 ''), 24 cm high (9.4 ''). At the beginning of the round, use a marker or thread of a different color so that you can see where the beginning of the round is.

Info :

Tip: If plush yarn is crumble, use cotton thread matching color to sew on pieces.
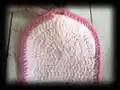
β€” Flap :

Round 1 :

ch2, crochet 5 sc into the 2nd ch from the hook. Do not pull the ring. Turn. (5)

Round 2 :

t-ch, 1 sc, inc * 4, turn (9)

Round 3 :

t-ch, (sc, inc) * 4, 1 sc, turn (13)

Round 4 :

t-ch, (2 sc, inc) * 4, 1 sc, turn (17)

Round 5 :

t-ch, (3 sc, inc) * 4, 1 sc, turn (21)

Round 6 :

t-ch, (4 sc, inc) * 4, 1 sc, turn (25)

Round 7 :

t-ch, (5 sc, inc) * 4, 1 sc, turn (29)

Round 8 :

t-ch, (7 sc, inc) * 3, 5 sc, turn (32)

Round 9 :

t-ch, (8 sc, inc) * 3, 5 sc (35)

Round 10 :

t-ch, (9 sc, inc) * 3, 5 sc (38)

Info :

Do not turn. Work along the top of the flap.

Round 11 :

t-ch, 21 sc, turn (21)

Round 12-18 :

t-ch, 21 sc, turn (6 rows)

Round 19 :

t-ch, 21 sc (21). Do not turn.

Info :

Change color to dark pink. Cut the pink yarn. Then work in rounds. Crochet the yarn ends after color changing into stitches of the next row.

Round 20 :

t-ch, 25 sc, ch3, skip 3 stitches, 25 sc, turn (53)

Round 21 :

t-ch, 53 reverse sc (53), sl st
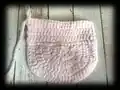
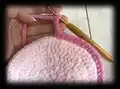
β€” Backpack :

Info :

Crochet with pink yarn. Ch20. Start on the second chain from the hook.

Round 1 :

18 sc, 3 sc in the last chain, on the other side of the chain: 17 sc, inc, inc into t-ch (42) Place a marker.

Round 2 :

inc, 15 sc, (inc, 1 sc) * 2, inc, 17 sc, (inc, 1 sc) * 2 (48)

Round 3 :

inc, 1 sc, inc, 15 sc, (inc, 1 sc) * 4, inc, 15 sc, (inc, 1 sc) * 3 (58)

Round 4 :

inc, 1 sc, inc, 16 sc, (inc, 3 sc) * 3, inc, 18 sc, (inc, 3 sc) * 2 (66)

Round 5 :

inc, 3 sc, inc, 18 sc, (inc, 4 sc) * 3, inc, 17 sc (inc, 4 sc) * 2 (74)

Round 6 :

74 sc (74)

Round 7 :

BLO 74 sc (74)

Round 8-16 :

74 sc (9 rounds)

Round 17 :

32 sc, dec, 35 sc, dec, 3 sc (72)

Round 18-36 :

72 sc (19 rounds)

Info :

Join the flap in the next round.

Round 37 :

1 sc, 23 sc with the flap, 48 sc (72), sl st.

β€” Straps :

Info :

Crochet with dark pink yarn. Work in rows.

Round 1 :

ch71, start from the second chain on the hook: 70 sc, turn (70)

Round 2-4 :

t-ch, 70 sc (3 rows)

Info :

You can make the straps longer or shorter. Make more or less chains. My straps are 50 cm long. Cut the yarn. Leave the end for sewing pieces. Sew the straps at the bottom of the backpack between rounds 7 and 11, at the top of the backpack between rounds 32 and 36. Distance between straps 12 sc.

β€” Handle :

Info :

Crochet with pink yarn. Work in rows.

Round 1 :

ch21, start from the second chain on the hook: 20 sc, turn (20)

Round 2-3 :

t-ch, 20 sc (20 rows)

Info :

Cut the yarn. Leave the end for sewing pieces. Sew on the handle.

β€” Cord :

Info :

Crochet with pink yarn. Ch150. Step back at the top of the backpack 2 rounds and stretch the cord between the stitches, after folding the backpack, as shown in the photo. Make knots at the ends. Sew a button between rounds 23 and 27.

β€” Unicorn Head :

Info :

Begin to crochet with cream yarn.

Round 1 :

ch2, crochet 6 sc into the 2nd ch from the hook (6)

Round 2 :

inc *6 (12)

Round 3 :

(1 sc, inc) * 6 (18)

Round 4 :

1 sc, inc (2 sc, inc) * 5, 1 sc (24)

Round 5-7 :

24 sc (3 rounds)

Info :

Change color to pink. Cut the cream yarn.

Round 8 :

24 sc (24)

Round 9 :

9 sc, 6 inc, 9 sc (30)

Round 10 :

9 sc, (1 sc, inc) * 6, 9 sc (36)

Round 11 :

(5 sc, inc) * 6 (42)

Round 12-14 :

42 sc (3 rounds)

Info :

Insert safety eyes between rounds 10 and 11. Distance between eyes 10-11 sc.

Round 15 :

(5 sc, dec) * 6 (36)

Round 16 :

2 sc, dec, (4 sc, dec) * 5, 2 sc (30)

Round 17 :

(3 sc, dec) * 6 (24)

Info :

Stuff the head. Leave the end for sewing pieces.

β€” Ears (make 2) :

Info :

Crochet with pink yarn. Crochet with hook 3 mm.

Round 1 :

ch2, crochet 4 sc into the 2nd ch from the hook (4)

Round 2 :

(1 sc, inc) * 2 (6)

Round 3 :

(2 sc, inc) * 2 (8)

Round 4 :

(1 sc, inc) * 4 (12)

Round 5 :

12 sc (12)

Round 6 :

(3 sc, dec) * 2 (10)

Info :

Cut the yarn. Leave the yarn tail to sew pieces.

β€” Horn :

Info :

Crochet with cotton yellow yarn. Crochet with hook 2.25 mm.

Round 1 :

6 sc in MR (6)

Round 2 :

(2 sc, inc) * 2 (8)

Round 3 :

8 sc (8)

Round 4 :

(3 sc, inc) * 2 (10)

Round 5 :

10 sc (10)

Round 6 :

(4 sc, inc) * 2 (12)

Round 7 :

12 sc (12)

Round 8 :

(3 sc, inc) * 3 (15)

Round 9 :

15 sc (15)

Round 10 :

(4 sc, inc) * 3 (18)

Round 11 :

18 sc (18) sl st.

Info :

Cut the yarn. Leave the yarn tail for sewing. Stuff the horn.

β€” Strands for the mane and tail (make 10) :

Info :

You can crochet them in a different color or in the same color. Ch 40, from the second chain on the hook: 39 inc. Fasten off and cut the yarn. Leave the end for sewing.

β€” Forelegs (make 2) :

Info :

Crochet with dark pink yarn.

Round 1 :

ch2, crochet 6 sc into the 2nd ch from the hook (6)

Round 2 :

inc * 6 (12)

Round 3 :

(3 sc, inc) * 3 (15)

Round 4 :

BLO 15 sc (15)

Info :

Change color to pink. Cut the dark pink yarn.

Round 5-6 :

15 sc (2 rounds)

Round 7 :

dec, 13 sc (14)

Round 8 :

dec, 12 sc (13)

Round 9 :

dec, 11 sc (12)

Round 10 :

dec, 10 sc (11)

Round 11 :

dec, 9 sc (10)

Round 12-13 :

10 sc (2 rounds)

Info :

Stuff the lower foreleg. Fold it in half and crochet 5 sc through both sides. Cut the yarn. Leave the yarn tail for sewing pieces.

β€” Hind Legs (make 2) :

Info :

Begin to crochet with dark pink yarn.

Round 1 :

ch2, crochet 6 sc into the 2nd ch from the hook (6)

Round 2 :

inc * 6 (12)

Round 3 :

(1 sc, inc) * 6 (18)

Round 4 :

BLO 18 sc (18)

Info :

Change color to pink. Cut the dark pink yarn.

Round 5-6 :

18 sc (2 rounds)

Round 7 :

(7 sc, dec) * 2 (16)

Round 8 :

(6 sc, dec) * 2 (14)

Round 9 :

dec, 12 sc (13)

Round 10 :

dec, 11 sc (12)

Round 11 :

dec, 10 sc (11)

Round 12 :

dec, 9 sc (10)

Round 13 :

10 sc (10)

Info :

Stuff the lower leg. Fold it in half and crochet 5 sc through both sides. Cut the yarn. Leave the yarn tail to sew pieces.

β€” Assembly :

Item Name (P1) :

1. Sew the ears between rounds 13 and 16 of the head at a distance of 7 sc.

Item Name (P2) :

2. Sew the horn to the head between rounds 11 and 13.

Item Name (P3) :

3. Embroider nostrils and lashes with dark pink chenille thread.

Item Name (P4) :

4. Sew the head to the flap of the backpack.

Item Name (P5) :

5. Sew on the hind legs between rounds 8 and 11.

Item Name (P6) :

6. Sew forelegs between rounds 22 and 27.

Item Name (P7) :

7. Sew 5 strands to the head and sew 5 strands of the tail to the back between the straps.

Assembly Instructions

  • Sew the ears between rounds 13 and 16 of the head at a distance of 7 sc.
  • Sew the horn to the head between rounds 11 and 13.
  • Embroider nostrils and lashes with dark pink chenille thread and secure embroidery tails.
  • Sew the head to the flap of the backpack, aligning the base of the head with the flap center and stitch securely.
  • Sew on the hind legs between rounds 8 and 11, placing them symmetrically for balance and stability.
  • Sew forelegs between rounds 22 and 27, folding each lower leg as instructed and stitching through both sides.
  • Attach 5 strands to the head for the mane and sew 5 tail strands to the back between the straps, securing ends firmly.

Important Notes

  • πŸ’‘Use stitch markers to mark the beginning of rounds and when joining pieces to keep track of placement.
  • πŸ’‘Stuff parts evenly and check the shape as you go; overstuffing can distort the plush look.
  • πŸ’‘Leave long yarn tails for sewing pieces to make assembly easier and more secure.
  • πŸ’‘Pin or clip parts in position before sewing so you can check symmetry and placement before final stitching.

Create a special handmade Plush Backpack Unicorn that will delight any child or unicorn lover. πŸ¦„ This pattern combines super-soft velvet yarn with bright mane curls for a playful, tactile finish. πŸŽ€ Enjoy the process of crocheting, assembling and customizing β€” then watch the smiles when it is gifted! 🧢

You ask,

we answer.

FAQs

What size will the finished piece be?

The finished backpack measures approximately 21 cm wide by 24 cm high using the recommended super bulky velvet yarn and hook sizes.

Can I use different yarn weights for this pattern?

Yes, you can change yarn weight but it will affect finished size and texture; use an appropriate hook and expect a different lookβ€”thicker yarn yields a chunkier bag and thinner yarn produces a smaller, firmer result.

Do I need prior crochet experience for this pattern?

This pattern is rated intermediate; basic crochet skills like single crochet, increases, decreases and working in the round are required for best results.

How long does this project typically take to complete?

Most crocheters complete this project in about 8-10 hours, depending on experience, speed and how much time you spend on assembly and decorative details.