🧢 Beautiful ✨ Detailed πŸ’ Adorable

Plush Ballerina Bear Amigurumi Pattern

Plush Ballerina Bear Amigurumi Pattern
4.0β˜… Rating
5-7 Hours Time Needed
3.1K Made This
βœ‚οΈ

Beginner Friendly Level

Perfect for those just starting their crochet journey, with clear instructions and simple techniques

⏱️

Weekend Treat

Takes 5-7 hours, making it an enjoyable project to finish over a couple of days.

🧸

Cute Companion

An adorable friend to cherish, handcrafted with love to bring comfort and joy for years to come.

About This Plush Ballerina Bear Amigurumi Pattern

This pattern creates a plush ballerina bear amigurumi worked in plush yarn for a super soft finish. The finished toy measures around 23 cm (9") tall using the recommended materials. It features a removable-looking ruffled dress, embroidered facial details and a tiny crocheted flower.

Plush Ballerina Bear Amigurumi Pattern crochet pattern - detailed view of completed project

The pattern is written in US terminology and rated easy β€” ideal for beginners who know basic stitches. Detailed round-by-round instructions are included for every piece to guide you step by step.

Why You'll Love This Plush Ballerina Bear Amigurumi Pattern

I absolutely love this pattern because it turns plush yarn into a sweet, huggable toy that feels luxurious and safe for little hands. I enjoy the simple shaping that still results in a characterful face and a delicate ruffled dress. The design is forgiving yet satisfying β€” you can see progress quickly while stitching. I am proud of how well the embroidery details bring personality to the bear with minimal effort.

Plush Ballerina Bear Amigurumi Pattern step 1 - construction progress Plush Ballerina Bear Amigurumi Pattern step 2 - assembly progress Plush Ballerina Bear Amigurumi Pattern step 3 - details and accessories Plush Ballerina Bear Amigurumi Pattern step 4 - final assembly and finishing

Switch Things Up

I love customizing this plush bear by changing the color palette; try soft pastels for a baby-friendly look or bright hues for a playful character.

I often switch yarn weights and hooks to create different sizes β€” a bulkier yarn with a larger hook makes a chunkier cuddly bear, while thinner yarn and a smaller hook gives a mini version.

I like to add wire to the arms for a poseable effect; insert thin floral wire inside the arm before stuffing and bend gently to pose.

For a different outfit, substitute the ruffled dress for a tiny crocheted sweater or tutu using complementary colors and simple dc rows.

I sometimes replace safety eyes with sewn-on embroidered eyes for baby-safe toys or use smaller safety eyes for a cuter proportion.

Try adding tiny accessories like a ribbon bow, crocheted shoes, or a tiny headband to personalize each bear for gifts.

I recommend experimenting with facial expressions by changing eyebrow placement or mouth length to give your bear different personalities.

Consider making a matching friend set by altering colours and adding small props, like a miniature crochet star or heart to hold.

If you want a faster make, crochet the dress as a separate piece and slip it on, so you can quickly swap outfits and create multiple looks.

I also enjoy embroidering different nose shapes and cheek blush intensities to change the overall expression and charm of the finished bear.

Common Mistakes & How to Fix Them

βœ— Skipping the stitch marker placement on the body can make the start point move and distort symmetry; place the marker in the back as instructed and check alignment after joining the legs. βœ— Not stuffing the head firmly, especially the lower part, results in a floppy shape; stuff the head firmly as you go and add extra stuffing to the lower part before closing. βœ— Forgetting to leave tails for sewing pieces causes difficulty during assembly; always leave a long tail when fastening off ears, muzzle, and the flower so you can sew them easily. βœ— Overstuffing limbs or the body creates a stretched fabric look and mis-shaped stitches; stuff gradually and moderately, shaping with small additions until you reach the desired firmness.

Plush Ballerina Bear Amigurumi Pattern

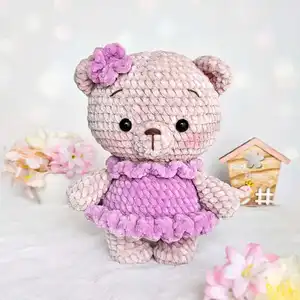
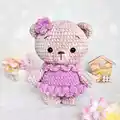
Make a cuddly plush ballerina bear with this easy-to-follow crochet pattern. You will create a soft, 23 cm (9") tall amigurumi using plush yarn and simple stitches. The pattern includes step-by-step rounds for arms, legs, body, head, ears, muzzle, dress, flower and finishing touches. Perfect for gifting or adding a handmade friend to your collection β€” great for relaxing afternoons of crochet.

Beginner Friendly 5-7 Hours

Materials Needed for Plush Ballerina Bear Amigurumi Pattern

β€” Main Fabric

  • 01
    Plush yarn (100g/120m) Beige - Himalaya Dolphin Baby 80301 (approx. one or more skeins as needed)
  • 02
    Plush yarn (100g/120m) Purple - Himalaya Dolphin Baby 80317 (approx. one skein)
  • 03
    Dark brown embroidery thread - YarnArt Jeans 70 (for eyebrows and mouth)
  • 04
    Safety eyes 12 mm (2 pieces)
  • 05
    Stuffing - Polyester fiber fill (enough to fill body, head, arms and legs)

β€” Tools Required

  • 01
    Crochet hook 4.00 mm
  • 02
    Scissors
  • 03
    Yarn needle for sewing and weaving ends
  • 04
    Stitch markers
  • 05
    Pins for positioning (optional)
  • 06
    Safety eyes 12 mm (2 pieces)
  • 07
    Blush or fabric-safe pink cheek color (optional)

Progress Tracker

0% Complete

β€” Materials and Tools :

Infos :

Plush yarn (100g/120m): Beige (Himalaya Dolphin Baby 80301). Purple (Himalaya Dolphin Baby 80317). Dark brown thread to embroider the eyebrows and the mouth (I use YarnArt Jeans 70). Safety eyes 12 mm. Crochet hook 4.00 mm. Stuffing (Polyester fiber fill). If you use these materials, the finished toy is around 23 cm (9") tall. There are no crochet instructions included in the pattern. It's assumed that you're familiar with the basic crochet stitches. The difficulty level of the pattern is EASY. I use US terminology in this pattern.

β€” Abbreviations :

Infos :

st – stitch. ch – chain. sl st – slip stitch. sc – single crochet. dc – double crochet. inc – increase. dec – decrease. (sc, inc)* n - repeat those in brackets n-times.

β€” Arms :

Info :

Crochet with the beige yarn. Stuff only lower half of the arm.

Round 1 :

6 sc into a magic ring (6)

Round 2 :

6 inc (12)

Round 3-4 :

12 sc (2 rounds)

Round 5 :

(4 sc, dec)*2 (10)

Round 6 :

10 sc

Round 7 :

(3 sc, dec)*2 (8)

Round 8 :

8 sc

Round 9 :

Flatten the arm and crochet 4 sc through both sides.

Info :

Fasten off and cut the yarn.

β€” Legs :

Info :

Crochet with the beige yarn. Stuff as you go.

Round 1 :

8 sc into a magic ring (8)

Round 2 :

8 inc (16)

Round 3 :

16 sc

Round 4 :

4 sc, 4 dec, 4 sc (12)

For the left leg :

7 sc, place additional marker, 5 sc (12). Make a sl st, fasten off and cut the yarn.

For the right leg :

12 sc (12). Don't cut the yarn, we will continue with the body.

β€” Body :

Info :

Continue crocheting with the beige yarn. Stuff as you go.

Round 1 :

Crochet 5 sc more on the right leg. Make chain 3 and attach the yarn to the left leg where you placed the additional marker. Crochet 12 sc on the left leg; 3 sc on the front of the chain; 12 sc on the right leg; 3 sc on the back of the chain (30)

Info :

Place the marker here, it will be the new start. (The marker should be in the back)

Round 2 :

12 sc, 3 inc, 12 sc, 3 inc (36)

Round 3 :

(11 sc, inc)*3 (39)

Round 4 :

39 sc

Info :

Change the yarn to purple color.

Round 5 :

39 sc

Round 6 :

Back loops only: 39 sc

Round 7-8 :

39 sc (2 rounds)

Round 9 :

(11 sc, dec)*3 (36)

Round 10 :

36 sc

Round 11 :

(4 sc, dec)*6 (30)

Info :

Check if the marker is exactly in middle of the back. If not - crochet 1-2 sc more to correct it.

Info :

Now we will join the arms:

Round 12 :

6 sc, 4 sc through the first arm and the body, 10 sc, 4 sc through the second arm and the body, 6 sc (30)

Info :

Check if the arms are symmetrical. If not, correct the stitches.

Info :

Change the yarn to beige color. Don't cut the purple yarn - move it to the front of your work.

Round 13 :

Back loops only: (3 sc, dec)*6 (24)

Round 14 :

24 sc

Info :

Don't cut the beige yarn, we will continue with the head, but first we need to finish the dress.

β€” Dress :

Info :

Take the purple yarn and crochet in the front loops of round 13 with the body turned upside down (look at the picture):

Round 1 :

((sc, chain 1, sc) in one stitch)*24 (72)

Info :

Make a sl st, fasten off and cut the yarn. Hide the thread inside the body.

Info :

Now attach the purple yarn to back in the front loops of round 6. Crochet with the body turned upside down:

Round 1 :

ch 2, (2 dc in one st, 2 dc in one st, 3 dc in one st)*13, sl st (91)

Round 2 :

91 sc

Info :

Make a sl st, fasten off and cut the yarn. Hide the thread inside the body.

β€” Head :

Info :

Continue crocheting with the beige yarn. Stuff as you go.

Round 1 :

(sc, inc)*12 (36)

Round 2 :

(2 sc, inc)*12 (48)

Round 3 :

(7 sc, inc)*6 (54)

Round 4 :

4 sc, inc, (8 sc, inc)*5, 4 sc (60)

Round 5-7 :

60 sc (3 rounds)

Round 8 :

4 sc, dec, (8 sc, dec)*5, 4 sc (54)

Round 9-11 :

54 sc (3 rounds)

Info :

Insert the safety eyes between rounds 6 and 7 with 8 stitches between them (6 stitches visible).

Round 12 :

(7 sc, dec)*6 (48)

Round 13 :

3 sc, dec, (6 sc, dec)*5, 3 sc (42)

Round 14 :

(5 sc, dec)*6 (36)

Round 15 :

2 sc, dec, (4 sc, dec)*5, 2 sc (30)

Round 16 :

(3 sc, dec)*6 (24)

Round 17 :

sc, dec, (2 sc, dec)*5, sc (18)

Round 18 :

(sc, dec)*6 (12)

Round 19 :

6 dec (6)

Info :

Tip: Make sure that the head is stuffed firmly, especially in the lower part.

Info :

Close the opening and hide the yarn inside.

β€” Ears :

Info :

Crochet with the beige yarn. Don't stuff.

Round 1 :

7 sc into a magic ring (7)

Round 2 :

7 inc (14)

Round 3-4 :

14 sc (2 rounds)

Info :

Tip: If you crochet wider and it looks like the ears are too big, just skip round 4 and make them only 3 rounds.

Info :

Make a sl st, fasten off and cut the yarn, leaving a tail for sewing.

Info :

Sew the ears to the head in rounds 10-14.

Info :

I sew the ears 5 st away from the end of the eyebrows (counted in round 10). That's 23 st total between the ears in their lower end.

Info :

The ears should be slightly curved.

β€” Muzzle :

Info :

Crochet with the beige yarn. Stuff lightly.

Round 1 :

6 sc into a magic ring (6)

Round 2 :

6 inc (12)

Round 3 :

(3 sc, inc)*3 (15)

Info :

Make a sl st, fasten off and cut the yarn, leaving a tail for sewing.

Info :

Sew the muzzle to the head in rounds 3-6 (look at the picture).

β€” Embroidering :

Info :

With a brown thread embroider the nose, as it's shown in the pictures. It's between rounds 2 and 3 of the muzzle and is 2 st wide.

Info :

Tip: The toy looks cuter if the nose is smaller.

Info :

The vertical line on the muzzle must be 2 rounds long.

Info :

Embroider the eyebrows in round 10. They are 2 st wide and with 8-9 st between them.

Info :

Color the cheeks with pink blush.

β€” Flower :

Info :

Crochet with the purple yarn.

Round 1 :

Make a magic ring and crochet in it: (2 ch, dc, 2 ch, sl st)*5

Info :

Tighten the magic ring, fasten off and cut the yarn, leaving a long thread for sewing.

Info :

Sew the flower to the head near one of the ears.

Assembly Instructions

  • Insert the safety eyes between rounds 6 and 7 of the head with 8 stitches between them (6 stitches visible).
  • Sew the muzzle to the head aligning it to rounds 3-6 of the head and hide the yarn tail inside after sewing.
  • Sew the ears to the head in rounds 10-14, placing each ear 5 stitches away from the end of the eyebrows and leaving 23 stitches total between the ears at their lower ends.
  • Join the arms to the body when crocheting round 12: work 4 sc through first arm and body and 4 sc through second arm and body to secure them.
  • Sew the flower to the head near one of the ears using the long tail left when fastening off the flower.

Important Notes

  • πŸ’‘Use a stitch marker to mark the new start of the body after joining the legs; the marker should be in the back and you may need to crochet 1-2 sc to correct its position.
  • πŸ’‘Don't stuff the ears; leave them flat and sew into place with the lower edge matching rounds 10-14 of the head.
  • πŸ’‘Keep the purple yarn when changing back to beige for the head β€” do not cut it; move it to the front of your work to continue the dress later.
  • πŸ’‘Hide and weave in all thread ends inside the body or head after fastening off to keep the toy neat and prevent loose tails.

This adorable Plush Ballerina Bear brings a soft, handmade touch to nurseries and gift boxes. Create a charming, squishy friend that is perfect for cuddles and play. Make one for yourself or as a heartfelt gift β€” crochet joy in every stitch! πŸ§ΆπŸ’œ

You ask,

we answer.

FAQs

What size will the finished piece be?

The finished amigurumi is approximately 23 cm (9") tall when using the recommended plush yarn and 4.00 mm hook.

Can I use different yarn weights for this pattern?

Yes, you can use different yarn weights but the final size and texture will change; adjust your hook size accordingly and note plush yarn gives the softest result.

Do I need prior crochet experience for this pattern?

This pattern is rated beginner friendly and requires familiarity with basic stitches (sc, inc, dec, sl st, ch) and crocheting in the round.

How long does this project typically take to complete?

Most crocheters complete this project in 5-7 hours, though time may vary depending on experience and how much detail you add.