🧢 Beautiful ✨ Detailed πŸ’ Adorable

Plush snuggler BUNNY Amigurumi Pattern

Plush snuggler BUNNY Amigurumi Pattern
4.5β˜… Rating
5-7 Hours Time Needed
1.4K Made This
βœ‚οΈ

Intermediate Level

Ideal for those with basic crochet experience, featuring slightly more advanced stitches and techniques to expand your skills.

⏱️

Weekend Treat

Takes 5-7 hours, making it an enjoyable project to finish over a couple of days.

🧸

Cute Companion

An adorable friend to cherish, handcrafted with love to bring comfort and joy for years to come.

About This Plush snuggler BUNNY Amigurumi Pattern

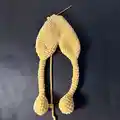
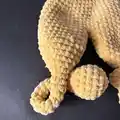
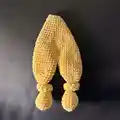
This pattern creates a plush snuggler bunny approx. 41 cm / 16" tall using plush chenille-style yarn. It includes fully written rounds for legs, body, arms, head, ears and tail plus step-by-step finishing notes. You can choose safety eyes or embroider details for a fully safe baby toy. The design uses spiral crochet and simple shaping techniques that result in a soft, floppy-eared companion.

Plush snuggler BUNNY Amigurumi Pattern crochet pattern - detailed view of completed project

The pattern provides yarn alternatives and a detailed materials list so you can adapt to what you have on hand. Clear photographs and assembly steps make it easy to sew parts together and add facial details.

Why You'll Love This Plush snuggler BUNNY Amigurumi Pattern

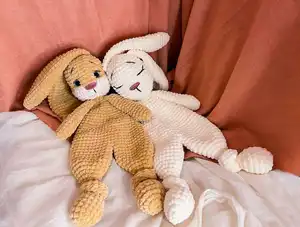
I absolutely love this pattern because it turns soft, luxurious plush yarn into a huggable friend that is both simple and rewarding to make. I enjoy how the spiral crochet technique creates smooth shaping without visible joins, and the floppy ears give the bunny so much character. I also love that you can choose between embroidered features or safety eyes, making it versatile for gifting to babies or older children. This pattern lets me combine quick rounds with thoughtful finishing touches, which is a satisfying balance of speed and detail.

Plush snuggler BUNNY Amigurumi Pattern step 1 - construction progress Plush snuggler BUNNY Amigurumi Pattern step 2 - assembly progress Plush snuggler BUNNY Amigurumi Pattern step 3 - details and accessories Plush snuggler BUNNY Amigurumi Pattern step 4 - final assembly and finishing

Switch Things Up

I love how easy it is to customize this bunny by changing yarn color and texture β€” try pastel shades for a baby-friendly look or a speckled yarn for whimsical charm.

I often swap the safety eyes for embroidered eyes to make the bunny completely baby-safe; dark embroidery thread creates a sweet sleepy expression.

To make a mini keychain version, use thinner plush yarn or a small novelty yarn and a 2.5–3.5 mm hook; reduce rounds proportionally for smaller measurements.

If you want a chunkier, cuddlier toy, use a bulky chenille yarn and a larger hook; the finished bunny will be plumper and very snuggly.

I sometimes add a removable crocheted scarf or little bow to personalize gifts β€” these tiny accessories add a finished look and are quick to make.

Try changing the face expression by moving the eyes or altering eyebrow embroidery; small shifts create very different personalities.

I recommend experimenting with contrast colors for the muzzle and inner ears to highlight facial features and make the expression pop.

If you like poseable toys, consider adding a short piece of wire inside the arms for gentle shaping, then secure the ends so they are safe for play.

For festive versions, embroider a small heart on the chest or add a holiday-themed felt accessory to make seasonal gifts.

I also enjoy making matching sibling sets by varying yarn colors and eye styles so each bunny is unique while using the same core pattern.

Common Mistakes & How to Fix Them

βœ— Skipping the stitch count when shaping the legs leads to lopsided pieces; count after every round and mark round starts to maintain symmetry. βœ— Not stuffing gradually creates lumps or an overstuffed shape; add small amounts of filler as you shape and check the silhouette frequently. βœ— Forgetting to leave the second leg attached when required for joining to the body prevents easy assembly; do not cut the thread of the second leg until instructed to join. βœ— Placing safety eyes too low or too close can distort the face; attach eyes between rounds 10 and 11 with 8 stitches between them or follow the embroidery placement diagrams carefully.

Plush snuggler BUNNY Amigurumi Pattern

Make a soft, cuddly plush snuggler bunny perfect for babies and nursery decor. This pattern uses plush chenille-style yarn to create a floppy-eared, huggable companion with embroidered details or safety eyes. You will find full step-by-step rounds, material lists, and assembly instructions to help you finish a charming 41 cm (16") bunny. Ideal for makers who enjoy sewing pieces together and adding simple facial embroidery.

Intermediate 5-7 Hours

Materials Needed for Plush snuggler BUNNY Amigurumi Pattern

β€” Main Fabric

  • 01
    Wolans Yarns BUNNY BABY plush yarn 100g / 120m (131yds) shade 100-18 (main color) - 2 skeins if using two colors for toy
  • 02
    Wolans Yarns BUNNY BABY 100g / 120m (131yds) shade 100-02 (secondary color for head) - small amount for head if using two colors
  • 03
    If making the toy in one color: 2 skeins of Wolans BUNNY BABY 100g / 120m (total)
  • 04
    Yarn analogues: Yarn Art DOLCE (100g / 120m) - 2 skeins equivalent
  • 05
    Premier Yarns PARFAIT CHUNKY (100g / 120m) - 2 skeins equivalent
  • 06
    Katia BAMBI (100g / 120m) - 2 skeins equivalent
  • 07
    King Cole YUMMY (100g / 120m) - 2 skeins equivalent
  • 08
    Universal Yarn BELLA CHENILLE (100g / 120m) - 2 skeins equivalent
  • 09
    Cygnet JELLY CHUNKY CHENILLE (100g / 120m) - 2 skeins equivalent

β€” Tools Required

  • 01
    Crochet hook size 4 mm (G6)
  • 02
    Toy filling or scraps fabric or yarn for stuffing
  • 03
    Stitch markers
  • 04
    Tapestry needle
  • 05
    Scissors
  • 06
    Thread for sewing details
  • 07
    Rose (pink) thread for embroidery nose (or matching yarn)
  • 08
    16 mm toy safety eyes (2) OR dark thread for embroidery eyes
  • 09
    Pins for assembly (optional)

Progress Tracker

0% Complete

β€” General :

Info :

FINISHED SIZE 41 cm / 16" (approx.)

Info :

PLUSH YARN: If you make the toy with two colors of yarn, you need 2 skeins of main color yarn (I used Wolans Yarns BUNNY BABY 100g / 120m (131yds) shade 100-18) and some secondary color for a head: I used Wolans Yarns BUNNY BABY 100g / 120m (131yds) shade 100-02. If you make the toy with one color yarn, you need 2 skeins.

Infos :

YARN ANALOGUES: Yarn Art DOLCE (100g / 120m). Premier Yarns PARFAIT CHUNKY (100g / 120m). Katia BAMBI (100g / 120m). King Cole YUMMY (100g / 120m). Universal Yarn BELLA CHENILLE (100g / 120m). Cygnet JELLY CHUNKY CHENILLE (100g / 120m). You can use any other plush yarn with the same weight.

Info :

CHOCHET HOOK: 4 mm (G6)

Infos :

EXTRAS: toy filling or scraps fabric or yarn for stuffing. stitch markers. tapestry needle. scissors. thread for sewing details. rose thread for embroidery nose. 16 mm toy safety eyes OR dark thread for embroidery eyes.

Info :

ABBREVIATIONS: sc = single crochet. inc = increase. dec = decrease. sl st = slip stitch. MR = magic ring.

Info :

SPIRAL WAY: All details of the toy crocheted in a spiral way. Crocheting in the spiral is the technique of working in the round in a continuous manner, without joining the separate rounds with a slip stitch.

β€” LEGS :

Info :

Use the main color yarn. Magic ring.

Round 1 :

6sc inside MR (6)

Round 2 :

6inc (12)

Round 3 :

(1sc, inc) x6 (18)

Round 4-6 :

18sc (18)

Round 7 :

(4sc, dec) x3 (15)

Round 8 :

(3sc, dec) x3 (12)

Info :

Add some filler.

Round 9 :

(2sc, dec) x3 (9)

Round 10 :

(1sc, dec) x3 (6)

Rounds 11-25 :

6sc (6)

Round 26 :

(1sc, inc) x3 (9)

Round 27 :

(2sc, inc) x3 (12)

Round 28 :

(3sc, inc) x3 (15)

Round 29 :

(4sc, inc) x3 (18)

Round 30 :

(5sc, inc) x3 (21)

Round 31 :

(6sc, inc) x3 (24)

Rounds 32-36 :

24sc (24)

Info :

Cut the yarn. Make the second leg in the same way, but don’t cut the thread at the end.

β€” BODY :

Assembling round 1 :

join the 2nd leg with 1st leg (insert hook and make sc in the point where stitch 24 of the last round ended), 23sc of 1st leg, join with the leg 2 (insert hook and make sc in the point where stitch 24 of last round ended), 23sc of 2nd leg (48)

Rounds 2-5 :

48sc (48)

Round 6 :

(6sc, dec) x6 (42)

Rounds 7-8 :

42sc (42)

Round 9 :

(5sc, dec) x6 (36)

Rounds 10-11 :

36sc (36)

Round 12 :

(4sc, dec) x6 (30)

Rounds 13-14 :

30sc (30)

Round 15 :

(3sc, dec) x6 (24)

Rounds 16-17 :

24sc (24)

Round 18 :

(2sc, dec) x6 (18)

Rounds 19-20 :

18sc (18)

Round 21 :

(1sc, dec) x6 (12), sl st.

Info :

Cut the yarn. Make knots on the legs.

β€” ARMS :

Info :

ARMS (make 2). Use the main color yarn. Magic ring.

Round 1 :

6sc inside MR (6)

Round 2 :

(1sc, inc) x3 (9)

Round 3 :

(2sc, inc) x3 (12)

Rounds 4-6 :

12sc (12)

Round 7 :

10sc, dec (11)

Round 8 :

9sc, dec (10)

Rounds 9-16 :

10sc (10)

Info :

Fold and crochet the edges together 5sc. Cut the yarn.

Info :

Make the second arm in the same way in rounds 1-6.

Round 7 :

dec, 10sc (11)

Round 8 :

dec, 9sc (10)

β€” HEAD :

Info :

Start with secondary color yarn. Magic ring.

Round 1 :

6sc inside MR (6)

Round 2 :

6inc (12)

Round 3 :

(1sc, inc) x6 (18)

Round 4 :

(2sc, inc) x6 (24)

Round 5 :

(3sc, inc) x6 (30)

Round 6 :

(4sc, inc) x6 (36)

Rounds 7-8 :

36sc (36)

Info :

Change yarn to the main color.

Rounds 9-15 :

36sc (36)

Info :

If you use the safety eyes, attach them between rounds 10 and 11 (leave 8 stitches between the eyes).

Round 16 :

(4sc, dec) x6 (30)

Round 17 :

(3sc, dec) x6 (24)

Info :

Fill the head with filler.

Round 18 :

(2sc, dec) x6 (18)

Round 19 :

(1sc, dec) x6 (12)

Info :

Add more filler to the head.

Round 20 :

6dec (6)

Info :

Cut the yarn, pull the hole. Hide the end of the thread inside the head.

β€” EARS :

Info :

EARS (make 2). Use the main color yarn. Magic ring.

Round 1 :

6sc inside MR (6)

Round 2 :

(1sc, inc) x3 (9)

Round 3 :

(2sc, inc) x3 (12)

Round 4 :

(3sc, inc) x3 (15)

Round 5 :

(4sc, inc) x3 (18)

Round 6 :

(5sc, inc) x3 (21)

Round 7 :

(6sc, inc) x3 (24)

Rounds 8-14 :

24sc (24)

Round 15 :

(6sc, dec) x3 (21)

Rounds 16-17 :

21sc (21)

Round 18 :

(5sc, dec) x3 (18)

Rounds 19-20 :

18sc (18)

Round 21 :

(4sc, dec) x3 (15)

Rounds 22-23 :

15sc (15)

Round 24 :

(3sc, dec) x3 (12)

Rounds 25-26 :

12sc (12)

Info :

Fold and crochet the edges together 6sc. Cut the yarn.

β€” TAIL :

Info :

Use the main color yarn. Magic ring.

Round 1 :

6sc inside MR (6)

Round 2 :

6inc (12)

Round 3 :

12sc (12)

Round 4 :

(2sc, dec) x3 (9)

Info :

Cut the yarn.

β€” FINISHING THE TOY :

Info :

1. Sew the head to the body. Sew the arms to the body, leave 4 stitches between the arms. Sew the tail to the back.

Info :

2. Sew the ears to the head between rounds 17 and 18.

Info :

3. Embroider the nose with pink thread between rounds 8 and 9. I got a nose 5 stitches wide. You can use any yarn you have (plush or cotton or acrylic). Hide the end of the thread inside the head.

Info :

4. Embroider the nose, the eyelashes and the brows with dark thread.

Info :

If you don’t use the safety eyes, embroidery the eyes, the nose and the brows with dark thread.

Info :

5. Tighten the muzzle with the thread of the main color. 1 -> 2 -> 3 -> 4 -> 5 -> 6 -> 7 -> 8

Assembly Instructions

  • Sew the head to the body and secure firmly by sewing through the neck stitches from the head to the body, ensuring the face sits centered.
  • Sew the arms to the body leaving 4 stitches between them; position each arm evenly on either side and sew with a ladder stitch for a neat finish.
  • Sew the tail to the back of the body at the center back, anchoring it firmly through several stitches so it stays attached during play.
  • Sew the ears to the head between rounds 17 and 18, pinning and checking symmetry before stitching to ensure even placement.
  • If using safety eyes attach them between rounds 10 and 11 with 8 stitches between eyes; if embroidering eyes follow the embroidery placement instructions and secure all thread ends inside the head.

Important Notes

  • πŸ’‘Work in continuous spiral rounds for all piecesβ€”do not join rounds with slip stitch unless instructed.
  • πŸ’‘Place safety eyes before stuffing fully to ease secure attachmentβ€”follow the round placement guidance (between rounds 10 and 11, 8 stitches apart).
  • πŸ’‘Stuff gradually and shape as you go; overstuffing can distort the plush look and under-stuffing will collapse the head and limbs.

This plush snuggler bunny is designed to be soft, cuddly, and easy to love, making it a delightful gift or nursery companion. Whether you embroider the face or use safety eyes, the expressive floppy ears and tiny tail give it timeless charm. Crochet one in your favorite plush yarn and enjoy the cozy results. 🧢🐰

You ask,

we answer.

FAQs

What size will the finished piece be?

The finished amigurumi measures approximately 41 cm / 16 inches tall when using the recommended plush yarn and 4 mm hook.

Can I use different yarn weights for this pattern?

Yes, you can use yarn analogues with similar bulky/plush weight, but the final size and look will change; adjust hook size accordingly.

Do I need prior crochet experience for this pattern?

This pattern is rated intermediate; basic knowledge of amigurumi techniques, working in spirals, increases and decreases is recommended.

How long does this project typically take to complete?

Most crocheters complete this project in 5-7 hours, though time may vary based on experience, chosen yarn, and finishing details.