๐Ÿงถ Beautiful โœจ Detailed ๐Ÿ’ Adorable

Potion Amigurumi Pattern

Potion Amigurumi Pattern
3.9โ˜… Rating
5-7 Hours Time Needed
2.3K Made This
โœ‚๏ธ

Intermediate Level

Ideal for those with basic crochet experience, featuring slightly more advanced stitches and techniques to expand your skills.

โฑ๏ธ

Weekend Treat

Takes 5-7 hours, making it an enjoyable project to finish over a couple of days.

๐Ÿงธ

Cute Companion

An adorable friend to cherish, handcrafted with love to bring comfort and joy for years to come.

About This Potion Amigurumi Pattern

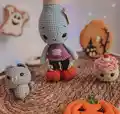
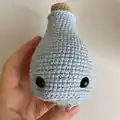
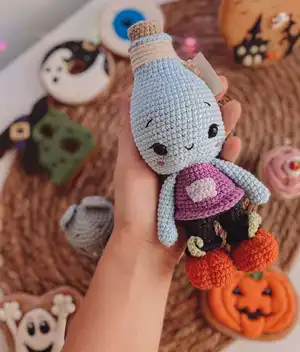
This pattern creates a sweet potion bottle amigurumi with a rounded head, tiny arms, a joined legs/body construction, and mini accessories like boots and a pocket. It features color changes, back/front loop work, and needle sculpting to shape facial expressions. You will learn to join legs into a body tube and add small embroidered details for personality.

Potion Amigurumi Pattern crochet pattern - detailed view of completed project

Designed for intermediate crocheters, the pattern assumes familiarity with basic amigurumi techniques. Detailed round-by-round instructions and placement notes are included for accurate assembly.

Why You'll Love This Potion Amigurumi Pattern

I absolutely love this pattern because it combines simple amigurumi shaping with playful details like a tapered bottle head and tiny boots that give the character so much personality. I enjoy the challenge of working into back loops and switching colors to create subtle ridges and texture. The needle-sculpting step lets me add expression with very little yarn, which always makes the finished piece feel alive. Sharing a pattern that produces a gift-ready toy in just a few hours fills me with joy, and I hope you feel the same satisfaction stitching it up.

Potion Amigurumi Pattern step 1 - construction progress Potion Amigurumi Pattern step 2 - assembly progress Potion Amigurumi Pattern step 3 - details and accessories Potion Amigurumi Pattern step 4 - final assembly and finishing

Switch Things Up

I love customizing this pattern by changing body and bottle colors to match different 'potions' โ€” try deep purple for a night potion or lime green for a bubbling brew.

If you want a chunkier, cuddlier version, use a bulkier yarn and a larger hook; this will make the toy bigger and softer.

For a tiny keychain version, switch to a thinner yarn and a smaller hook and reduce stuffing for a compact result.

I often add tiny crocheted props like a miniature cork or label to the neck to make each potion unique and story-ready.

Try embroidering different facial expressions: a wide smile, sleepy eyes, or a surprised look โ€” eye placement shifts can dramatically change personality.

Make seasonal variations by adding tiny motifs on the belly or boots โ€” pumpkins for fall or stars for a magical theme.

Use safety jointing for movable arms or add a bit of wire inside limbs for poseable options when gifting or displaying.

Experiment with textured stitches on the body or head to simulate liquid ripples or glass shimmer โ€” FLO/BLO rounds lend themselves to texture work.

I like to combine felt or tiny beads for labels and accessories for a mixed-media charm that stands out in photos.

Remember to test color changes and contrast on a small swatch to ensure your chosen yarns read well together before assembling the full amigurumi.

Common Mistakes & How to Fix Them

โœ— Skipping the instruction to work into back loops only can change the head and body texture; follow the BLO/FLO notes exactly to keep the correct ridges. โœ— Forgetting to install eyes between the specified rounds will make placement inaccurate; measure and place eyes between rounds 30-31 with 13 SC apart to match the photos. โœ— Not counting stitches after increases and decreases often leads to incorrect shaping; count each round and verify stitch totals shown in parentheses. โœ— Stuffing too early or too much can distort shaping during finishing; stuff gradually using a chopstick and finish shaping before tight closures to maintain smooth curves.

Potion Amigurumi Pattern

Create a whimsical potion bottle amigurumi with this full crochet pattern. You will make a cute, wearable-style toy with detailed shaping, color changes, and facial needle sculpting. The pattern includes step-by-step rounds, materials, and finishing tips so you can confidently stitch your own charming character. Perfect for gifting or adding a playful touch to your handmade collection.

Intermediate 5-7 Hours

Materials Needed for Potion Amigurumi Pattern

โ€” Main Fabric

  • 01
    Yarn Art Jeans colors 75, 72, 85, 19, 05 - small amounts of each color sufficient to make a ~19 cm toy
  • 02
    Black fine yarn for eyelashes and embroidery - small skein
  • 03
    Polyester toy stuffing - enough to firmly stuff head and body

โ€” Tools Required

  • 01
    Crochet hook size 1.75 mm
  • 02
    10-12 mm black plastic safety eyes (2 pieces)
  • 03
    Scissors
  • 04
    Needle for joining pieces and embroidering
  • 05
    Chopstick for stuffing
  • 06
    Pins for assembly
  • 07
    Stitch marker
  • 08
    Black fine yarn or embroidery thread for eyelashes

Progress Tracker

0% Complete

โ€” Head :

Info :

BEGIN CROCHETING IN GREY

Round 1 :

6SC INTO MR

Round 2 :

6INC (12)

Round 3 :

(1SC, INC)*6 (18)

Info :

WORK INTO BACK LOOPS ONLY

Round 4 :

18SC

Round 5-7 :

18SC

Info :

SWITCH TO BLUE YARN AND WORK INTO BACK LOOPS ONLY

Round 8 :

(2SC, INC)*6 (24)

Round 9-12 :

24SC

Round 13 :

(3SC, INC)*6 (30)

Round 14-15 :

30SC

Round 16 :

(4SC, INC)*6 (36)

Round 17 :

(5SC, INC)*6 (42)

Round 18 :

42SC

Round 19 :

(6SC, INC)*6 (48)

Round 20-21 :

48SC

Round 22 :

(7SC, INC)*6 (54)

Round 23-34 :

54SC

Round 35 :

(7SC, DEC)*6 (48)

Round 36 :

BLO (6SC, DEC)*6 (42)

Round 37 :

(5SC, DEC)*6 (36)

Round 38 :

(4SC, DEC)*6 (30)

Round 39 :

(3SC, DEC)*6 (24)

Info :

RETURN TO ROUND 8, WORK ACROSS THE FRONT LOOPS

Info :

INSTALL EYES BETWEEN ROUNDS 30-31, 13SC APART

โ€” Legs and Body :

Round 1 :

CHAIN 7, STARTING TO THE 2ND ST FROM HOOK WORK 5SC, 4SC TO 1 ST, 4SC, INC (13)

Round 2 :

INC, 4SC, 4INC, 4SC, 2INC (22)

Round 3 :

1SC, INC, 4SC, (1SC, INC)*4, 4SC, (1SC, INC)*2 (29)

Round 4 :

2SC, INC, 4SC, (2SC, INC)*4, 4SC, (2SC, INC)*2 (36)

Round 5-7 :

36SC

Round 8 :

12SC, 6DEC HDC, 12SC (30)

Round 9 :

(3SC, DEC)*6 (24)

Round 10 :

3SC, DEC, (1SC, DEC)*5, 4SC (18)

Round 11 :

2SC, DEC, (4SC, DEC)*2, 2SC (15)

Info :

CHANGE YARN COLOR

Round 12 :

15SC

Info :

WORK INTO BACK LOOPS ONLY

Round 13 :

15SC

Round 14-17 :

15SC

Info :

RETURN TO ROUND 13 AND WORK 15DC

Info :

WORK 5SC ADDITIONALLY ACROSS THE SECOND LEG

Info :

CYT YARN ON THE SECOND LEG, BUT DO NOT BREAK YARN ON THE SECOND ONE, GO ON WORKING ACROSS LEG #1: 15SC AND THEN ACROSS LEG #2: 15SC

Round 19 :

(4SC, INC)*6 (36)

Round 20 :

36SC

Info :

CHANGE YARN COLOR

Round 21 :

36SC

Info :

WORK INTO BACK LOOPS ONLY

Round 22 :

36SC

Round 23-25 :

36SC

Round 26 :

(4SC, DEC)*6 (30)

Round 27 :

30SC

Round 28 :

(3SC, DEC)*6 (24)

Round 29-31 :

24SC

Info :

RETURN TO ROUND 22, WORK 36DC

โ€” Arms :

Round 1 :

6SC INTO MR

Round 2 :

6INC (12)

Round 3 :

12SC

Round 4 :

10SC, DEC (11)

Round 5 :

9SC, DEC (10)

Round 6-14 :

10SC

Info :

A ROW THROUGH BOTH EDGES WORK

โ€” Veins on the Boots :

Info :

10CH, TURN AND STARTING TO THE 2ND ST FROM HOOK WORK 9 SL ST

โ€” Pocket :

Row 1 :

5CH, TURN YOUR WORK

Row 2 :

INC, 2SC, INC (6SC) TURN YOUR WORK

Row 3 :

6SC

Info :

SEW IT ON THE BELLY

โ€” Face & Finishing :

Info :

MAKE FACE NEEDLE SCULPTING, SEND YOUR NEEDLE FROM BELOW THE NECK TO THE PLACE UNDER ONE OF THE EYES, AND GO BACK DOWN 1 ST AWAY, PULL. REPEAT THE STEPS ABOVE FOR THE SECOND EYE. PULL AND TIE KNOTS

Info :

EMBROIDER BROWS AND A SMILE.

Assembly Instructions

  • Install the safety eyes between rounds 30-31 of the head, placing them 13 single crochets apart before needle sculpting and stuffing securely.
  • Join the legs into the body by returning to round 13 and working 15 DC across the join, then continue by working across both legs (15SC each) as instructed to form the torso tube.
  • Sew the arms to the body sides using a yarn needle, positioning them at the sides of the upper body and securing with hidden whipstitches so that they angle slightly forward.
  • Sew the pocket onto the belly in the center front using the provided 3-row pocket piece as a guide, aligning it with the color-change row for best appearance.
  • Attach the little boot veins and boot pieces to the legs, then secure and hide all tails inside the body before final stuffing adjustments.
  • Perform needle sculpting for the face by threading the needle from below the neck to under one eye and back, pull to create facial indentation, repeat for the other eye, then embroider brows and a smile and tie knots securely.

Important Notes

  • ๐Ÿ’กThis pattern does not include crochet lessons; it is designed for crocheters who have mastered basic stitches and amigurumi techniques.
  • ๐Ÿ’กUse stitch markers to mark the beginning of rounds and to maintain stitch counts during increases and decreases.
  • ๐Ÿ’กStuff firmly but gradually using a chopstick to achieve smooth shaping; overstuffing can distort the figure.
  • ๐Ÿ’กCheck stitch counts after each round to avoid mistakes, especially when following sequences with multiple increases or decreases.

Thank you for choosing this Potion Amigurumi pattern โ€” I hope it sparks a little magic in your hands! ๐Ÿงช This pattern is perfect for gifting or adding a whimsical friend to your handmade collection. ๐Ÿงถ Share your finished work and tag me on Instagram so I can see your adorable creations! โœจ

You ask,

we answer.

FAQs

What size will the finished piece be?

The finished toy measures about 19 cm with the recommended materials; size may vary depending on tension and yarn weight.

Can I use different yarn weights for this pattern?

Yes, you can change yarn weight, but this will affect the final size; adjust your hook accordingly and expect a larger or smaller finished toy.

Do I need prior crochet experience for this pattern?

This pattern is rated intermediate and assumes familiarity with amigurumi techniques such as magic ring, working into BLO/FLO, increases and decreases.

How long does this project typically take to complete?

Most crocheters complete this project in 5-7 hours, though time may vary by experience and how many details (like embroidery) you add.