๐Ÿงถ Beautiful โœจ Detailed ๐Ÿ’ Adorable

Psyduck-Baby Amigurumi Pattern

Psyduck-Baby Amigurumi Pattern
4.6โ˜… Rating
5-7 Hours Time Needed
2.0K Made This
โœ‚๏ธ

Intermediate Level

Ideal for those with basic crochet experience, featuring slightly more advanced stitches and techniques to expand your skills.

โฑ๏ธ

Weekend Treat

Takes 5-7 hours, making it an enjoyable project to finish over a couple of days.

๐Ÿงธ

Cute Companion

An adorable friend to cherish, handcrafted with love to bring comfort and joy for years to come.

About This Psyduck-Baby Amigurumi Pattern

This pattern creates a soft, chubby Psyduck-Baby amigurumi using plush yarn for a cuddly texture. The design features flat feet, a fluffy beak, small wings, a tail, and three strands of hair for character. Instructions include round-by-round shaping, switch-to-color notes, and simple detailing tips so you can finish a polished toy.

Psyduck-Baby Amigurumi Pattern crochet pattern - detailed view of completed project

The pattern uses accessible stitches like single crochet, increases and decreases, plus a bobble stitch for texture. Photos and placement notes help with accurate assembly and finishing.

Why You'll Love This Psyduck-Baby Amigurumi Pattern

I absolutely love this pattern because it transforms soft plush yarn into a charming, huggable Psyduck with minimal fuss. I enjoy the compact shapingโ€”it's satisfying to watch the body become chubby and rounded as you stuff it. The Beak and Feet details are clever and give the toy tons of personality without complex sewing. I also love that the pattern is adaptable; you can change colors or yarn weight to create different sizes and looks. Seeing the finished Psyduck held in your hand always makes me smile.

Psyduck-Baby Amigurumi Pattern step 1 - construction progress Psyduck-Baby Amigurumi Pattern step 2 - assembly progress Psyduck-Baby Amigurumi Pattern step 3 - details and accessories Psyduck-Baby Amigurumi Pattern step 4 - final assembly and finishing

Switch Things Up

I love how easy it is to customize this Psyduck-Baby pattern by changing colors and textures.

You can make a pastel version by substituting soft baby colors for Color A and Color B for a nursery-friendly toy.

To make a larger Psyduck, use a bulkier plush yarn and a larger hookโ€”this creates a chunkier, cuddlier result.

For a mini keychain, use a finer yarn and smaller hook, then attach a keyring to the top strand of hair.

I often swap the safety eyes for embroidered eyes or felt pieces for a more child-safe version.

Try adding tiny accessories like a crocheted bowtie or hat to personalize your Psyduck for gifts.

You can experiment with different stitch texturesโ€”replace some single crochet rounds with half double crochet rows for a slightly different body texture.

If you want poseable wings, consider inserting a small piece of flexible wire inside the wing tail before sewing it flat.

I sometimes stitch a small pocket on the back to store tiny notes or charms for a playful surprise.

Switching yarn fiber (acrylic vs plush) will change the drape and feelโ€”choose what matches your intended recipient best.

Common Mistakes & How to Fix Them

โœ— Skipping stitch markers when working flat foundation rounds can cause losing your place; use a stitch marker at the start of each round and especially when turning to the other side of the foundation chain. โœ— Forgetting to switch to Color B at the indicated round will leave the feet/beak in the wrong color; follow the note at Rnd 4 and change color exactly where instructed. โœ— Overstuffing the head or body can distort the shaping and make sewing pieces difficult; stuff gradually and shape the body to be chubby but not overly firm. โœ— Closing openings too early prevents correct placement of safety eyes and stuffing; insert safety eyes between rnd 15 and 16 and start stuffing the head and body only when instructed. โœ— Stuffing wings, beak, or tail will change their intended flat look and placement; do not stuff the Wings, Beak, or Tail and leave yarn tails for sewing as instructed.

Psyduck-Baby Amigurumi Pattern

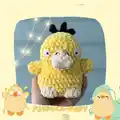
Make a cuddly Psyduck-Baby using plush yarn with this clear intermediate crochet pattern. You will get full round-by-round instructions, photos, and finishing notes so you can create a chubby, adorable Psyduck. Perfect for gifting or keeping as a cute handmade companion you will enjoy crafting.

Intermediate 5-7 Hours

Materials Needed for Psyduck-Baby Amigurumi Pattern

โ€” Main Fabric

  • 01
    Plush yarn (Premier Yarn recommended) - Color A: yellow (body)
  • 02
    Plush yarn (Premier Yarn recommended) - Color B: beige (feet/beak)
  • 03
    Plush yarn (Premier Yarn recommended) - Color C: black (detailing)

โ€” Tools Required

  • 01
    Crochet hook size 4.5mm
  • 02
    Plush yarn (see Yarn Colors above)
  • 03
    Safety eyes 10-12mm (2 pieces)
  • 04
    Polyfill stuffing
  • 05
    Embroidery/darning needle
  • 06
    Stitch markers
  • 07
    Scissors
  • 08
    Optional: Felt fabric (white)
  • 09
    Optional: Black bead (for eyes)
  • 10
    Optional: Superglue (to glue bead)

Progress Tracker

0% Complete

โ€” Materials & Abbreviations :

Info :

Materials: 4.5mm crochet hook. Plush yarn (see Yarn Colors). 10-12mm safety eyes. Polyfill stuffing. Embroider needle. Stitch markers. Scissor. Optional: Felt fabric (white). Black bead (for eyes). Superglue (to glue bead).

Infos :

Abbreviations: sc: single crochet. inc: increase. dec: invisible decrease. ch: chain. rnd: round. hdc: half double crochet. hdc-inc: half double crochet increase. bo: 5-dc bobble stitch. (...) *...: repeat the instruction in the (bracket) to the number of times. [...]: total number of stitch at the end of the round. slst: slip stitch.
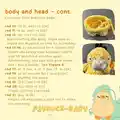
โ€” Body and Head (make 1) :

Round 1 :

foundation chain: ch 10; starting in the 2nd loop from hook: 8 sc, 3 sc in the last chain, (on the other side of foundation chain) 7 sc, inc [20]

Round 2 :

inc, 7 sc, 3 inc, 7 sc, 2 inc [26]

Round 3 :

sc, inc, 7 sc, (sc, inc) ร—3, 7 sc, (sc, inc) ร—2 [32]

Info :

Note: switch to Color B as indicated in Rnd 4. See "Detailing" on how to finish Psyduck feet (next to last page).

Round 4 :

2 sc, (sc + hdc) in 1 stitch, hdc-inc, (hdc, sc) in 1 stitch, 3 sc, (sc + hdc) in 1 stitch, hdc-inc, (hdc + sc) in 1 stitch, 21 sc [38]

Round 5 :

2 sc, 3 dec, 3 sc, 3 dec, 21 sc [32]

Round 6-8 :

sc all around for 3 rounds [32]

Round 9 :

3 dec, 3 sc, 3 dec, 17 sc [26]

Round 10 :

(11 sc, dec) ร—2 [24]

Round 11 :

(4 sc, dec) ร—4 [20]

Round 12 :

(sc, inc) ร—10 [30]

Info :

Start stuffing the Body. Make sure to shape our Psyduck so that he is chubby.

Round 13-16 :

sc all around for 4 rounds [30]

Info :

Insert the safety eyes between rnd 15 and 16, about 5-6 stitches apart. Alternatively, you can also glue white felt + black beads. See Figure 5.

Round 17 :

sc, 3 dec, 4 sc, 3 dec, 13 sc [24]

Round 18 :

sc all around for 1 round [24]

Info :

Start stuffing the Head.

Round 19 :

(2 sc, dec) ร—6 [18]

Round 20 :

(sc, dec) ร—6 [12]

Info :

Finish stuffing the Head.

Round 21 :

dec ร—6 [6]

Info :

Fasten off and leave a yarn tail to close the opening.

โ€” Wings (make 2) :

Round 1 :

6 sc in Magic Circle [6]

Round 2 :

(sc, inc) ร—3 [9]

Round 3-4 :

sc all around for 2 rounds [9]

Info :

Fasten off and leave a yarn tail for sewing the Wings to the Body. Do not close the opening. Do not stuff the Wings. Sew the Wings to the Body between rnd 9 and 11, about 7-8 stitches apart. You can choose to sew the Wings horizontally or diagonally. I did diagonally. Optional: you can sew the Wings to the Head for Psyduck's *confused* look.

โ€” Beak (make 1) :

Round 1 :

foundation chain: ch 4; starting in the 2nd loop from hook: 2 sc, 3 sc in the last chain, (on the other side of foundation chain) sc, inc [8]

Round 2 :

sc all around for 1 round [8]

Round 3 :

sc, (3 sc in 1 stitch) ร—2, 5 sc [12]

Info :

Fasten off. Leave a yarn tail for sewing. Do not stuff the Beak. Fold the Beak flat at the front (rnd 1) to create a flat front. Fold the opening to create a triangle. See Figure 10. Sew to the Head between rnd 12 and 15. Use black yarn to embroider his nose detail. See Figure 11.

โ€” Tail (make 1) :

Round 1 :

6 sc in Magic Circle [6]

Round 2 :

(sc, inc) ร—3 [9]

Round 3 :

(2 sc, inc) ร—3 [12]

Round 4 :

(3 sc, inc) ร—3 [15]

Info :

Fasten off and leave a yarn tail for sewing. Do not stuff the Tail. Fold the Tail flat and sew the Tail to the back of the Body between rnd 5 and 7.
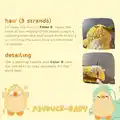
โ€” Hair (3 strands) :

Info :

To make his hair, in Color C, insert the hook at the middle of his Head: [chain 4, (starting from the 2nd chain from hook) 3 sc, slst into the same hole on the head] ร—3 strands

โ€” Detailing :

Info :

Use a darning needle and Color B, sew flat the Feet so they resemble his flat duck feet.

Assembly Instructions

  • Insert and secure the safety eyes between rnd 15 and 16, spacing them about 5-6 stitches apart; alternatively glue white felt circles and black beads for eyes according to Figure 5.
  • Sew the Beak to the Head between rnd 12 and 15, folding the Beak flat at the front and creating a triangular opening before stitching; embroider the nose detail with black yarn.
  • Sew the Wings to the Body between rnd 9 and 11, spacing them about 7-8 stitches apart and positioning them horizontally or diagonally as desired.
  • Fold the Tail flat and sew it to the back of the Body between rnd 5 and 7, using the yarn tail left from fastening off to stitch in place.
  • Use a darning needle and Color B to sew the Feet flat so they resemble Psyduck's flat duck feet, following the detailing photo reference.

Important Notes

  • ๐Ÿ’กUse stitch markers to mark the start of rounds and to keep track of safety eye placement and shaping.
  • ๐Ÿ’กStart stuffing the Body at rnd 12 to shape the chubby form, and start stuffing the Head at rnd 18; finish stuffing before closing.
  • ๐Ÿ’กDo not stuff the Wings, Beak, or Tail; leave yarn tails after fastening off for sewing these pieces flat to the body.
  • ๐Ÿ’กSwitch to Color B as indicated in Rnd 4 to create the beige feet/beak details as shown in the photos.
  • ๐Ÿ’กLeave long yarn tails when fastening off pieces so you can sew them neatly to the body without extra joins.

This sweet Psyduck-Baby pattern turns plush yarn into a lovable, chubby toy that's perfect for gifting or keeping. With clear round-by-round instructions and helpful photos, you can finish a polished amigurumi that will make you smile. Enjoy creating your handmade companion and share the joy of crochet! ๐Ÿงถ๐Ÿงต

You ask,

we answer.

FAQs

What size will the finished piece be?

The finished Psyduck-Baby measures approximately the size shown in the pattern photos when using plush Premier Yarn and a 4.5mm hook; exact size will vary with yarn weight and tension.

Can I use different yarn weights for this pattern?

Yes, you can use different yarn weights, but the final size and texture will change; choose an appropriate hook for your yarn and adjust stuffing and safety eye size accordingly.

Do I need prior crochet experience for this pattern?

This pattern is rated intermediate because it uses shaping, bobble-style texture and some finishing techniques; basic knowledge of single crochet, increases and decreases is recommended.

How long does this project typically take to complete?

Most crocheters complete this project in 5-7 hours, though time may vary depending on experience level, yarn choice, and how much time you spend on detailing and assembly.