🧢 Beautiful ✨ Detailed πŸ’ Adorable

Ragdoll Pocket Jellyfish Amigurumi Pattern

Ragdoll Pocket Jellyfish Amigurumi Pattern
4.7β˜… Rating
2-3 Hours Time Needed
3.7K Made This
βœ‚οΈ

Beginner Friendly Level

Perfect for those just starting their crochet journey, with clear instructions and simple techniques

⏱️

Bite-Sized Project

Finishes in 2-4 hoursβ€”perfect for an afternoon of creative relaxation.

🎁

Tiny Treasure

Small, sweet, and gift-worthy creations that fit perfectly in the palm of your hand with detailed charm.

About This Ragdoll Pocket Jellyfish Amigurumi Pattern

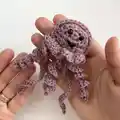
This pattern creates a pocket-sized ragdoll jellyfish with a rounded body and spiral tentacles. It uses basic US crochet stitches and simple shaping to form both sides of the body and the frilly skirt. The design is compact and portable, ideal for quick makes and thoughtful handmade gifts.

Ragdoll Pocket Jellyfish Amigurumi Pattern crochet pattern - detailed view of completed project

Photos are included to guide assembly and finishing steps, making the pattern printer-friendly. The pattern uses DK yarn and a 3.5mm hook for a soft, cuddly final piece.

Why You'll Love This Ragdoll Pocket Jellyfish Amigurumi Pattern

I absolutely love this pattern because it turns simple stitches into an irresistibly cute pocket-sized jellyfish that everyone adores. I enjoy how quickly the piece comes together, making it perfect for last-minute gifts or quick practice sessions. The curly tentacles give so much personality with very little work, and I always smile when I see the finished face. The pattern is forgiving for beginners but still offers little details to make each jellyfish unique and charming.

Ragdoll Pocket Jellyfish Amigurumi Pattern step 1 - construction progress Ragdoll Pocket Jellyfish Amigurumi Pattern step 2 - assembly progress Ragdoll Pocket Jellyfish Amigurumi Pattern step 3 - details and accessories Ragdoll Pocket Jellyfish Amigurumi Pattern step 4 - final assembly and finishing

Switch Things Up

I love experimenting with colors for this jellyfish; try bright neons for a playful look or soft pastels for a sweet, baby-friendly version.

I often change yarn weight and hook size to make a mini or jumbo version; thicker yarn with a bigger hook creates a chunkier, cuddlier jellyfish.

I like adding beads or sequins to the tips of the tentacles for a little sparkle and extra texture that catches the light.

I sometimes skip safety eyes and embroider eyes instead for a softer, child-safe toy using small French knots or stitched circles.

I make the tentacles longer or shorter depending on the effect I want; you can change the CH 21 and CH 28 to other lengths for varied curls.

I add a small keyring at the top to turn the jellyfish into a portable charmβ€”perfect for backpacks or keys.

I experiment with two-tone bodies by using a contrasting color for the exterior DC row so the frill stands out more visually.

I like to embroider little freckles or tiny smiles to change the expression and personality of each jellyfish I make.

I sometimes use cotton yarn for a firmer texture that works well when attaching to bags or keychains and feels nice in warm weather.

I recommend trying metallic or variegated yarns for tentacles to create beautiful gradient curls that look unique every time.

Common Mistakes & How to Fix Them

βœ— Skipping placement of safety eyes before closing the body can make attachment difficult later; place and secure safety eyes on the second body side as instructed before joining.
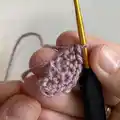
 βœ— Not stuffing as you go often results in uneven shapes and lumps; stuff gradually during assembly and add small amounts to shape the dome smoothly.
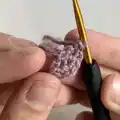
 βœ— Working into both loops at the straight edge instead of only the inside loops will prevent proper closure; follow the instruction to SC only in the inside loops when closing the straight part.
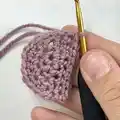
 βœ— Cutting yarn at the end of the first body side will disrupt the continuous join process; do not fasten off on the second body part so you can join and work around without cutting the yarn.

Ragdoll Pocket Jellyfish Amigurumi Pattern

Make a tiny, squishable pocket jellyfish you can carry everywhere. This sweet amigurumi uses simple stitches and creates a charming toy with curled tentacles. Perfect for gift-making or a quick, satisfying crochet session. Photos are included to guide each step and keep the pattern printer-friendly.

Beginner Friendly 2-3 Hours

Materials Needed for Ragdoll Pocket Jellyfish Amigurumi Pattern

β€” Main Fabric

  • 01
    DK acrylic yarn (DK / light worsted) - small amount for one jellyfish (use cotton yarn as an alternative)
  • 02
    Black embroidery thread - small amount for mouth
  • 03
    Polyester fibrefill or scraps of yarn for stuffing

β€” Tools Required

  • 01
    Crochet hook size 3.5mm
  • 02
    1mm safety eyes (pair)
  • 03
    Scissors
  • 04
    Metal yarn needle
  • 05
    Optional: Keyring (if making a keychain)

Progress Tracker

0% Complete

β€” Body :

Info :

BODY (MAKE 2): -slipknot, CH 2, SC 3 times in the 2nd CH from hook

Round R1 :

R1 – SC 2 times in each ST (6 sts total) CH 1, turn

Round R2 :

R2 – INC, SC 1, repeat until end of row (9 sts total), CH 1, turn

Round R3 :

R3 - INC, SC 2, repeat until end of row (13 sts total) CH 1

Round R4 :

R4 – starting from where the row ended and working on the bottom (the straight side) SC in 8 ST spaces to form a straight row (picture is marked to show which ST spaces)

Round R5 :

R5 - SC in each ST – CH 1, turn

Round R6 :

R6 – SC in each ST, fasten and cut yarn

Infos :

*on the second body part don’t fasten yarn, add the safety eyes on each side of the starting centre point (the row above the straight row). *bring both sides together and start to SC along the edges. *stuff as you go. *when reaching the straight part, SC only in the inside loops until closed. *when that row is finished CH 1 and start working in the loops on the exterior. *DC 3 times in each loop around (39 sts in total), SLST in the CH from the beginning of this row. *working in the middle row (the one in between the DC sts) make: SLST in first ST. SLST in next ST, CH 21, starting form 2nd CH SC 2 times in each CH, SLST back in the same ST. SLST in next ST, CH 28, starting form 2nd CH SLST in each CH, SLST back in the same ST. SLST in next ST. SLST in next ST, CH 21, starting form 2nd CH SC 2 times in each CH, SLST back in the same ST. SLST in next ST, CH 28, starting form 2nd CH SLST in each CH, SLST back in the same ST. SLST in next ST. SLST in next ST, CH 21, starting form 2nd CH SC 2 times in each CH, SLST back in the same ST, fasten, cut and weave in yarn tail. *with black thread add a mouth in V shape working through the back, make a knot and tuck in ends.

Assembly Instructions

  • On the second body piece do not fasten off; add the 1mm safety eyes on each side of the starting centre point (the row above the straight row) before joining the two halves.
  • Bring both body sides together aligning the straight edges and begin single crocheting around the edges to join, stuffing gradually as you close the seam.
  • When you reach the straight section, work single crochet only into the inside loops until closed, then CH 1 and continue working into the exterior loops as instructed.
  • Work DC 3 times in each loop around the exterior to form the frilly skirt (39 sts total), then SLST into the CH from the beginning of that row to finish.
  • In the middle row between the DC loops, follow the SLST and chain instructions to create curled tentacles (CH 21 and CH 28 sections), finishing each set with a SLST back in the same stitch.
  • Embroider a small V-shaped mouth with black thread by working through the back of the fabric, knot securely and tuck in ends; fasten, cut and weave in remaining yarn tail.

Important Notes

  • πŸ’‘Do not fasten off the yarn on the second body half so you can join both sides and continue working with the same strand.
  • πŸ’‘Add safety eyes on the second body piece before you close the edges; place them at the starting centre point above the straight row for correct spacing.
  • πŸ’‘Stuff the body as you go to achieve a smooth dome shape and avoid lumps during final closure.
  • πŸ’‘Work single crochet only in the inside loops when closing the straight part to ensure a neat seam before working the exterior loops.

This tiny Ragdoll Pocket Jellyfish is perfect for gifting or keeping in your pocket for instant smiles. The curled tentacles and sweet embroidered face make each one unique and full of charm. Make a whole collection in different colors to brighten your day! πŸ§ΆπŸŽ€

You ask,

we answer.

FAQs

What size will the finished piece be?

The finished amigurumi is pocket-sized and will measure roughly 6-9 cm tall depending on your tension and yarn choice.

Can I use a different yarn weight or hook size?

Yes, you can change yarn weight and hook size, but this will alter the finished size; use an appropriately sized hook for your yarn and expect adjustments in stitch counts and final dimensions.

Do I need to know special stitches to make this jellyfish?

No special stitches are required beyond basic US terms: CH, SC, SLST, DC and simple increases; this pattern is beginner friendly with photo guidance.

How are the tentacles created?

Tentacles are worked by making chains (CH 21 and CH 28) and then working back into each chain with repeated stitches to curl them, following the SLST anchors in the middle row.