🧢 Beautiful ✨ Detailed πŸ’ Adorable

Rainbow Bunny Amigurumi Pattern

Rainbow Bunny Amigurumi Pattern
4.3β˜… Rating
5-7 Hours Time Needed
1.8K Made This
βœ‚οΈ

Intermediate Level

Ideal for those with basic crochet experience, featuring slightly more advanced stitches and techniques to expand your skills.

⏱️

Weekend Treat

Takes 5-7 hours, making it an enjoyable project to finish over a couple of days.

🧸

Cute Companion

An adorable friend to cherish, handcrafted with love to bring comfort and joy for years to come.

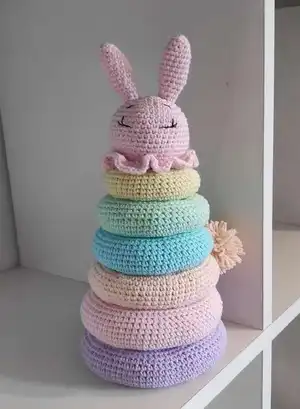
About This Rainbow Bunny Amigurumi Pattern

This pattern shows you how to crochet a pastel Rainbow Bunny stacking ring toy made from soft yarn. You will make six stackable rings, a cone base, a bunny head with ears and a ruffle, and sew everything together. The design uses simple rounds, increases and decreases to shape the rings and cone for neat stacking.

Rainbow Bunny Amigurumi Pattern crochet pattern - detailed view of completed project

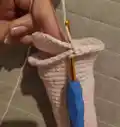
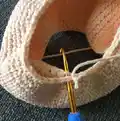
Detailed round-by-round instructions and photos are included to guide you through assembly. Suitable for crafters comfortable with basic amigurumi shaping and sewing.

Why You'll Love This Rainbow Bunny Amigurumi Pattern

I absolutely love this pattern because it combines playful stacking rings with a sweet bunny topper, making it both decorative and functional. I enjoyed choosing pastel shades β€” they give the toy a gentle, calming look that is perfect for nurseries. The construction uses repetitive rounds that feel meditative yet produce satisfying progress. Sewing the cone and rings together and adding the embroidered face brings the whole project to life for me.

Rainbow Bunny Amigurumi Pattern step 1 - construction progress Rainbow Bunny Amigurumi Pattern step 2 - assembly progress Rainbow Bunny Amigurumi Pattern step 3 - details and accessories Rainbow Bunny Amigurumi Pattern step 4 - final assembly and finishing

Switch Things Up

I love customizing this design by changing the colors β€” try muted tones for a modern nursery or vibrant primaries for a playful look.

I often experiment with different yarn weights and hooks to alter the finished size: a bulkier yarn makes a chunky, cuddly version while thinner yarn creates a mini stack.

Swap the cone length or add extra rounds to create taller or shorter versions; measure as you go so the rings still stack correctly.

I sometimes replace the embroidered face with safety eyes for older children or felt features for a softer, handmade look.

Try adding a little wire inside the ears if you want posable ears that can be bent into different expressions.

Make a keychain mini by using finer yarn and a smaller hook, and reduce ring counts for a tiny portable version.

Consider crocheting removable outfits or tiny accessories β€” a little scarf, bow or hat gives each bunny its own personality.

For a festive twist, use sparkly or variegated yarn for one or two rings to catch the light and add visual interest.

I sometimes embroider a small name or initial on the largest ring to personalize it for a baby shower gift.

Experiment with different stuffing amounts for each ring to change how tightly they stack; I prefer slightly firmer stuffing in the bottom rings for stability.

Common Mistakes & How to Fix Them

βœ— Skipping the stitch marker can cause you to lose track of round endings; use a marker and move it after finishing each round to stay accurate. βœ— Not leaving long yarn tails when finishing body parts makes sewing difficult later; leave around 10-15 cm of yarn for sewing each part except the head. βœ— Under- or over-stuffing rings creates uneven stacking and shape problems; stuff gradually and evenly while crocheting to maintain consistent ring shapes. βœ— Forgetting to count stitches after increases or decreases leads to incorrect stitch counts; count stitches after rounds with shaping to ensure correct totals. βœ— Pulling your tension too tight on small rings can distort circumference measurements; maintain a consistent, moderate tension and check ring circumference as you go.

Rainbow Bunny Amigurumi Pattern

Create a soft pastel Rainbow Bunny stacking ring toy for little hands with this detailed crochet pattern. You will work colorful rings, a cone base and a cute bunny head with ears and ruffle detail. The pattern includes full round-by-round instructions, materials list, and helpful notes so you can follow along easily and assemble a charming handmade toy you will love to gift or keep.

Intermediate 5-7 Hours

Materials Needed for Rainbow Bunny Amigurumi Pattern

β€” Main Fabric

  • 01
    Yarn 'YARN-ART JEANS' pink color N 74 (55 g)
  • 02
    Yarn 'YARN-ART JEANS' purple color N 89 (26 g)
  • 03
    Yarn 'YARN-ART JEANS' Peach color N 73 (15 g)
  • 04
    Yarn 'YARN-ART JEANS' Blue color N 76 (10 g)
  • 05
    Yarn 'YARN-ART JEANS' Green color N 79 (9 g)
  • 06
    Yarn 'YARN-ART JEANS' Yellow color N 67 (8 g)
  • 07
    But you can take any yarn and color you like

β€” Tools Required

  • 01
    Crochet hook 2.5 mm
  • 02
    Toy filling (polyester stuffing)
  • 03
    Stitch marker or a little piece of a different color yarn
  • 04
    Needles for sewing up
  • 05
    A small amount of black yarn to embroider the eyes
  • 06
    Scissor
  • 07
    Pins for assembly

Progress Tracker

0% Complete

β€” Cone :

Round 1 :

5 sc in MR

Round 2 :

5 inc (10)

Round 3 :

(sc, inc) x 5 (15)

Round 4-8 :

sc in each st (15)

Round 9 :

(2sc, inc) x 5 (20)

Round 10-18 :

sc in each st (20)

Round 19 :

(3sc, inc) x 5 (25)

Round 20-28 :

sc in each st (25) start to staff the detail gradually and evenly

Round 29 :

(4sc, inc) x 5 (30)

Round 30-36 :

sc in each st (30)

Round 37 :

(5sc, inc) x 5 (35)

Round 38-43 :

sc in each st (35)

Round 44 :

(6sc, inc) x 5 (40)

Round 45-47 :

sc in each st (40)

Round 48 :

(7sc, inc) x 5 (45)

Round 49 :

(8sc, inc) x 5 (50)

Info :

Finish with a slip stich. Cut the yarn leaving a long tail for sewing.

Info :

The length of cone should not exceed 17-18 cm.

β€” The bottom of the cone :

Round 1 :

7 sc in MR.

Round 2 :

7 inc (14)

Round 3 :

(sc, inc) x 7 (21)

Round 4 :

(2 sc, inc) x7 (28)

Round 5 :

(3 sc, inc) x 7 (35)

Round 6 :

(4 sc, inc) x 7 (42)

Round 7 :

(5 sc, inc) x 6, 4 sc, 2 inc (50)

Round 8 :

sc in each st (50)

Info :

Sew the bottom and the cone together.

β€” Ring 1 :

Info :

PURPLE COLOR

Round 0 :

ch 60. sl st the end to the first ch to make a ring

Round 1 :

sc into the same ch that you just did a sl st into, sc around (60)

Round 2 :

(sc, inc) x 30 (90)

Round 3-16 :

sc in each st (90)

Round 17 :

(sc, dec) x 30 (60)

Round 18 :

sc in each st (60)

Info :

Leave a long enough end to sew it together (see pictures). let's start to stuff the detail gradually and evenly. Preferably, the circumference of 1and 2 rings should be 10 cm.

β€” Ring 2 :

Info :

PINK COLOR

Round 0 :

ch 54. sl st the end to the first ch to make a ring

Round 1 :

sc into the same ch that you just did a sl st into, sc around (54)

Round 2 :

(sc, inc) x 27 (81)

Round 3-16 :

sc in each st (81)

Round 17 :

(sc, dec) x 27 (54)

Round 18 :

sc in each st (54)

Info :

Leave a long enough end to sew it together. let's start to stuff the detail gradually and evenly. Preferably, the circumference of 1 and 2 rings should be 10 cm.

β€” Ring 3 :

Info :

PEACH COLOR

Round 0 :

ch 50. sl st the end to the first ch to make a ring

Round 1 :

sc into the same ch that you just did a sl st into, sc around (50)

Round 2 :

(sc, inc) x 25 (75)

Round 3-15 :

sc in each st (75)

Round 16 :

(sc, dec) x 25 (50)

Round 17 :

sc in each st (50)

Info :

Leave a long enough end to sew it together. let's start to stuff the detail gradually and evenly. Preferably, the circumference of ring should be 9 cm.

β€” Ring 4 :

Info :

BLUE COLOR

Round 0 :

ch 44. sl st the end to the first ch to make a ring

Round 1 :

sc into the same ch that you just did a sl st into, sc around (44)

Round 2 :

(sc, inc) x 22 (66)

Round 3-15 :

sc in each st (66)

Round 16 :

(sc, dec) x 22 (44)

Round 17 :

sc in each st (44)

Info :

Leave a long enough end to sew it together. let's start to stuff the detail gradually and evenly. Preferably, the circumference of ring should be 9 cm.

β€” Ring 5 :

Info :

GREEN COLOR

Round 0 :

ch 38. sl st the end to the first ch to make a ring

Round 1 :

sc into the same ch that you just did a sl st into, sc around (38)

Round 2 :

(sc, inc) x 19 (57)

Round 3-14 :

sc in each st (57)

Round 15 :

(sc, dec) x 19 (38)

Round 16 :

sc in each st (38)

Info :

Leave a long enough end to sew it together. let's start to stuff the detail gradually and evenly. Preferably, the circumference of ring should be 9 cm.

β€” Ring 6 :

Info :

YELLOW COLOR

Round 0 :

ch 34. sl st the end to the first ch to make a ring

Round 1 :

sc into the same ch that you just did a sl st into, sc around (34)

Round 2 :

(sc, inc) x 17 (51)

Round 3-13 :

sc in each st (51)

Round 14 :

(sc, dec) x 17 (34)

Round 15 :

sc in each st (34)

Info :

Leave a long enough end to sew it together. let's start to stuff the detail gradually and evenly.

β€” Assembly :

Info :

Sew the bottom and the cone together.

Info :

Sew the obtained cone to the first ring with a needle.

Info :

Leave long yarn ends from each ring to sew pieces together and stuff gradually and evenly while assembling.

Info :

Embroider facial details (eyes) using a small amount of black yarn after assembling the top detail.

Assembly Instructions

  • Sew the bottom and the cone together along the edge so the cone is closed and secure before attaching to the rings.
  • Sew the obtained cone to the first (largest) ring with a needle, positioning the cone center into the ring opening and stitch evenly.
  • Leave long yarn ends when you finish each ring (except the head) so you can sew rings together and to the cone, and stuff gradually and evenly as you assemble.
  • Stack the rings onto the cone from largest (bottom) to smallest (top), adjusting stuffing to ensure each ring has consistent shape and circumference before final sewing.
  • Embroider the eyes with black yarn and attach any ruffle or ear details to the top piece after the rings are secured.

Important Notes

  • πŸ’‘Use a stitch marker to mark the ending of the round and move the stitch marker after finishing each round.
  • πŸ’‘When finishing any of the body parts except the head leave a long yarn tail (around 10-15cm) which you can use for sewing.
  • πŸ’‘Fill the stuffing into the body parts while crocheting them and be sure to fill the rings with the same amount of fiberfill so rings will have the same shape.
  • πŸ’‘Work with the recommended 2.5 mm crochet hook and check ring circumferences as suggested to achieve the correct finished size.

This pastel Rainbow Bunny stacking toy is a delightful handmade project that brightens nurseries and playrooms with soft colors and charming details. It makes a thoughtful gift for little ones or a sweet decor piece for your home. Enjoy the process and savor each stitch as your tower of rings comes to life! 🧢🐰✨

You ask,

we answer.

FAQs

What size will the finished piece be?

The finished toy measures approximately 27 cm (10.62 inch) tall when using the recommended yarn, hook size and stuffing amounts.

Can I use different yarn weights for this pattern?

Yes, you can use different yarn weights, but the final size will change. Choose an appropriate hook for your yarn and check ring circumferences while working.

Do I need prior crochet experience for this pattern?

This pattern is rated intermediate, so basic knowledge of single crochet, increases, decreases, working in the round and simple sewing is recommended.

How long does this project typically take to complete?

Most crocheters complete this project in 5-7 hours, though time may vary depending on experience level, yarn choice and assembly pace.