🧢 Beautiful ✨ Detailed πŸ’ Adorable

Reversible Cat Amigurumi Pattern

Reversible Cat Amigurumi Pattern
4.9β˜… Rating
1-2 Hours Time Needed
3.8K Made This
βœ‚οΈ

Beginner Friendly Level

Perfect for those just starting their crochet journey, with clear instructions and simple techniques

⏱️

Quick Make

Complete in under 2 hoursβ€”lightning fast fun for instant gratification and quick gifts.

🧸

Cute Companion

An adorable friend to cherish, handcrafted with love to bring comfort and joy for years to come.

About This Reversible Cat Amigurumi Pattern

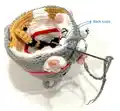
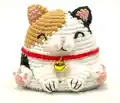
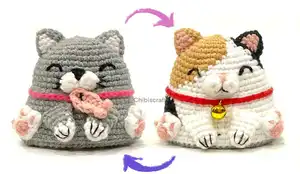
This instruction sheet explains how to join two completed chibiscraft cat amigurumis to make a reversible cat. It focuses on the safe knotting and sewing technique using the yarn tails from the magic rings. The method ensures a neat finish and allows you to flip between two faces without stuffing or bulky joins.

Reversible Cat Amigurumi Pattern crochet pattern - detailed view of completed project

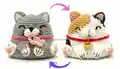
The guide is photo-supported and written in plain language so even beginners can follow. It assumes you have two finished cats ready and shows how to align and sew the final rounds together.

Why You'll Love This Reversible Cat Amigurumi Pattern

I absolutely love this pattern because it turns two separate amigurumis into a charming reversible companion that doubles the fun. I enjoy the clever use of the magic ring tails to create a secure join without adding bulk or visible seams. The technique is simple and satisfying, and you can complete it quickly as a finishing touch to your projects. It's the kind of small finishing skill that makes handmade toys look professional and makes me proud to gift them.

Reversible Cat Amigurumi Pattern step 1 - construction progress Reversible Cat Amigurumi Pattern step 2 - assembly progress Reversible Cat Amigurumi Pattern step 3 - details and accessories Reversible Cat Amigurumi Pattern step 4 - final assembly and finishing

Switch Things Up

I love experimenting with different color combinations when making reversible cats; swapping the color schemes can make two completely different characters.

You can use a contrast top color for Cat B so the inner face pops when reversed.

If you want a smaller reversible toy, use finer yarn and a smaller hook to reduce the finished size.

For a chunkier version, choose bulkier yarn and a larger hook to make a plush reversible cat that feels extra cuddly.

I sometimes add a small bell or charm to the collar of one face to create a playful surprise when reversed.

Try embroidering alternate facial expressions on each cat so flipping it changes the mood instantly.

To personalize gifts, I add initials or tiny motifs on the inside piece before joining them together.

For a sturdier join, I reinforce the seam with an extra row of stitches using matching yarn and then hide the tail inside.

If you like posable toys, consider adding a small wire spine before final sewing to help the cat hold a pose when flipped.

I also enjoy making sets with coordinating accessories so each reversible cat has a tiny hat or scarf that complements both faces.

Common Mistakes & How to Fix Them

βœ— Tying the knot too tightly between the magic rings can distort the shapes of the cats; leave about 1-2 cm space before tightening to preserve shape and adjust later.
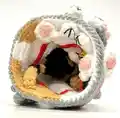
 βœ— Trying to stuff cat A after inserting it into cat B will make joining difficult and messy; do not stuff cat A once you begin the joining process so it fits inside smoothly. βœ— Sewing through both loops instead of the back loops only can make the seam visible from the outside; sew through the back loops of each piece to keep the join neat and hidden. βœ— Not lining up the faces before sewing causes an off-center reversible effect; push cat A inside cat B and check face alignment carefully before stitching to ensure both faces match.

Reversible Cat Amigurumi Pattern

This short guide shows you exactly how to join two chibiscraft cat amigurumis to make a reversible cat. You will learn the safe, neat method to knot and sew the pieces together so both faces line up perfectly. Follow these clear photo-supported steps to create a tidy, reversible toy you can flip for two looks.

Beginner Friendly 1-2 Hours

Materials Needed for Reversible Cat Amigurumi Pattern

β€” Main Fabric

  • 01
    2 completed chibiscraft cat amigurumis (Cat A and Cat B) made from the main yarn of the original pattern
  • 02
    Yarn tails from the magic rings: Cat A short tail (last stitch of body) and Cat B long tail (last stitch of body) used for joining

β€” Tools Required

  • 01
    Tapestry needle
  • 02
    Scissors
  • 03
    Long yarn tail from Cat B (used for sewing the pieces together)
  • 04
    Yarn tail from Cat A (used to tie the initial knot)
  • 05
    Fiberfill (optional, mentioned as not needed for Cat A during joining)

Progress Tracker

0% Complete

β€” Tips :

Infos :

Each cat amigurumi should be worked using the same weight of yarn, same hook size, and same stitch tension to maintain their similarities in size. It is highly recommended that you read through the pattern completely before beginning to make your reversible amigurumi.

β€” Material :

Infos :

Tapestry needle. Scissors. 2 chibiscraft's cat amigurumies: Cat A : has short yarn tail from the last stitch of its body. Cat B : has long yarn tail from the last stitch of its body. This tail will be used to join both cats.

β€” Procedure to Join Both Cats :

Step 1 :

Turn both cats inside out with the wrong/ugly sides facing you.

Step 2 :

Tie a knot with the yarn tails from the magic rings of both of them, leaving a space between them (about 1-2 cm).

Step 3 :

Turn the cat B back with the right/good side facing you, and leave the cat A intact at the wrong/ugly side.

Step 4 :

No need to stuff with fiberfill.

Step 5 :

Push the cat A inside the cat B.

Step 6 :

Since there is not any shared part between them, you have the option to line up both faces.

Step 7 :

Join the last rounds of both cats.

Step 8 :

Sew them together with yarn tail of cat B through the back loops of each piece.

Step 9 :

To finish, make a knot and hide the tail.

β€” Finishing :

Info :

After sewing and knotting, tuck and hide any remaining tails inside the body so both outer faces look neat and reversible from the outside.

β€” Congratulations :

Info :

Congratulations! Your reversible cat amigurumi is ready.

Assembly Instructions

  • Turn both cats inside out so the wrong/ugly sides are facing you before you begin joining them.
  • Tie a knot using the yarn tails from the magic rings of both cats, leaving about 1-2 cm of space between the knots to preserve shape.
  • Turn cat B back so its right/good side faces outward, leave cat A with the wrong/ugly side out, and push cat A inside cat B without adding stuffing.
  • Align both faces as desired, then sew the last rounds of both cats together by stitching through the back loops of each piece using the long yarn tail from cat B.
  • Secure the seam with a final knot and hide the tail inside the body so the reversible join appears neat and seamless.

Important Notes

  • πŸ’‘Use the same yarn weight, hook size, and stitch tension for both cats so they match in size and fit neatly together.
  • πŸ’‘Leave approximately 1-2 cm of space when tying the initial knot between the magic ring tails to avoid distorting the shapes.
  • πŸ’‘Do not stuff cat A after inserting it into cat B; the guide specifically advises no fiberfill for the inserted piece.
  • πŸ’‘Sew through the back loops of the last rounds to keep the seam hidden and maintain the reversible appearance.

This reversible cat joining guide helps you turn two cute amigurumis into one delightful flip-toy that shows two faces. The method is quick, tidy, and gives you a professional-looking finish every time. Make one for yourself or gift a reversible pal to surprise someone special. 🧢🐱

You ask,

we answer.

FAQs

What do I need to join two cats?

You need two completed chibiscraft cat amigurumis (Cat A and Cat B), the yarn tails from their magic rings, a tapestry needle, and scissors.

How much space should I leave when tying the knot between the magic ring tails?

Leave about 1-2 cm of space between the knots to prevent distorting the shapes and to make final adjustments before sewing.

Do I need to stuff the inserted cat before joining?

No, the instructions advise that there is no need to stuff Cat A once it is inserted into Cat B; leaving it unstuffed helps it fit inside neatly.

How do I make the seam invisible on the outside?

Sew the last rounds together by stitching through the back loops only; this keeps the seam tucked and less visible from the outside.