About This Reversible Octo Mood Hat Pattern
This pattern makes a reversible octopus mood hat by crocheting two matching hat bases and joining them together for a flip-able look. It features double crochet rounds, a ruffled brim created with front loop work, and embroidered facial details for two moods. The construction is largely no-sew apart from face embroidery, making assembly quick and neat.
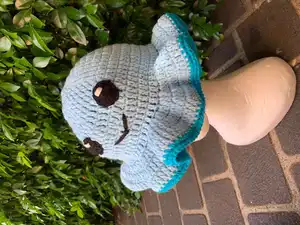
You will create two hat crowns in contrasting colors and join their brims with a third color for a neat reversible finish. The hat is adult-sized but easily adjustable by removing increase rows for smaller sizes.
Why You'll Love This Reversible Octo Mood Hat Pattern
I absolutely love this pattern because it blends playful design with practical construction — a reversible hat gives you two looks in one. I enjoy how customizing colors instantly changes the personality of the hat and makes each version unique. The ruffled brim adds a lovely silhouette that keeps the pattern fun and engaging to make. Sewing only the facial embroidery keeps the assembly minimal while allowing expressive finishing touches.
Switch Things Up
I love how easily you can change the hat's personality by swapping colours; try pastel shades for a softer look or neon colours for bold drama.
You can change the size by removing one or more increase rows (especially between rows 6-8) to make a child-sized version.
I often make a chunky version by using a bulkier yarn and a larger hook, which creates a thicker, warmer hat perfect for winter.
For a mini keychain or child-sized toy, use fingering or DK weight yarn with a smaller hook to create a tiny octo hat.
I sometimes add felt backing to the embroidered eyes for extra stability and a cleaner finish — glue or sew them before embroidery.
Try adding a small pompom or tassel at the crown knot for a playful accent that also hides the triple knot securely.
You can embroider different mouth shapes and eyebrow positions to create an entire mood collection—happy, sleepy, surprised, and grumpy all look great.
Consider using variegated yarn for one crown and a solid for the other to get a textured, two-tone reversible effect without extra sewing.
I like to edge the brim with a contrasting slip stitch row instead of HDC for a delicate finish if I want a subtler reversal.
For extra stability on the brim, try a lighter weight interfacing or a thin wire sewn into the edge, which helps the ruffle hold shape for photos or display.
I sometimes stitch on small appliques or tiny crocheted accessories (like a star or a shell) to give the hat a themed look for gifts.
Don’t be afraid to mix fibers; a cotton blend crown paired with an acrylic brim can give different drape and texture that’s interesting and wearable.
Common Mistakes & How to Fix Them
✗ Skipping the initial chain count can make your rows off and uneven; always start each row with ch2 and count it as the first dc to keep stitch counts accurate.
✗ Not placing a stitch marker when joining brims can misalign the faces; place a marker to match face placement and ensure both brims line up before joining.
✗ Working with inconsistent tension causes the ruffle to be too tight or too floppy; maintain medium to tight tension and check your ruffle as you go, adjusting hook size if necessary.
✗ Forgetting to embroider the face before joining the hats can make placement difficult; complete eye and mouth embroidery on each crown while separate to ensure even positioning after joining.
✗ Overstretching the brim while joining can distort the shape; join with relaxed tension and shape the brim gently after finishing to maintain the ruffled look.