🧢 Beautiful ✨ Detailed πŸ’ Adorable

Round Bag with T-Shirt Yarn Pattern

Round Bag with T-Shirt Yarn Pattern
4.1β˜… Rating
2-4 Hours Time Needed
1.9K Made This
βœ‚οΈ

Beginner Friendly Level

Perfect for those just starting their crochet journey, with clear instructions and simple techniques

⏱️

Bite-Sized Project

Finishes in 2-4 hoursβ€”perfect for an afternoon of creative relaxation.

✨

Stylish Touch

An elegant detail to elevate any look, combining traditional techniques with contemporary design sensibilities.

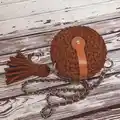
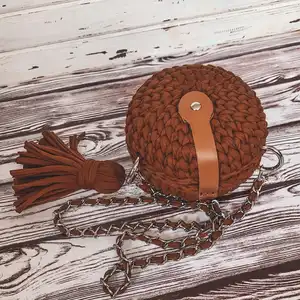
About This Round Bag with T-Shirt Yarn Pattern

This pattern shows you how to crochet a round bag using t-shirt yarn and a 6 mm hook, creating two stiff circular panels joined into a compact crossbody bag. It includes clear step-by-step rounds for the base, edge finishing, assembly instructions for hardware, and a simple tassel tutorial. Youll learn how to steam and shape the panels for a neat finish and how to attach chain and snap hooks for a polished result.

Round Bag with T-Shirt Yarn Pattern crochet pattern - detailed view of completed project

Perfect for beginners who want a quick wearable project, the pattern uses basic single crochet and increases to form the circle. Full materials, abbreviations, and assembly steps are included so you can finish a complete bag.

Why You'll Love This Round Bag with T-Shirt Yarn Pattern

I absolutely love this pattern because it turns simple t-shirt yarn into a structured, fashionable bag with surprisingly little effort. I enjoy how quickly the circle grows with chunky yarn and how the steam finishing gives a professional look. I love that the pattern is beginner friendly yet produces a polished accessory that people ask about. I also enjoy adding a handmade tassel and chain to personalize each bag and make it uniquely mine.

Round Bag with T-Shirt Yarn Pattern step 1 - construction progress Round Bag with T-Shirt Yarn Pattern step 2 - assembly progress Round Bag with T-Shirt Yarn Pattern step 3 - details and accessories Round Bag with T-Shirt Yarn Pattern step 4 - final assembly and finishing

Switch Things Up

I love how easy it is to customize this pattern with different colors of t-shirt yarn; try a two-tone circle for a modern look.

I often change the hardware to match my outfit, using antique brass rings instead of silver for a vintage feel.

If you want a firmer bag, I sometimes insert a thin felt circle between the layers before joining to add structure.

To make a mini keychain version, use thinner yarn and a smaller hook to scale down the entire pattern.

I like to experiment with strap styles β€” try a short leather strap for a handbag or a long chain for a crossbody vibe.

For a beachy look, use lighter natural colors and add a large pompom instead of the tassel.

Consider embroidering a small motif on one panel before joining to personalize the bag.

I sometimes line the bag with fabric for added durability and a neat interior finish; choose a coordinating fabric and hand sew it in place.

Try attaching a zipper instead of a valve if you want a more secure closure; sew it carefully into the unconnected 7-8 inch gap when joining panels.

I also enjoy making matching accessories like a small coin pouch or wristlet using the same circular base technique for a coordinated set.

Common Mistakes & How to Fix Them

βœ— Not taking the yarn from the outside of the bobbin can cause the yarn to twist and tangle; always pull the thread from the outside of the bobbin so the yarn unwinds smoothly. βœ— Crocheting perpendicular with the hook can create holes in the fabric when using t-shirt yarn; hold the hook at an angle and pull the working thread just above the level of the stitch to avoid gaps. βœ— Failing to hide the starting end after round 2 leaves a visible hole in the center; pull the end through all stitches of the 1st row from the wrong side, tighten and hide the end to close the hole. βœ— Ironing at high heat without a damp cloth can leave a shine on the canvas; always steam or iron through a damp cloth to protect the t-shirt yarn and maintain a matte finish. βœ— Cutting the thread too early before joining panels can make joining awkward; dont cut the thread after round 6 or 8 until youve prepared the trims and are ready to join. βœ— Skipping the base trim SlSt step can make the edge look unfinished and uneven; follow the pull-loop under 1st SC method and crochet SlSt in each loop for a tidy base edge.

Round Bag with T-Shirt Yarn Pattern

Make a stylish round crossbody bag using chunky t-shirt yarn and a 6 mm hook. This beginner-friendly pattern walks you through crocheting two circular panels, joining them, and adding hardware and a tassel for a professional finish. Youll enjoy a quick, tactile project that produces a durable, fashionable accessory perfect for gifts or everyday use.

Beginner Friendly 2-4 Hours

Materials Needed for Round Bag with T-Shirt Yarn Pattern

β€” Main Fabric

  • 01
    T-shirt yarn, width 7-9 mm, approximately 131 yards (120 meters), main color (quantity: 1 skein)
  • 02
    Sewing thread matching yarn color, small amount for attaching hardware and finishing

β€” Tools Required

  • 01
    Crochet hook N6 - 6 mm
  • 02
    Set of hardware: chain 47 inches (120 cm), valve with button, 2 snap hook-rings, 3 snap hooks
  • 03
    Sewing needle
  • 04
    Needle with large eyelet (for threading yarn through chain links)
  • 05
    Scissors
  • 06
    Iron and damp cloth (for steaming and shaping edges)
  • 07
    Sewing thread with matching color
  • 08
    Pins (optional, for aligning pieces while joining)

Progress Tracker

0% Complete

β€” Materials and tools :

Info :

T-shirt yarn, width 7-9 mm, 131 yard (120 meters); Hook N6 - 6 mm; Set of furniture (chain - 47 inches (120 cm); valve with button; 2 snap hook-rings; 3 snap hooks); Sewing thread; Sewing needle; Needle with large eyelet; Scissors; Iron and damp cloth. Finished bag from the specified materials: diameter - 7-8inches (18-20 cm), width - 4 3/8 inches (11 cm). Gauge: 9 stitches and 8 row = 4*4 inches (10*10cm).

β€” Abbreviation :

Infos :

CH - chain stitch. SlSt - slip stitch. SC - single crochet. Inc - increase (2 SC in 1).

β€” Crochet the base(circle) :

Info :

Crochet 2 CH.

Round 1 :

1 row. Crochet 6 SC in the 2nd loop from the hook. In the 1st SC crocheth CH like on the video.

Info :

Next, crochet the split single stich. For that, we need to insert the hook between the legs of each stitch, to split the stitch from the face and from the wrong side.

Round 2 :

2 row. 1 Inc*6= 12, CH.

Info :

After crocheting 2nd row, the hole will be formed in the middle. The end needs to be hidden and thus the hole will be removed.

Info :

Pull the end through all the stitches of the 1st row from the wrong side. Tighten, strengthen, hide and cut the end of the thread.

Info :

The hole is gone.

Round 3 :

3 row. (1 SC, 1 Inc)*6 = 18, CH.

Round 4 :

4 row. (2 SC, 1 Inc)*6 = 24, CH.

Round 5 :

5 row. (3 SC, 1 Inc)*6 = 30, CH.

Round 6 :

6 row. (4 SC, 1 Inc)*6= 36, CH. Don't cut the thread. Steam the circle with an iron through a damp cloth at high setting. T-shirt yarn can withstand high temperatures. But, need to iron through a damp cloth so that the canvas does not shine.

Round 7 :

7 row. 36 SC, CH.

Round 8 :

8 row. 36 SC. Don't cut the thread.

Info :

Pull the loop under 1st SC, pull out on the wrong side under last SC. Crochet the base trim SlSt in the each loops. Cut the end. Pull the end under 1st SlSt, pull back on the wrong side. Strengthen and hide the end.

Info :

Steam the edge with an iron through a damp cloth. Similarly, crochet the second part of the bag.

β€” Assembly :

Info :

Join the 2 parts of the bag with the edges. Insert the hook in the loops of the previous row of both parts of the bag. Pull out the loop. Again, insert the hook in the loops of the previous row of both parts of the bag. Pull out the next loop, crochet SlSt. Each time, insert the hook, first in one part, then in the other. Crochet SlSt, leave unconnected 7-8 inches (18-20 cm). Strengthen and hide both ends of the thread on the wrong side.

Info :

Insert the snap hook-rings in the places where the connecting seam ends.

Info :

Sew on the valve. Sew on the top part of the valve. Then, position the lower part of the valve to where it is supposed to be and sew on it.

Info :

Cut off the piece of the yarn 48 inches (122 cm) long. Pass the piece of the yarn through each link of the chain with the needle with large eyelet. Sew in the ends with the sewing needle and the sewing thread with the color of the yarn.

β€” Finish and Tassel :

Info :

Fasten the shoulder strap to the snap hook-rings.

Info :

Cut off 20-25 pieces of the yarn 13-14 inches (33-35 cm) long. Intercept with a longer piece in the middle. Put a snap hook on the piece of the yarn.

Info :

Wrap the bundle with a long piece several times.

Info :

Tie the ends, hide them under the turns. Spread the tassel with hands, cut off the ends exactly. Hang the tassel on any snap hook-ring.

Info :

Congratulations! Your cute bag is readyπŸ‘

Assembly Instructions

  • Join the two crocheted circular panels by inserting the hook into the loops of the previous row of both parts, pull out a loop, repeat inserting the hook into each panel alternately and crochet SlSt; leave an unconnected opening of 7-8 inches (18-20 cm) for the valve/closure placement before fastening off.
  • Insert snap hook-rings at the seam ends where you want the shoulder strap to connect, ensuring rings are aligned on both sides before securing the seam ends.
  • Sew the magnetic valve by attaching the top part first to the flap area, then position the lower part of the valve on the front panel where the flap will close and sew securely with sewing thread.
  • Create the chain shoulder strap by cutting a 48 inch (122 cm) piece of yarn and threading it through each chain link with a large-eye needle, then sew and secure the yarn ends with matching sewing thread.
  • Attach the shoulder strap clasps to the snap hook-rings and fasten to check alignment and balance, adjusting ring positions if needed for an even hang.

Important Notes

  • πŸ’‘Take the yarn from the outside of the bobbin so it unwinds smoothly and does not twist while you crochet.
  • πŸ’‘When crocheting with t-shirt yarn, pull the working thread just above the level of the stitch and hold the hook at an angle to avoid holes in the fabric.
  • πŸ’‘Steam or iron the circle panels through a damp cloth at high setting to shape and flatten without creating shine on the yarn.
  • πŸ’‘Hide ends by pulling the tail through the first row from the wrong side and secure before continuing to avoid visible holes.

Thank you for choosing this round t-shirt yarn bag pattern β€” I hope it inspires your next handmade accessory! πŸ‘œ This pattern is designed to be beginner friendly while delivering a polished, professional finish you can be proud of. ✨ Enjoy making it for yourself or as a thoughtful handmade gift, and dont forget to add your personal touches for a unique result. 🧡

You ask,

we answer.

FAQs

What size will the finished piece be?

The finished bag measures approximately 7-8 inches (18-20 cm) in diameter and about 4 3/8 inches (11 cm) in width using the specified t-shirt yarn and a 6 mm hook.

Can I use different yarn weights for this pattern?

Yes, but changing yarn weight will change the final size and drape; if you use thicker yarn use a larger hook, and for thinner yarn use a smaller hook, adjusting rounds as needed to reach desired diameter.

Do I need prior crochet experience for this pattern?

This pattern is rated beginner friendly, so basic knowledge of single crochet, increases, and slip stitch is sufficient to complete the bag successfully.

How long does this project typically take to complete?

Most crocheters complete this project in 2-4 hours, depending on experience and speed, plus extra time for assembly, sewing on hardware, and making the tassel.

How do I close the hole formed after round 2?

Pull the end through all the stitches of the 1st row from the wrong side, tighten, strengthen and hide the tail; this removes the central hole and tidies the circle.