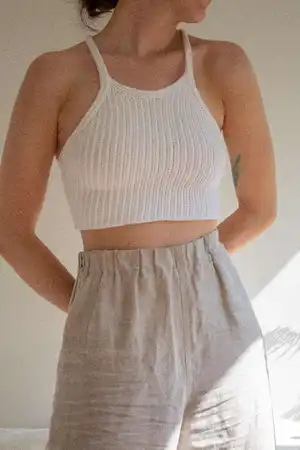
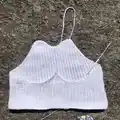
Make a stylish cropped racerback top with this written Roza Top Version B pattern. You will work alternating rows of half double crochet and yarn-over slip stitches to create a clean ribbed texture. The pattern includes sizing for XS to 5XL, step-by-step assembly, blocking advice, and pictured finishing techniques to help you complete a polished handmade top.
Progress Tracker
0% Complete
— Body :
Info :
Start by chaining (41,45,49,53,57,61,65,69,73). This number will determine the length of the top, specifically the length in the back. If you want it to be longer than stated in the size chart for measurement B and C, you can just write in a different number for the starting chains in the Excel sheet just above your size.
Round 1 :
In the second and third ch from the hook, make one hdc (one decrease). In the next two chs, make one hdc (one decrease). Hdc once in each remaining ch. Ch 1 and turn.
Round 2 :
Yoslst into the front loop of each stitch until you have four stitches left. Make one yoslst in the first two stitches (one decrease) and one yoslst in the last two stitches (one decrease). Ch 1 and turn.
Round 3 :
Make one hdc in the first two stitches (one decrease) and another hdc in the following two stitches (one decrease). Hdc once in each remaining ch. Ch 1 and turn.
Round 4 :
For sizes S-5XL: Row 4 – (4,5,6,7,8,9,10,11): Repeat row 2 and 3 until you’ve made the number of rows stated above for your size (for size S, you only repeat row 2). Ch 1 and turn after each row.
Round 5 :
For all sizes: Row (4,5,6,7,8,9,10,11,12) – (6,8,10,12,14,16,18,20,22): Continue alternating between a row of hdc in the back loop and a row of yoslst in the front loop but decrease one on every row. Decrease at the beginning of every row of hdc and at the end of every row of yoslst. Ch 1 and turn after each row.
Round 6 :
Row (7,9,11,13,15,17,19,21,23) – (11,14,17,20,23,26,29,32,35): Continue alternating between a row of hdc and a row of yoslst. Make no increases or decreases. Ch 1 and turn after each row.
Round 7 :
Row (12,15,18,21,24,27,30,33,36) – (26,30,35,42,46,51,56,61,66): Continue alternating between hdc and yoslst but make one increase on every row. Increase at the beginning of every row of hdc and increase at the end of every row of yoslst. Ch 1 and turn after each row.
Round 8 :
Row (27,31,36,43,47,52,57,62,67) – (40,48,56,64,72,80,88,96,104): Keep alternating between hdc and yoslst but increase two on every row.
Round 9 :
Row (41,49,57,65,73,81,89,97,105) – (42,50,58,66,74,82,90,98,106): Make one row of hdc and one row of yoslst. No increases or decreases.
Round 10 :
Row (43,51,59,67,75,83,91,99,107) – (48,58,68,76,87,97,106,116,126): Decrease one on every row.
Round 11 :
Row (49,59,69,77,88,98,107,117,127) – (52,62,72,82,93,103,114,124,134): No increases or decreases. We have now made it past the halfway point!
Round 12 :
Row (53,63,73,83,94,104,115,125,135) – (58,70,82,92,106,118,130,142,154): Increase one on every row.
Round 13 :
Row (59,71,83,93,107,119,131,143,155) – (60,72,84,94,108,120,132,144,156): No increases or decreases.
Round 14 :
Row (61,73,85,95,109,121,133,145,157) – (74,90,105,116,134,149,164,179,194): Decrease two on every row.
Round 15 :
Row (75,91,106,117,135,150,165,180,195) – (89,106,123,138,157,174,191,208,225): Decrease one on every row.
Round 16 :
Row (90,107,124,139,158,175,192,209,226) – (94,112,130,146,166,184,202,220,238): No increases or decreases.
Round 17 :
Row (95,113,131,147,167,185,203,221,239) – (97,116,135,152,173,192,211,230,249): Increase one on every row.
Round 18 :
Row (98,117,136,153,174,193,212,231,250) – (99,119,139,159,179,199,219,239,259): Increase two on every row.
Round 19 :
Row (100,120,140,160,180,200,220,240,260): No increases or decreases.
Info :
Great! We are now finished with the body of the top, but do not cut the yarn just yet. The next step is to block the top (this is not absolutely necessary, but I highly recommend it as the ribbed rows might turn out looking a bit skewed otherwise).
— Blocking :
Info :
Make the last loop a bit bigger to keep it from unravelling while blocking. Grab your top and gently submerge it in lukewarm water. Let it sit for 15-20 minutes and make sure it is completely wet before taking it out. Wring out the excess water but do it carefully so you don’t accidentally unravel anything. Grab a blocking board or towel and place your top on it. Use pins to pin your top into the shape and size you want it to be. Use the measurements in the chart but if you want to make it slightly bigger you can stretch it out a bit. Let it fully dry before moving on to the next step.
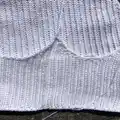
— Seaming :
Info :
Start by watching THIS YouTube video, where I show you how to seam the back of the top and make the bottom edge. Fold your top in half with right sides facing each other. The right side is the 'ribbed' side. Insert your hook into the first loop of both edges and make a slip stitch. Then repeat the same process for the rest of the edge until it is fully attached. You should now be at the bottom edge.
— Bottom edge :
Info :
Turn the top inside out so you have the right sides facing out. There are now two options available for the bottom edge. Either you make a single row of sc, or you make a few more rows of sc and insert an elastic band. I will explain both options.
Info :
If you only want to make a single row of sc, then make one sc for every row on the body of the top. This will cause the edge to be a little tighter. Sl st to the first sc you made and then cut the yarn and fasten the loose end.
Info :
If you want to include the elastic band, make one sc for every row of yoslsts and two scs for every row of hdcs. Sl st to the first sc you made, then ch 1. Make additional rows of sc (sc once into each stitch from the previous round) until the length is a little over double the width of the elastic band. My band was 5 mm wide, so I made enough rows until the edge was around 12 mm (which ended up being 5 rows). After that you can tie a knot so that your work is secure, then measure around 1 m of yarn and cut it off. Grab your elastic band and cut it so that it’s narrower than the edge of the top (or it won’t really do much). I cut mine 7 cm smaller than my waist circumference, and then I also overlapped the ends of the band maybe 1.5 cm. Use sewing thread and needle to sew together the ends of the elastic band, creating a closed circle. Then fold the bottom of the edge inwards with the band inside. Using your tapestry needle, sew the folded edge shut all the way around using a hemming or overcast stitch. Fasten and cut the yarn.
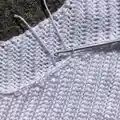
— Edges and straps :
Info :
With the right sides facing out, we are now going to make the remaining edges and straps. Start by watching THIS YouTube video.
Step 1 :
Place the top with its back facing up. We’re going to start on the right side of the middle (I know I said left side in the video (my bad!) but you can really start either side, it doesn’t matter!). Try to locate approximately where the armpit of the top would be (it doesn’t have to be too precise). Insert your hook into the top edge, yarn over and pull through. We’re going to sc along the edge, placing two sc for every row of hdc and one sc for every row of yoslst, until we reach the middle back. Make sure to stop when you are right on top of the seam.
Step 2 :
We’re now going to create the strap that will attach to the front of the top, using chains. The number of chains will be highly individual, so I won’t be telling you exactly how many to make. I made 80 chains for a size S but I suggest starting around that number, attaching to the stitch mark on the opposite side with a sc and trying it on. It shouldn’t feel too tight or too loose.
Step 3 :
After you are happy with the number of chains you’ve made (write this number down), and you have sc into the stitch with the second stitch marker we placed in the front, you should now have a strap. Now, continue toward the armpit until you’ve made it back to where you first started. Sl st to the first sc you made.
Step 4 :
Ch 2 and do not turn. Hdc into every stitch from the previous round, including the chains. Then sl st to the first ch 2.
Step 5 :
Ch 1 and turn. Make yoslst into the front loop of every stitch from the previous round. Then sl st to the first ch 1.
Step 6 :
Ch 2 and turn. Hdc into the back loop of every stitch from the previous round. Sl st to the first ch 2.
Step 7 :
Repeat step 5. Then cut the yarn and fasten the loose end.
Step 8 :
Locate the opposite armpit and insert your hook into the top edge. Sc along the edge until you reach the other stitch marker in the front. Place on sc into this stitch then start chaining to make the other strap. We will not make the same number of chs as we did for the other strap as they are supposed to be connected to each other. I chose to have the last 15 chs connected but this number is optional. So I took the number of chains I made for the first strap and subtracted 15. Then I counted the last 15 stitches on the other strap and that is where I inserted my hook. I then slip stitched into each 15 stitches until I reached the middle seam of the body.
Step 9 :
After the strap is made and the two straps are connected at the bottom, continue with sc along the edge until you’re back at the armpit again. Sl st to the first sc.
Step 10 :
Repeat steps 4-7.
Step 11 :
We’re now going to make the front edge. For the other two versions, A and C, this edge goes all the way around the straps and to the back as well, but for version B we will instead keep it along the front edge and crochet back and forth. Lay your top down with the front facing up.
Step 12 :
Insert your hook into the top right corner, right next to where the strap is connected to the body. Yarn over and pull through, then ch 1. Carefully remove the loop from your hook and insert your hook into the first stitch of the strap, grab the loop again and pull through.
Step 13 :
Sc along the front edge until you reach the strap on the opposite side. Sl st to the first stitch on the strap, ch 1 and turn.
Step 14 :
Carefully remove the loop from your hook and insert your hook into the next stitch on the strap, grab the loop and pull through. Make yoslst into each sc from the previous row (you don’t have to worry about doing them in the front loop now, just insert them into the 'main' loops) until you reach the opposite strap. Sl st to the next stitch on the strap, then ch 2 and turn.
Step 15 :
Remove the loop from your hook, insert your hook into the next stitch on the strap, grab the loop again and pull through. Hdc into the back loop of each stitch until you reach the other strap. Sl st to the next st on the strap, ch 1 and turn.
Step 16 :
For the final row we’re going to make yoslst sts. Repeat the same process of attaching to the next stitch of the strap and then yoslst st to the other side. Sl st to the strap. Cut the yarn and fasten the loose end.
Info :
You are now finished with your top!!
This Roza Top Version B pattern gives you a chic racerback crop top you can wear all summer long. The ribbed texture and clean edges make it both modern and timeless. Whether you make one for yourself or as a thoughtful handmade gift, this top is fun to make and easy to style. 🧶✨