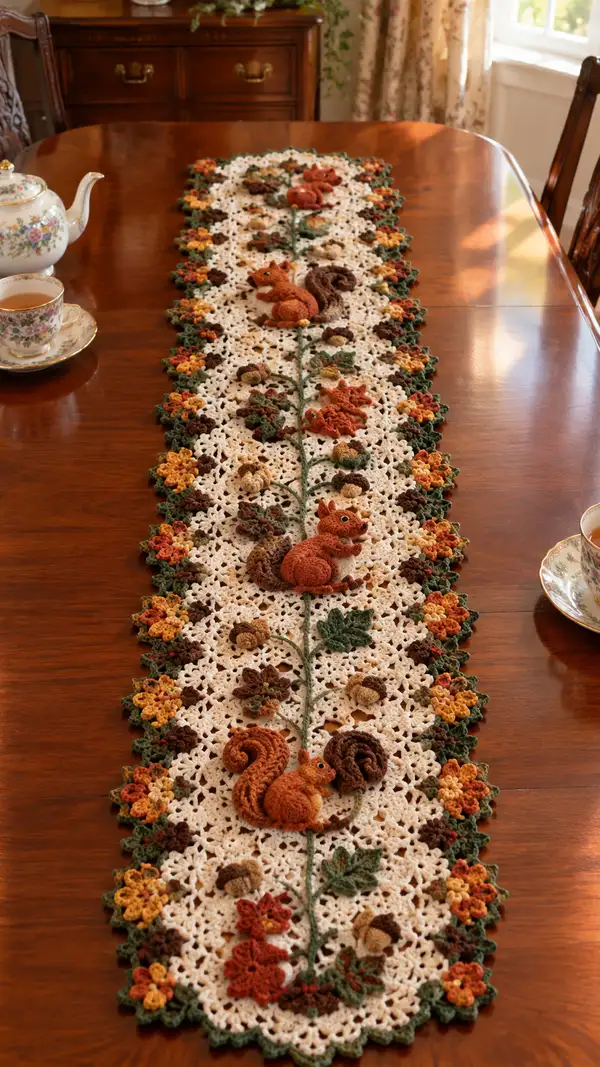
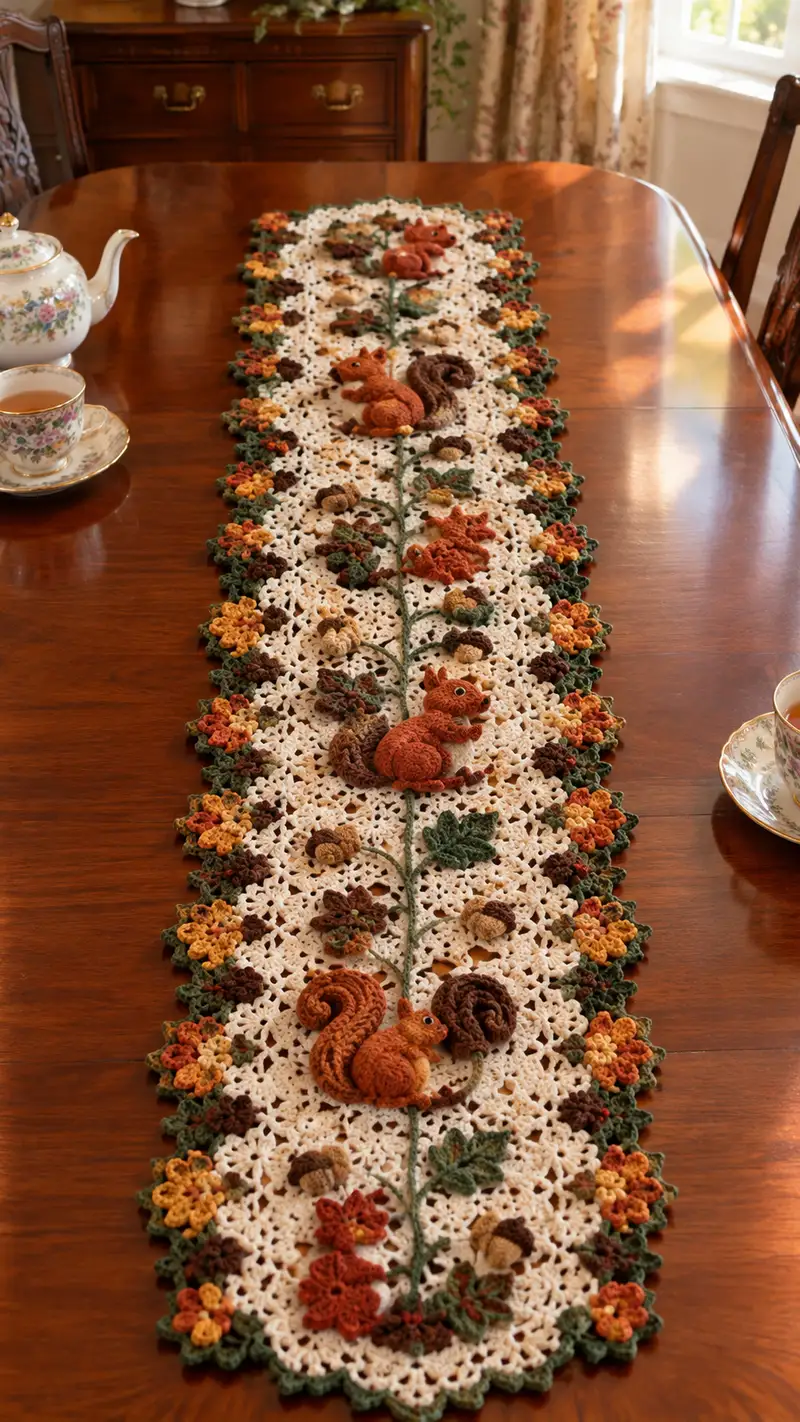
A warm autumn table runner featuring crocheted cream lace motifs, an embroidered green vine down the center, and 3D rust-and-brown squirrels, acorns, leaves and floral clusters at the edges. This richly textured runner combines delicate openwork with sculpted elements to create a charming harvest centerpiece. Finished with a scalloped multicolor border in greens, golds, rust and chocolate browns, it brings country elegance and seasonal cheer to any table.
Progress Tracker
0% Complete
— Notes and Overview :
Info :
This pattern describes all parts used to create the Rust and Cream Squirrel Vine Table Runner: the lace square motif (join-as-you-go), decorative scalloped border, crocheted vine cord, 3D squirrels (each made from head, body, tail, legs, ears), acorns (cap and body), leaves and small decorative flowers. Work motifs flat, block each square, then join-as-you-go along the length to create a long narrow runner approximately 14" wide by 52" long (estimate with specified yarn and hooks). Adjust number of motifs to suit your table length.
Info :
Gauge is not critical for motif join-as-you-go assembly, but consistency is important so motifs line up. Blocks will be approximately 3-3.5 inches square unblocked, 4-4.25 inches blocked; runner in photo is 13-15 motifs long by 3 across (3 columns) for a narrow rectangular runner. Use safety eyes or embroider the squirrel eyes according to preference and household safety concerns.
— Lace Floral Square Motif (make 45-48 motifs; make extra)
Round 1 :
With cream yarn, mr, ch3 (counts as dc), 11 dc into ring, sl st to top of ch3 to join (12 dc)
Round 2 :
Ch3, dc in same st, *ch2, (2 dc) in next st; rep from * around making 12 pairs separated by ch2, sl st to join (24 dc, 12 ch2 sps)
Round 3 :
Sl st into first ch2 sp, ch3, (2 dc, ch2, 3 dc) in same ch2 sp (first corner made), *sk next pair, (3 dc, ch2, 3 dc) in next ch2 sp; rep from * around to create 6 corner shells, sl st to join (6 shell corners)
Round 4 :
Ch1, sc in same st, *ch4, skip to next shell center and sc in central dc of shell, repeat along to create 6 long spaces; at corner shells work (sc, ch4, sc) in corner ch2 space; sl st to join (6 long ch4 sps plus corner ch4s)
Round 5 :
Working into each ch4 space around: (sc, hdc, 3 dc, hdc, sc) to form petal clusters; at corners work (sc, 2hdc, 5dc, 2hdc, sc) to expand corner; sl st to join. Motif now measures approx 3-3.5" unblocked.
Info :
Block each completed square to an even size before joining. Use pins and a damp cloth or gentle steam. Blocking ensures cleaner joins and a flat background for sewing 3D elements.
Round 6 :
Ch1, sc in each st and into top of petals around to create a neat edge (approx 40-48 sc depending on tension). Sl st and finish off leaving long tail for join-as-you-go (approx 6" tail).
Info :
Make motifs in batches: alternate a few cream motifs, then assemble center column first. Suggestion: 3 motifs across and 15-16 motifs length for runner shown. Make extras to allow placement of embellishments.
— Join-as-you-go Assembly of Motifs (center panel)
Round 1 :
Lay out motifs in rows of 3 across. With RS facing, hold first motif A and motif B adjacent (A on left, B on right). Use the long tail from motif B then sc around edge of motif B to join into motif A by replacing corner sc with sl st into corresponding sc on motif A to join; work sc in each st across edge, sl st into matching stitches on A every 3-4 sc to secure. Repeat to join second motif in row. (Join method: seam using sc and occasional sl st anchors)
Info :
Alternatively you can join motifs by whip stitch or mattress stitch with yarn needle. Join-as-you-go creates a stronger, flatter seam. Keep joins tight but not so tight that motifs pucker.
Round 2 :
When joining rows lengthwise, join the next row to the previous row by matching edge scs and working sc through both motifs every 2-3 stitches to create secure seam. Maintain consistent spacing so motifs align in columns.
Info :
Work the entire runner center panel by joining motifs into 3-column width then lengthwise. The cream background should be flat and even before adding the green vine and 3D pieces.
— Scalloped Multi-Color Border and Edge Flowers
Round 1 :
With forest green, attach at outer edge of runner with sl st, ch1, sc around edge working 1 sc in each petal top and 2 sc in corner points to keep corners flat. Work evenly so edge remains flat (approx 120-150 sc total around runner depending on length).
Round 2 :
Switch to small flower colors (mustard, rust, chocolate) for clustered flowers: In chosen sc, ch3, (3 dc, ch2, 3 dc) to make small cluster petal, sl st to next spaced sc leaving 2-3 sc between clusters; continue alternating small 5-dc flower clusters and 2 sc base to create a garland of tiny flowers at the edge.
Round 3 :
Return to forest green and work a final scallop of (sl st, ch3, 3 dc, ch3, sl st) anchored into spaces between flower clusters to create a scalloped leafy outer border. Fasten off and weave ends.
Info :
Use multiple colors to create the textured floral clusters seen along both long edges. Make small three-dimensional five-petal flowers (pattern below) and sew them atop clusters for extra depth.
— Small Five-Petal Flower (make 40-50 for border clusters)
Round 1 :
With color A (mustard), mr, ch1, work 5 sc into ring, sl st to join (5)
Round 2 :
*(ch3, sl st) into next sc; rep from * around to make 5 ch3 loops for petals. (5 loops)
Round 3 :
In each ch3 loop work (sl st, sc, hdc, dc, hdc, sc), sl st to base, fasten off leaving long tail for sewing. Make small clusters of 2-3 flowers in varied colors and sew to border.
Info :
Sew flower clusters into the scalloped border at approximately every 6-8 sc along the edge to mirror the photo. Mix colors for an autumn palette: mustard, rust, chocolate, tan.
— Embroidered Stem / Vine (center)
Round 1 :
With forest green, work a chain long enough to run down the center of the runner: ch 1 then ch to length approximately 48" (estimate) or the length of runner; fasten off. This is your base vine cord.
Round 2 :
Lay cord centered along runner. With matching green, using yarn needle and surface crochet technique, work slip-stitch loops along the chain to create an embroidered raised vine. Alternatively, overlay single crochet along both sides of chain to create a thick stem: insert hook into fabric beside chain, pull up loop, sc around chain to tack it down. Continue down length.
Info :
Placement :
Place vine so it intersects centers of the square motifs forming a continuous path; use pins to secure and adjust before final stitching.
— Squirrel: General Notes (make 4 squirrels — small, medium, large as seen)
Info :
Squirrel is crocheted in separate pieces and sewn together: head, body (torso), tail (sculpted spiral), two ears, four legs (make two larger hind legs and two smaller front paws), optional tummy panel in cream. Work tightly with 3.0mm hook for 3D parts so stuffing doesn't show. Use rust/orange for main body, dark brown for tail highlight and underside, cream for small tummy or face patches. Safety eyes 6mm-8mm or embroider eyes using dark brown thread. Stuff firmly but shapeable; use stitch markers to keep round starts consistent.
— Squirrel Head :
Round 1 :
With rust yarn and 3.0mm hook, mr, 6 sc in ring (6)
Round 3 :
(1 sc, inc) x6 (18)
Round 4 :
(2 sc, inc) x6 (24)
Round 5 :
(3 sc, inc) x6 (30)
Round 6 :
(4 sc, inc) x6 (36)
Round 7 :
1 sc in each st around (36)
Round 8 :
1 sc in each st around (36)
Round 9 :
(4 sc, dec) x6 (30)
Info :
Place safety eyes between rounds 6 and 7, approximately 6-8 stitches apart depending on desired expression. If embroidering eyes, mark placement now. Begin light stuffing at this stage to shape cheeks.
Round 10 :
(3 sc, dec) x6 (24)
Round 11 :
(2 sc, dec) x6 (18)
Round 12 :
(1 sc, dec) x6 (12)
Info :
Fasten off leaving 6-8" tail for sewing to body. Finish stuffing head firmly, shaping a slight muzzle. Embroider nose using dark brown yarn in a small triangular satin stitch across the lower center of head. Add small cream face patch by sewing a tiny oval piece if desired.
— Squirrel Body (Torso) :
Round 1 :
With rust yarn, mr, 6 sc in ring (6)
Round 3 :
(1 sc, inc) x6 (18)
Round 4 :
(2 sc, inc) x6 (24)
Round 5 :
(3 sc, inc) x6 (30)
Round 6 :
1 sc in each st around (30)
Round 7 :
1 sc in each st around (30)
Round 8 :
(3 sc, dec) x6 (24)
Round 9 :
1 sc in each st around (24)
Round 10 :
(2 sc, dec) x6 (18)
Round 11 :
1 sc in each st around (18)
Info :
Begin light stuffing at round 6-8. Body should be slightly firm but not rock hard so it sits flat when attached to runner. Leave top opening for sewing head and bottom opening for attaching legs and tail later.
Round 12 :
(1 sc, dec) x6 (12)
Info :
Do not fasten off yet; leave a long tail for sewing the head and for attaching the body to the runner. Stuff fully through the top opening before closing.
— Squirrel Tail (spiral sculpted)
Round 1 :
With dark brown and 3.0mm hook, ch 6, sl st to first ch to form small loop, then 6 sc into loop (6)
Round 2 :
1 sc in each st around (6) then continue working in spiral without joining to create a tapered strip: ch1, turn, sc across each stitch adding 1 sc at end of row to create increasing rows that form a long flat spiral strip approximately 30-36 rows long (width increases to approx 12-14 sc at widest).
Round 3-18 :
Work 16 continuous rows of sc along the strip; every 4th row add a dec at the inner edge to encourage curl inward for spiral. After 16-20 rows the strip should measure approx 4-5" long and 1.25-1.75" wide. For visual banding, switch to rust for 2 rows mid-strip and then back to dark brown for outer edge rows.
Round 19 :
Fold strip into a spiral coil starting at inner end. Using yarn needle and tail, sew coil together through adjoining rounds to hold spiral shape, stuffing lightly between layers for volume. Shape outer edge to be fluffy by adding a round of sl st into each outer stitch then working partial hdc clusters to create curvature.
Info :
For a fuller tail, create two strips and stitch them together edge-to-edge before coiling. Optionally insert thin wire through the center of the spiral and wrap ends to secure if you want the tail poseable. Cover wire ends with fiberfill and yarn before final sewing to prevent poking out.
— Squirrel Legs & Paws (Make 4: 2 hind, 2 fore)
Round 1 :
With rust, mr, 6 sc in ring (6)
Round 3 :
1 sc in each st around (12)
Round 4 :
(2 sc, dec) x3 (9) — begin shaping foot
Round 5-9 :
1 sc around (9) for foot length (5 rounds) — for hind legs make these rounds 6-8 to add length; for front paws keep shorter.
Round 10 :
(1 sc, dec) x3 (6)
Info :
Stuff feet firmly to maintain flat bottom so squirrels sit nicely on the runner. For hind legs leave a longer tail for sewing into body. For front paws use a shorter tail and do not stuff as full as hind legs.
Round 11 :
Fasten off leaving long tail for sewing.
— Squirrel Ears (Make 2)
Round 1 :
With rust, mr, 5 sc in ring (5)
Round 3 :
1 sc in each st around (10)
Round 4 :
(2 sc, dec) x2, 2 sc (8) — fold slightly and sl st along bottom to create cupped ear shape
Info :
Sew ears to top of head around round 3-4 spaced approx 6-8 stitches apart. Slightly roll ears forward for natural look. Embroider inner ear line with lighter yarn if desired.
— Squirrel Assembly
Info :
Sew head to body using the long tail on the head: position head over the closed top of the body opening aligning center front. Whip stitch evenly around body opening securing head. Attach ears at top of head at rounds 3-4. Sew front paws to the front at body rounds 6-8, with hind legs positioned at lower body opening. Attach tail to lower back of body with multiple sturdy stitches through tail coil and body base to secure. Hide and weave ends. Add embroidered whiskers and small eye highlights using tiny French knots or yarn knots.
— Acorn (Cap and Nut) — Make many
Cap Round 1 :
With dark brown, mr, ch1, 6 sc (6)
Cap Round 3 :
(1 sc, inc) x6 (18)
Cap Round 4 :
(2 sc, inc) x6 (24)
Cap Round 5 :
1 sc around for 1-2 rounds to build depth (24)
Cap Round 6 :
Switch to textured stitch: *ch1, skip next st, 3 sc in next st; rep around to create bobble effect across surface; sl st to join. Fasten off leaving long tail for sewing.
Nut Round 1 :
With tan yarn, mr, 6 sc (6)
Nut Round 3 :
(1 sc, inc) x6 (18)
Nut Round 4 :
1 sc around (18)
Nut Round 5 :
(2 sc, dec) x4, 2 sc (14)
Nut Round 6 :
Stuff lightly and finish with dec rounds to close; leave tail to sew the nut into the cap; attach cap to nut by whip stitch at the rim.
Info :
Sew small acorns onto motifs and along vine for scattered nuts. Make acorns in varied sizes by adding or subtracting rounds in the nut section to create small, medium and larger versions.
— Leaf (Make 18-24)
Round 1 :
With forest green and 3.0mm hook, ch8, sc in 2nd ch from hook and next 5 chs (6 sc), 3 sc in last ch, continue down opposite side of chain, sc in remaining 5 chs, sl st to join making a long oval leaf base.
Round 2 :
Ch1, (sc, hdc, 2 dc, hdc, sc) across the top center to form a raised ridge; in the pointed tip work (sc, picot, sc) for a defined tip then continue back; sl st to join.
Round 3 :
Using contrasting lighter green, embroider central vein with running stitch or surface single crochet from base to tip and back to make it look dimensional. Fasten off leaving tail for sewing.
Info :
Make leaves in multiple sizes and shades of green to sew along vine. Slightly starch or shape with a bit of spray starch to give a crisper look if desired.
— Decorative Large Flower (Make 8-10 for centers)
Round 1 :
With rust color, mr, ch1, 10 sc in ring, sl st to join (10)
Round 2 :
*(ch4, sl st) into next sc; rep from * around to make 10 ch4 loops.
Round 3 :
In each ch4 loop work (sc, hdc, 3 dc, hdc, sc) to form petals. Change to mustard for the last round and place a small French knot or tiny picot cluster in center using brown yarn for contrast. Fasten off leaving tail for sewing.
Info :
Sew these larger flowers where the runner photo shows focal clusters near squirrels to add visual weight and balance. Mix in smaller flowers for layered look.
— Small Rosebud (Optional) — for additional texture
Round 1 :
Chain 20, sc in 2nd ch from hook, hdc, 2 dc, 3 tr, 2 dc, hdc, sc across forming a tapered petal strip. Roll strip tightly from one end and sew base together forming a rosebud. Sew base to runner or to squirrel tail as seen.
Info :
Use this method to create small rolled roses in chocolate and rust shades for a more organic border effect.
— Long Thin Cord for Vine Branches
Round 1 :
With forest green, ch 100 (or length required), sl st back along chain to create a tight cord. Alternatively make i-cord using 3sc in each chain to create thicker cord (work sc around chain). Fasten off leaving long tails for sewing ends to runner.
Info :
Pin cord to runner along desired path and tack down with small sc stitches every 1/2" or with yarn needle using matching floss. Attach leaves and acorns along vine using the long tails to whip stitch through vine and motif backing for secure attachment.
— Additional Decorative Motifs (Berries and Tiny Clusters)
Round 1 :
For tiny berries: mr, 6 sc in chosen color (chocolate, mustard). Fasten off leaving tail and sew directly onto runner in clusters of 2-4. For tiny cluster mounds use 3 sc bobble stitches in same spot to create small raised texture.
Info :
Scatter these around the vine and near the squirrels to mimic seeds, berries and leaf litter. Use glue sparingly only if necessary; sewing is preferred for longevity.
— Final Blocking and Trimming
Info :
Once all elements are sewn in place, block the entire runner to even out motifs and flatten joins. Keep 3D elements slightly damp-proof by covering them with plastic while steaming motifs around them. Trim any stray ends and weave them into backs of motifs. Ensure the underside is tidy and secure.
— Finishing Touches and Care
Info :
Hand wash gently in cool water and lay flat to dry. Avoid machine washing to protect 3D elements. Store flat or rolled with tissue to prevent crushing the squirrels and acorns. If adding safety eyes, avoid for items intended for small children; embroider eyes instead for safety.
Completing this Rust And Cream Squirrel Vine Table Runner is a satisfying blend of lacework and playful sculpting. Each motif and tiny squirrel brings a bit of autumn charm to your table, turning everyday meals into cozy seasonal moments. The textured border and scattered acorns create delightful visual interest from every angle. I hope you enjoy every stitch of this project and treasure the warm, handmade centerpiece it becomes! 🧶🍁