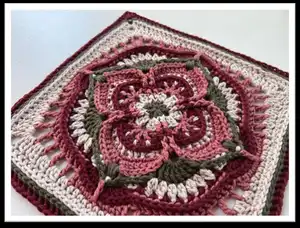
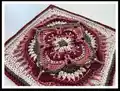
Make a beautiful, layered crochet square with textured petals, puff stitches and elegant post stitches. This pattern guides you through each round with clear, step-by-step instructions and helpful tips so you can recreate the pictured colorways. Perfect for adding to a blanket, cushion or using as a standalone decorative square.
Progress Tracker
0% Complete
— Main Square :
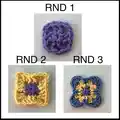
Round 1 :
In a double magic circle, ch 3 as a dc, dc; [ch 2, 2 dc] 3 times, ch 2; Join: slst to 3rd starting ch OR invisible join to 1st true dc of rnd, fasten off. Counts: 8 dc, 4 ch-2 corner sp (8 total)
Info :
Before starting, read the information about slst join and starting the next rnd. See stitch definitions for standing stitch and invisible join instructions.
Round 2 :
Start in any ch-2 corner sp OR slst into next dc and ch-2 corner sp, then ch 3 (as 1st dc of rnd), *(2 dc, ch 2 as a corner, 2 dc) in ch-2 sp; FPdc around each of the next 2 dc*; REPEAT FROM * TO * 3 MORE TIMES; Join: slst to 3rd starting ch OR invisible join to 2nd dc of rnd, fasten off. Counts: 16 dc, 8 FPdc, 4 ch-2 corner sp (24 total)
Round 3 :
Start in any ch-2 corner sp OR slst to corner, ch 3 (as 1st dc of rnd), *[(dc, ch 1) 5 times] in ch-2 corner sp; sk 2 dc; FPdc around 2 FPdc; ch 1, sk 2 dc*; REPEAT FROM * TO * 3 MORE TIMES; Join: invisible join to 1st ch of rnd, fasten off. Counts: 20 dc, 8 FPdc, 24 ch-1 sp (52 total)
Round 4 :
Start around 1st FPdc of 2 FPdc, *FPdc around each of the next 2 FPdc; sk ch-1 sp AND dc; (3 dc) in ch-1 sp; [ch 1, sk dc; (2 dc) in ch-1 sp] 2 times; ch 1, sk dc; (3 dc) in ch-1 sp; sk dc AND ch-1 sp*; REPEAT FROM * TO * 3 MORE TIMES; Join: slst to 1st FPdc of rnd OR invisible join to 2nd FPdc of rnd, fasten off. Counts: 40 dc, 8 FPdc, 12 ch-1 sp (60 total)
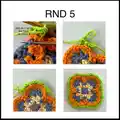
Round 5 :
Start in 1st dc after any 2 FPdc OR slst into next FPdc and dc, then ch 2 (as 1st hdc of rnd), *hdc in 3LP of 3 dc; fold ch-1 sp to the front, [2tr-cluster in dc of rnd 3, sk ch-1 sp; hdc in 3LP of 2 dc of rnd 4] 2 times; 2tr-cluster in dc of rnd 3, sk ch-1 sp; hdc in 3LP of 3 dc of rnd 4; ch 1, sk 2 FPdc*; REPEAT FROM * TO * 3 MORE TIMES; Join: slst to 2nd starting ch OR invisible join to 2nd hdc of rnd, fasten off. Counts: 40 hdc, 12 2tr-cluster, 4 ch-1 sp (56 total)
Round 6 :
Start in 3rd hdc after ch-1 sp OR slst into next 2 hdc, then ch 1 and sc in same hdc, *sc in hdc; [(2 sc) in 2tr-cluster; sc in 2 hdc] 2 times; (2 sc) in 2tr-cluster; sc in 3 hdc; FPdc around 2 FPdc of rnd 4; sk ch-1 sp, sc in 2 hdc*; REPEAT FROM * TO * 3 MORE TIMES; Join: slst to 1st sc of rnd OR invisible join to 2nd sc of rnd, fasten off. Counts: 64 sc, 8 FPdc (72 total)
Round 7 :
Start in 3rd sc after any 2 FPdc OR ch 3 as a dc, *dc in 5 sc; (2 dc) in sc, ch 2; (2 dc) in sc; dc in 6 sc; sk sc; FPdc around FPdc, ch 2 as a corner, FPdc around FPdc; sk sc, dc in sc*; REPEAT FROM * TO * 3 MORE TIMES; Join: invisible join to 2nd dc of rnd, fasten off. Counts: 64 dc, 8 FPdc, 4 ch-2 sp, 4 ch-2 corner sp (80 total/20 per side)
Round 8 :
Start in any ch-2 corner sp, *(7 tr) in ch-2 corner sp; sk FPdc AND 2 dc; hdc in 3LP of 6 dc; ch 1, EXT-puff in ch-2 sp, ch 1; hdc in 3LP of 6 dc; sk 2 dc AND FPdc*; REPEAT FROM * TO * 3 MORE TIMES; Join: slst to 1st tr of rnd OR invisible join to 2nd tr of rnd, fasten off. Counts: 48 hdc, 28 tr, 4 EXT-puff, 8 ch-1 sp (88 total/22 per side)
Round 9 :
Start in 1st tr of any (7 tr) group OR ch 2 (as starting of 1st 2dc-cluster of rnd), *[2dc-cluster in tr, ch 1] 7 times; sk 2 hdc, BPhdc around 3 hdc; ch 2, sk hdc AND ch 1 sp; BPhdc around EXT-puff; ch 2, sk ch-1 sp AND hdc; BPhdc around 3 hdc; ch 1, sk 2 hdc*; REPEAT FROM * TO * 3 MORE TIMES; Join: invisible join to 1st ch of rnd, fasten off. Counts: 28 BPhdc, 28 2dc-cluster, 32 ch-1 sp, 8 ch-2 sp (104 total/26 per side)
Round 10 :
Start in ch-2 sp after BPhdc around EXT-puff, *(6 dc) in ch-2 sp; sk 3 BPhdc, (2 dc) in ch-1 sp; [sk 2dc-cluster, (2 dc) in ch-1 sp] 6 times; sk 2dc-cluster, (2 dc) in ch-1 sp; sk 3 BPhdc, (6 dc) in ch-2 sp, sk BPhdc*; REPEAT FROM * TO * 3 MORE TIMES; Join: invisible join to 2nd dc of rnd, fasten off. Counts: 112 dc (112 total/28 per side)
Round 11 :
Start around 1st dc after any 2nd set of (6 dc) group, *BPdc around 16 dc; sk dc, sc in 3LP of 10 dc, sk dc*; REPEAT FROM * TO * 3 MORE TIMES; Join: invisible join to 2nd BPdc of rnd, fasten off. Counts: 40 sc, 64 BPdc (104 total/26 per side)
Info :
Do not skip the special note for rnd 12; read the instructions about not skipping sc in rnd 12 and the 3LP technique before starting rnd 12.
Round 12 :
Note: do not sk any sc in this rnd. Start in 1st sc of any group of 10 sc, *dc in sc; hdc in sc; sc in 3 sc; tr in EXT-puff of rnd 8, sc in 3 sc; hdc in sc; dc in sc; ch 1, sk BPdc, dc in BPdc; [ch 1, sk BPdc, tr in BPdc] 3 times; ch 2 as a corner; [tr in BPdc, ch 1, sk BPdc] 3 times; dc in BPdc, ch 1, sk BPdc*; REPEAT FROM * TO * 3 MORE TIMES; Join: invisible join to 1st hdc of rnd, fasten off. Counts: 24 sc, 8 hdc, 16 dc, 28 tr, 32 ch-1 sp, 4 ch-2 corner sp (108 total/27 per side)
Round 13 :
Start in any ch-2 corner sp, *(2tr-cluster, tr, ch 2, tr, 2tr-cluster) in ch-2 corner sp; sk tr, (tr, 2tr-cluster) in ch-1 sp; [sk tr, (dc, 2dc-cluster) in ch-1 sp] 2 times; sk dc, (2 hdc) in ch-1 sp; sk dc, hdc in hdc AND sc; sc in 2 sc, tr AND next 2 sc; hdc in sc AND hdc; sk dc, (2 hdc) in ch-1 sp, sk dc; [(2dc-cluster, dc) in ch-1 sp, sk tr] 2 times; (2tr-cluster, tr) in ch-1 sp, sk tr*; REPEAT FROM * TO * 3 MORE TIMES; Join: slst to 1st 2tr-cluster of rnd OR invisible join to 1st tr of rnd, fasten off. Counts: 20 sc, 32 hdc, 16 dc, 16 2dc-cluster, 16 tr, 16 2tr-cluster, 4 ch-2 corner sp (116 total/29 per side)
Round 14 :
Start in ch-2 corner sp OR slst into next tr and ch-2 corner sp, then ch 3 (as 1st dc of rnd), *(2 dc, ch 2, 2 dc) in ch-2 corner sp; dc in 8 sts; hdc in 13 sts; dc in 8 sts*; REPEAT FROM * TO * 3 MORE TIMES; Join: slst to 1st dc of rnd OR invisible join to 2nd dc of rnd, fasten off. Counts: 52 hdc, 80 dc, 4 ch-2 corner sp (132 total/33 per side)
Round 15 :
Note: I suggest going up a hook size for this rnd only so the 3LP of scs are a little larger for dc in 3LP in rnd 16. Start in ch-2 corner sp OR slst into next dc and ch-2 corner sc, then ch 1 and sc in ch-2 corner sp, *(sc, ch 2, sc) in ch-2 corner sp; sc in 3LP of 33 sts*; REPEAT FROM * TO * 3 MORE TIMES; Join: slst to 1st sc of rnd OR invisible join to 1st ch of rnd, fasten off. Counts: 140 sc, 4 ch-2 corner sp (140 total/35 per side)
Round 16 :
Note: If you went up a hook size in last rnd, be sure to go back down a hook size. Start in ch-2 corner sp OR slst into ch-2 corner sp, then ch 3 (as 1st dc of rnd), *(2 dc, ch 2, 2 dc) in ch-2 corner sp; dc in 3LP of 35 sc*; For those unable to work the 3LP dc into the sc, a BLdc would achieve a similar look. REPEAT FROM * TO * 3 MORE TIMES; Join: invisible join to 2nd dc of rnd, fasten off. Counts: 156 dc, 4 ch-2 corner sp (156 total/39 per side)
This Sage Advice Square was designed to combine floral textures and structural stitches for a show-stopping square you will love to make. It layers petals, posts and clusters into a dimensional motif that works beautifully in blankets and cushions. Try it in your favorite palette and celebrate the handmade charm! 🧶✨