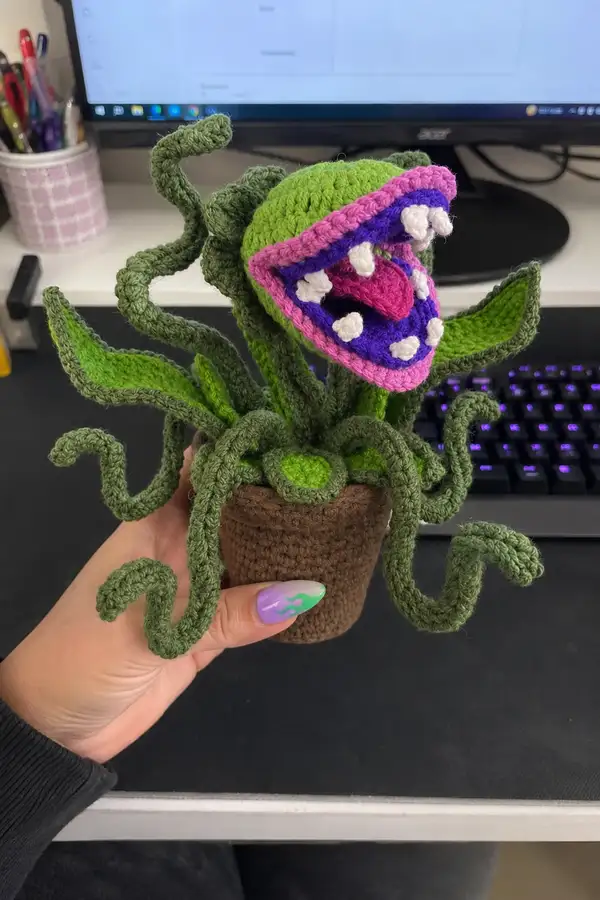
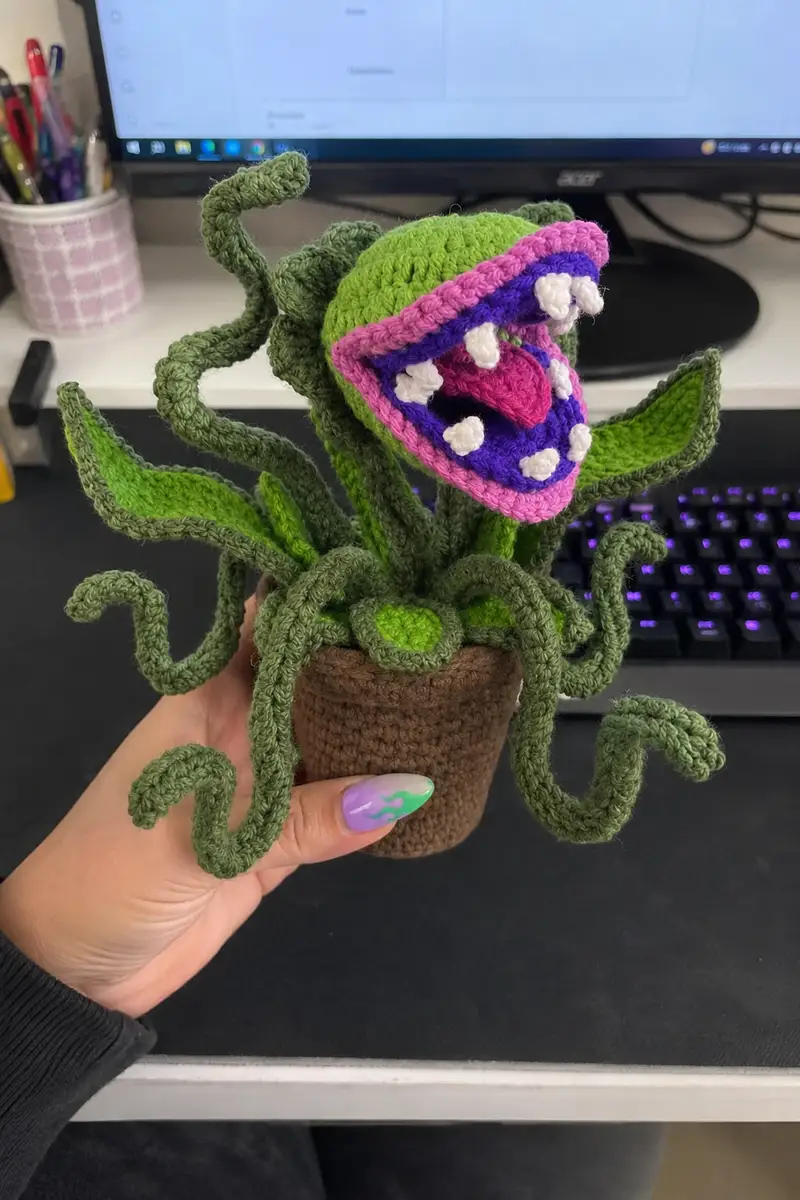
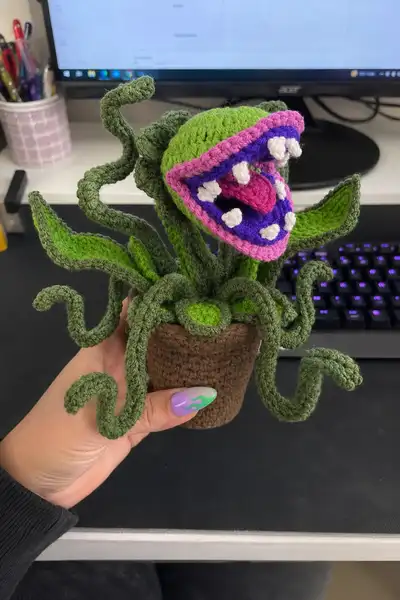
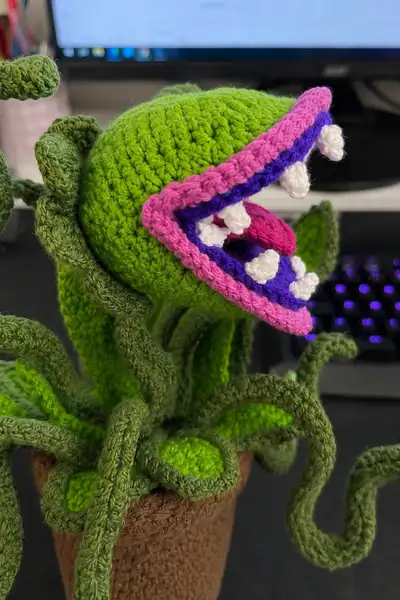
Bring a mischievous, chomping little plant to life with this detailed amigurumi pattern. This project recreates the plant in the photos: a round, hinged mouth with purple inner lining, pink ruffle rim, bright pink tongue and little white teeth, all sitting in a crochet pot with curly vines and layered leaves. Finished piece is poseable, full of texture, and a fantastic gift or desk companion for a plant-lover with a sense of humor.
Progress Tracker
0% Complete
— Upper Jaw (Top Hemisphere) :
Round 1 :
6 sc in magic ring (6)
Round 3 :
(1 sc, inc) x 6 (18)
Round 4 :
(2 sc, inc) x 6 (24)
Round 5 :
(3 sc, inc) x 6 (30)
Round 6 :
(4 sc, inc) x 6 (36)
Info :
Work this top hemisphere in bright lime green (main head color). Keep stitches tight. Use a stitch marker to mark each round start. This piece will be joined at the jaw seam to the lower jaw later.
Round 7 :
(5 sc, inc) x 6 (42)
Round 8 :
(6 sc, inc) x 6 (48)
Round 9-14 :
1 sc in each st (48)
Info :
Rounds 9-14 add height for the upper jaw. At the end of round 12 note the center-front area where the mouth will hinge: mark the central 10-12 stitches with removable markers to align with lower jaw later.
Round 15 :
(6 sc, dec) x 6 (42)
Round 16 :
(5 sc, dec) x 6 (36)
Info :
Start gently stuffing the upper hemisphere now: add fiberfill in small handfuls until it feels firm but not overstuffed. Smooth stuffing toward the front edge so the mouth rim remains shaped.
Round 17 :
(4 sc, dec) x 6 (30)
Round 18 :
(3 sc, dec) x 6 (24)
Round 19 :
(2 sc, dec) x 6 (18)
Round 20 :
(1 sc, dec) x 6 (12)
Info :
Fasten off leaving a long tail for sewing the top hemisphere into the back of the inner mouth/lining later. The top hemisphere will be slightly more domed than the lower jaw so it appears like a hinged lid.
— Lower Jaw (Bottom Hemisphere) :
Round 1 :
6 sc in magic ring (6)
Round 3 :
(1 sc, inc) x 6 (18)
Round 4 :
(2 sc, inc) x 6 (24)
Round 5 :
(3 sc, inc) x 6 (30)
Round 6 :
(4 sc, inc) x 6 (36)
Info :
Work lower jaw in the same main green. This piece will be slightly flatter and will be joined to the upper jaw with the inner mouth/rim in between. Keep the round counts consistent so rims align.
Round 7 :
(5 sc, inc) x 6 (42)
Round 8 :
(6 sc, inc) x 6 (48)
Round 9-12 :
1 sc in each st (48)
Info :
Lower jaw rounds 9-12 create depth for the inner lining and jaw opening. Leave the front edge slightly less stuffed to allow the jaw to open and rest under the upper jaw.
Round 13 :
(6 sc, dec) x 6 (42)
Round 14 :
(5 sc, dec) x 6 (36)
Round 15 :
(4 sc, dec) x 6 (30)
Round 16 :
(3 sc, dec) x 6 (24)
Round 17 :
(2 sc, dec) x 6 (18)
Round 18 :
(1 sc, dec) x 6 (12)
Info :
Fasten off leaving long tail for attaching lower jaw to pot/stem assembly later. Keep lower jaw lightly stuffed until final assembly so it can attach and hinge properly.
— Inner Mouth Lining (Purple) :
Info :
Inner mouth lining is a flattened ring that fits between upper and lower jaws. Work in purple yarn. This piece is worked in rounds to create a shallow cup that will be seamed to both jaws to create the inner purple lining visible in the photos.
Round 1 :
6 sc in magic ring (6)
Round 3 :
(1 sc, inc) x 6 (18)
Round 4 :
(2 sc, inc) x 6 (24)
Round 5 :
(3 sc, inc) x 6 (30)
Round 6 :
1 sc in each st (30)
Round 7 :
1 sc in each st BLO (30)
Info :
The BLO round creates a slight ridge so the purple lining tucks neatly under the pink ruffle later. Do not stuff this piece - it should remain flexible to be sewn between jaws.
Round 8 :
Fasten off, leave long tail for sewing. If your purple ring seems too small to reach both jaws, add one or two additional even rounds (1 sc in each st) before fastening off.
— Pink Ruffle Rim (Outer Mouth Edge) :
Info :
The pink ruffle frames the mouth and is worked as a shallow oval ruffle to be sewn around the front edge of the jaws. Use light pink yarn. Work this as a short scalloped edge around a ring sized to match the mouth opening.
Round 1 :
Using pink, join in a stitch at the front center of the purple ring and work 1 sc around to make a single crochet edge (30)
Round 2 :
(1 sc, ch2, 3 dc in next st, ch2, 1 sc) repeat evenly around to create ruffle scallops. Work 10 scallops across the front opening area (scallops across the visible mouth rim only)
Round 3 :
Work 1 sc between each scallop to stabilize (approximately 30 sc around front area). Fasten off and leave long tail for sewing to purple ring and then to upper/lower jaw front edges.
Info :
If you prefer a subtler rim, use single crochet in pink around the edge instead of scallops. For a pronounced ruffle like the photo, use DC clusters as described.
— Tongue :
Round 1 :
With bright magenta, ch 2, 6 sc in 2nd ch from hook (6) - make small oval tongue
Round 3 :
(1 sc, inc) x 6 (18)
Round 4-6 :
1 sc in each st (18)
Round 7 :
(1 sc, dec) x 6 (12)
Round 8 :
Dec x 6 (6) - do not completely close; leave tail for sewing
Info :
Stuff the tongue lightly so it remains flexible and slightly floppy. Flatten slightly and sew the base of the tongue inside the lower jaw so it peeks out as shown in the photo.
— Teeth (Make 10 Typical Small Teeth) :
Info :
Each tooth is a small bobble/bulb made in white. These are sewn to both jaws along the rim. Make 10-12 teeth to match the photo spacing (5-6 on top, 5-6 on bottom).
Tooth Round 1 :
With white, ch 2, 6 sc in 2nd ch from hook (6)
Tooth Round 2 :
In next 3 rounds: work a puff/picot cluster to make a bulging tooth: (yarn over, insert, pull up loop) x3, yarn over and draw through all loops, ch1 to secure; repeat to create one solid little bump. Alternatively do 1 sc then 1 hdc then 1 sc to create a small cone. Fasten off leaving tail for sewing.
Info :
Make at least 10-12 teeth. Vary slightly in size for a natural uneven look. Use a yarn needle to attach teeth to the pink ruffle and the purple inner lining area; space evenly across rim (about every 4-6 stitches).
— Head Assembly :
Info :
Pin the purple inner ring inside the opening of the lower jaw first - align the BLO ridge toward the rim so the purple shows when assembled. Then pin the pink ruffle around the rim of the purple ring covering the purple edge. Place upper jaw over the lining so the pink rim is visible between the jaws.
Step :
Sew purple ring to lower jaw using mattress or whip stitch through the purple rounds and the inner lower jaw front stitches. Then sew the pink ruffle to purple ring aligning scallops evenly front-to-back. Repeat sewing for upper jaw so the purple ring is secured between both jaw halves.
Info :
Sew teeth to the pink rim and purple ring both top and bottom after the ruffle is secured. Stagger teeth so top and bottom teeth do not align exactly but create a natural gap when mouth closes. Attach tongue to base of lower jaw centered slightly off-center to mimic the reference look.
— Central Stem (Neck) :
Round 1 :
6 sc in magic ring (6)
Round 3 :
(1 sc, inc) x 6 (18)
Round 4-6 :
1 sc in each st (18)
Info :
Work the stem in the darker olive green. The stem should be fairly stiff; consider adding a length of thin floral wire inside before stuffing or using a tighter hook (3.25mm) for a firmer tube. The top of the stem connects to the lower jaw interior; the bottom will be stitched to the soil pad inside the pot.
Round 7 :
(2 sc, dec) x 6 (12)
Round 8-18 :
1 sc in each st (12) - repeat 11 rounds to build stem length (12)
Round 19 :
Stuff lightly, fasten off leaving long tail for sewing to head and soil pad.
— Vines / Tentacles (Make 8) :
Info :
The curly tentacles seen in the photo are spiral tubes that are crocheted as thin cylinders and then shaped into corkscrew curves. Make 8 vines in the medium olive green; vary lengths to create a natural arrangement. Insert optional florist wire for poseability.
Vine Base Round 1 :
6 sc in magic ring (6)
Vine Round 3 :
1 sc in each st (12)
Vine Round 4 :
(2 sc, inc) x 4 (16)
Vine Round 5-16 :
1 sc in each st (16) - repeat 12 rounds to get length
Vine Round 17 :
(2 sc, dec) x 4 (12)
Vine Round 18 :
1 sc in each st (12)
Vine Round 19 :
Fasten off leaving long tail. If adding wire, feed wire through the tube before stuffing lightly. Curl the vine around a dowel or pencil to set the spiral. Repeat to make 8 vines of varying lengths (some with 10-12 rounds extra to extend length if desired).
Info :
To create a stronger spiral, after stuffing, wet-block the vine around a cylindrical object and let dry, or twist around a pencil and secure with pins until dry. If using wire, fold and secure the ends and bend to your desired shape. Sew vine ends into the soil pad later.
— Leaves (Make 6 Large Leaves and 4 Small Filler Leaves) :
Info :
Leaves are worked flat and then edged in the darker green. Large leaves are two-tone: lighter green center with darker green ridged border. Make 6 large leaves and 4 smaller leaves to tuck between vines and around pot lip.
Large Leaf Round 1 :
With light green, ch 10, sc in 2nd ch from hook, hdc in next, dc in next 4, hdc in next, sc in last (this forms center spine). Turn and work along opposite side to return to start with mirrored increases; slip stitch to join forming an oval (approx 18 st)
Large Leaf Round 2 :
Round the edge: join darker green and work 1 sc around entire leaf evenly to create a neat border (approx 18-20 sc)
Large Leaf Round 3 :
Work 1 sc BLO across center line on top to create a ridge (optional). Fasten off leaving tail for sewing to pot rim and soil pad.
Small Leaf :
Ch 6, sc 5 back, join, edge with darker green 1 sc around. Fasten off. Make 4 small leaves.
Info :
Sew leaves to the pot rim and soil pad, tucking edges under vines. Pin everything in place before sewing to achieve the look shown in the reference photo where leaves overlap slightly and create layered texture.
— Pot Base (Flat Circle) :
Round 1 :
6 sc in magic ring (6) - brown yarn
Round 3 :
(1 sc, inc) x 6 (18)
Round 4 :
(2 sc, inc) x 6 (24)
Round 5 :
(3 sc, inc) x 6 (30)
Round 6 :
(4 sc, inc) x 6 (36) - this will be the bottom of the pot and should match pot diameter in photo
Info :
If you prefer a wider pot, add another increase round (5 sc, inc) x 6 = 42. The example uses 36 stitches so the pot is compact and slightly taller.
— Pot Body (Sides) :
Round 1 :
1 sc in each st around (36)
Round 2-12 :
1 sc in each st (36) - repeat rounds to build the pot height (11 rounds)
Round 13 :
1 sc in each st BLO for a decorative rim ridge (36)
Round 14 :
Optional: change to a slightly darker brown and work 1 hdc around rim for contrast (36)
Info :
Stuff the pot lightly if you want it weighted. Many makers insert a small craft weight or pebble bag before sewing the soil pad to keep the plant stable. Leave the top edge open to sew the soil pad and stem into place.
Round 15 :
Fasten off leaving long tail for sewing the soil pad and body to the pot edge securely.
— Soil Pad (Green Pad that Sits at Top of Pot) :
Round 1 :
6 sc in magic ring (6) - bright green
Round 3 :
(1 sc, inc) x 6 (18)
Round 4 :
(2 sc, inc) x 6 (24)
Round 5 :
1 sc in each st (24)
Info :
The soil pad will be sewn to the pot rim as a shallow disc and will receive the stem and vine ends. Consider stuffing it lightly with fiberfill so it raises slightly above the pot edge as in the reference photo.
Round 6 :
1 sc in each st (24) - add two rounds if you want a thicker cushion
Round 7 :
Fasten off leaving long tail for sewing. Before fully closing, insert the stems and vine ends to check placement and trim tails accordingly.
— Small Decorative Soil Buttons (Optional, Make 3) :
Round 1 :
6 sc in magic ring (6)
Round 3 :
1 sc in each st (12) - fasten off, leave tail for sewing these as little raised soil lumps on the green pad
Info :
Sew these small pads around the stem base on the soil pad to echo the reference photo's little green blobby pads. They add visual interest and cover seam lines.
— Assembly Instructions (Pre-Sewing Prep) :
Info :
Before sewing any major pieces, block and lightly shape each item. Pin pieces temporarily: position leaves, vines, and teeth, then photograph or check symmetry from all angles so attachments are balanced.
Step :
Sew the soil pad to the pot rim using mattress stitch, easing the fabric to fit if necessary. Ensure the pad is centered and that you leave openings to insert the stem and vine ends.
Step :
Insert the bottom of the stem into the center of the soil pad and secure with several passes of yarn to the inside of the pot so it is stable. If using wire, anchor wire ends under the pad and cover with a small disc of fabric or extra stitches to hide wires.
Info :
Sew vines into the pad at staggered positions around the stem. Anchor each vine end by sewing through several times and weaving the tail inside the pad for security. Pin leaves in place and sew their bases to the pad edge so they overlap the pot rim slightly.
Step :
Attach lower jaw to the top of the stem by sewing the lower jaw base to the stem end (use the long tail from stem). Then sew the upper hemisphere to the back/top of the purple lining so the mouth can hinge. Reinforce seam so mouth will open and close a little without tearing.
Info :
After major pieces are sewn, sew teeth into place on pink rim and purple lining. Add any embroidered accents with dark or black yarn to create nostrils or mouth creases as desired. Weave in all tails inside the pot body for a neat finish.
— Final Details and Tips :
Info :
Arrange vines with different spirals and heights to mimic the lively look from the photos. If you used wire, twist vine ends inward and anchor under the soil pad for stability. Add extra stitches around high-stress joins (stem to lower jaw, soil pad to pot) for durability.
Info :
To achieve the exact look shown: use a slightly tighter hook for the vines and stem to create crisp spirals, use the BLO trick on the purple lining to make a visible ridge under the pink ruffle, and space teeth irregularly for personality.
Info :
If you want the mouth to close flush, adjust the stuffing level in both jaws so that when you press them together they meet with the pink ruffle forming a continuous band.
This little chomper is such a joy to assemble and display — it brings personality with its ruffled rim and corkscrew vines. Each section comes together to build a dynamic, cheeky plant that looks alive on a shelf or desk. I hope this pattern inspires you to play with color and attitude — happy stitching and enjoy your new plant pal! 🧶🌿