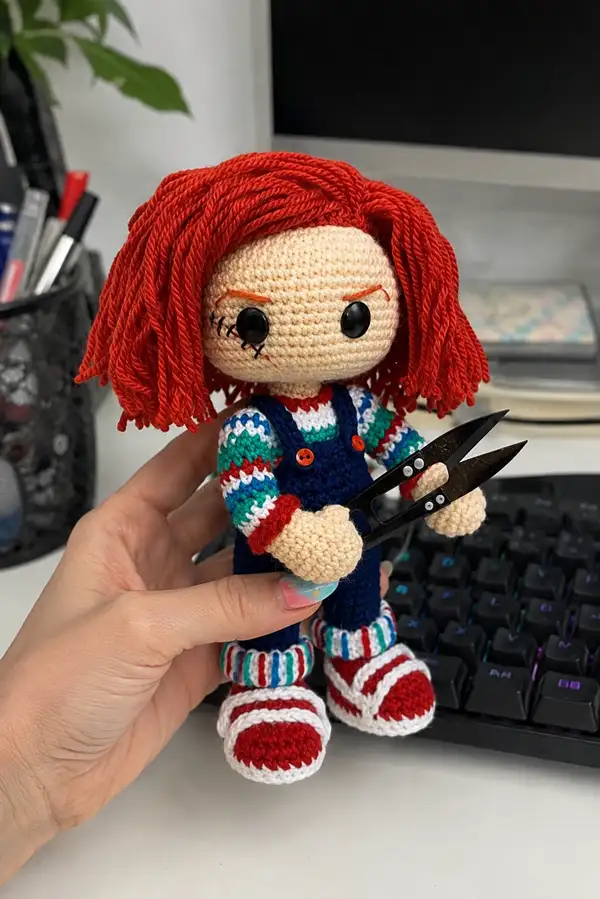
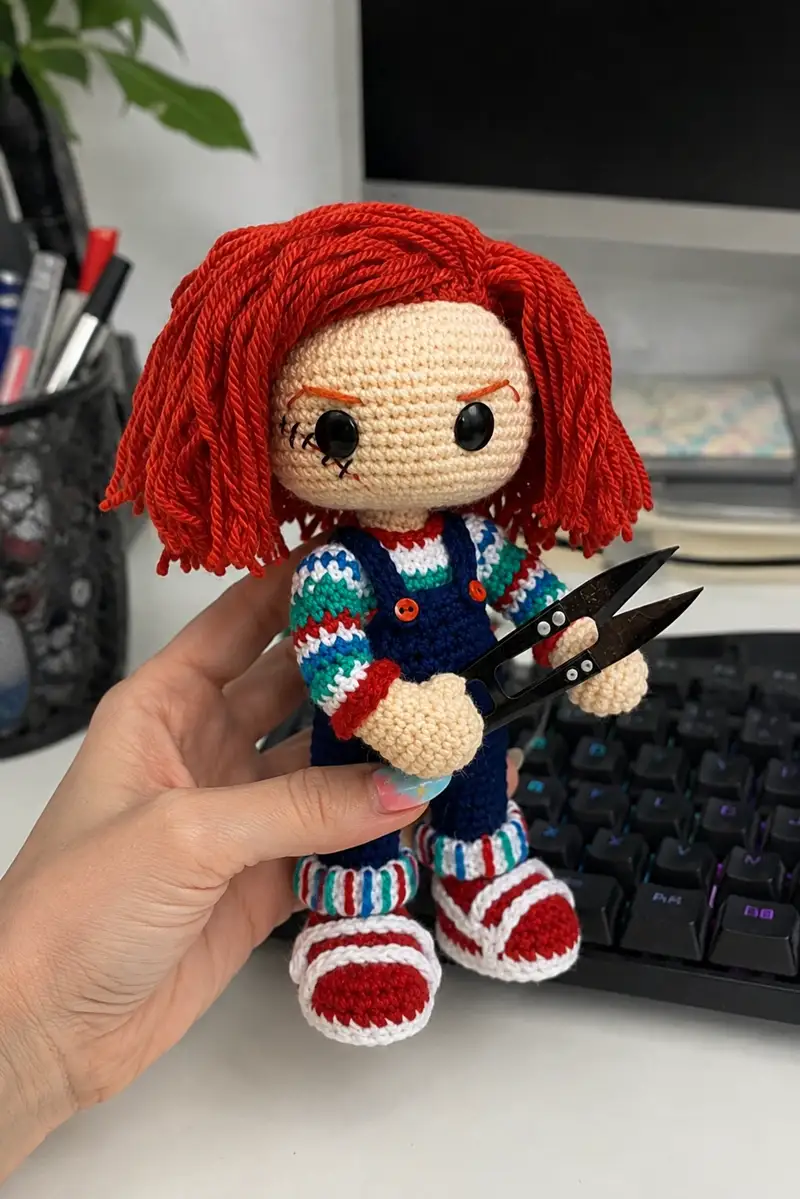
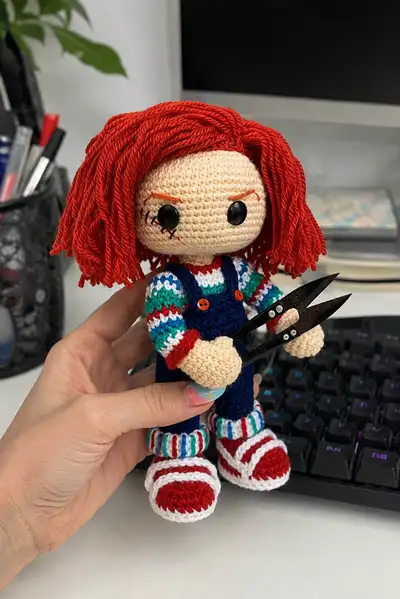
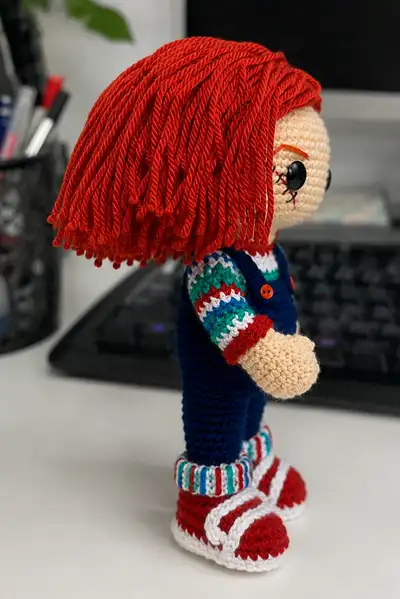
This detailed amigurumi pattern recreates a mini Chucky-inspired doll with bright red yarn hair, striped sweater, navy overalls, and tiny red sneakers. The pattern includes step-by-step round counts, color-change tips, and hair/face embroidery guidance to capture the characterful look. Perfect for crocheters who want a playful (and spooky) collectible or Halloween decoration. Includes assembly and finishing notes to get the same polished result shown in the photos.
Progress Tracker
0% Complete
— Head :
Round 1 :
6 sc in magic ring (6)
Round 3 :
(1 sc, 1 inc) x 6 (18)
Round 4 :
(2 sc, 1 inc) x 6 (24)
Round 5 :
(3 sc, 1 inc) x 6 (30)
Round 6 :
(4 sc, 1 inc) x 6 (36)
Round 7 :
(5 sc, 1 inc) x 6 (42)
Round 8 :
(6 sc, 1 inc) x 6 (48)
Round 9 :
1 sc in each st (48)
Round 10 :
1 sc in each st (48)
Round 11-12 :
1 sc in each st (48)
Info :
Place safety eyes between rounds 12 and 14, approx 10-12 sts apart (adjust for expression). For 8mm eyes place them 14-16 stitches apart center to center; use a stitch marker to mark the central stitch between eyes.
Round 13 :
1 sc in each st (48)
Round 14 :
1 sc in each st (48)
Round 15-17 :
1 sc in each st (48)
Info :
If you plan embroidery scars/eyebrows, mark threads now. The eyebrow in the photo sits between rounds 11-13 curved over the eye; stitch placement and tiny French knots will be added after head is finished.
Round 18 :
(6 sc, 1 dec) x 6 (42)
Round 19 :
(5 sc, 1 dec) x 6 (36)
Info :
Begin stuffing head firmly now, adding small amounts and pounding stuffing into the eye sockets to keep eye area smooth. Use a stuffing tool or back of crochet hook for even distribution.
Round 20 :
(4 sc, 1 dec) x 6 (30)
Round 21 :
(3 sc, 1 dec) x 6 (24)
Round 22 :
(2 sc, 1 dec) x 6 (18)
Round 23 :
(1 sc, 1 dec) x 6 (12)
Info :
Fasten off leaving a long tail for sewing to the neck. Finish stuffing so head feels firm but slightly yielding. Weave yarn tail through remaining 6 sts and pull closed; knot and secure inside. If you intend to sew neck directly to the body, leave a tail long enough for several passes (approx 20-30 cm).
— Neck Collar / Neck Stump :
Round 1 :
Join to neck opening, ch1, 6 sc around the neck opening (6)
Round 2 :
1 sc in each st (6)
Round 3 :
Work 6 sc BLO to create a subtle neck ridge (6)
Info :
This short neck stump will be used to sew into the body opening and provides a tidy join. Leave tail for sewing or attach to body as you assemble.
— Body (Base and Clothing Integrated) :
Round 1 :
With navy blue (overall base) start 6 sc in magic ring (6)
Round 3 :
(1 sc, inc) x 6 (18)
Round 4 :
(2 sc, inc) x 6 (24)
Round 5 :
(3 sc, inc) x 6 (30)
Round 6 :
(4 sc, inc) x 6 (36)
Round 7-8 :
1 sc in each st (36)
Info :
If you want separate inner shirt, work body in two parts. The sample has the overall yoke crocheted as part of the body; continue working in navy to create a slim torso. Keep stitches tight so stuffing does not show through.
Round 9 :
(5 sc, inc) x 6 (42)
Round 10-12 :
1 sc in each st (42)
Round 13 :
(6 sc, inc) x 6 (48)
Round 14-18 :
1 sc in each st (48)
Info :
At round 18 the work reaches the chest/overall bib area. If you prefer to add a separate sweater front in stripes, change to cream/stripe colors now and work a few rounds in FLO for rib effect. In the sample the striped sleeve is worked separately and sewn in; the body remains navy with an embroidered red neckline added later.
Round 19 :
(6 sc, dec) x 6 (42)
Round 20 :
(5 sc, dec) x 6 (36)
Round 21 :
(4 sc, dec) x 6 (30)
Info :
Begin stuffing body moderately around round 19-21. Stuff firmly in the lower torso and lighter near the neck so the head sits naturally.
Round 22 :
(3 sc, dec) x 6 (24)
Round 23 :
(2 sc, dec) x 6 (18)
Round 24 :
(1 sc, dec) x 6 (12)
Info :
Fasten off leaving long tail for sewing head to body. Some makers prefer to leave an opening and place a neck dowel for added strength; if doing so, insert dowel before final closing and secure with several whip stitches.
— Right Arm (Make 1) :
Round 1 :
6 sc in magic ring (6)
Round 3 :
(1 sc, inc) x 6 (18)
Round 4 :
1 sc in each st (18)
Info :
Switch to skin color (cream) before starting round 5 if you prefer a cuffed sleeve appearance. In the sample a red cuff encircles the wrist, so we will change color at Round 5.
Round 5 :
Change to cream/skin color. 1 sc in each st (18)
Round 6-8 :
1 sc in each st (18)
Info :
For hands that are slightly cupped, insert extra stuffing at the palm and keep fingers undefined as a thumb seam will be sewn later for shaping.
Round 9 :
(3 sc, dec) x 3 (15)
Round 10 :
1 sc in each st (15)
Round 11 :
(2 sc, dec) x 3 (12)
Round 12 :
1 sc in each st (12)
Info :
Stuff the hand area firmly now; maintain firm stuffing in palm and lighter stuffing toward elbow. Leave a tail for sewing to shoulder; you will later stitch the cuff to the sweater sleeve edge so the seam is hidden.
Round 13 :
(1 sc, dec) x 4 (8)
Round 14 :
1 sc in each st (8)
Round 15-18 :
1 sc in each st (8)
Info :
Use rounds 15-18 to lengthen the upper arm to match body proportions; measure against the opposite side if working both arms at once. Add light stuffing. Fasten off leaving long tail for sewing.
— Left Arm (Make 1) :
Round 1 :
6 sc in magic ring (6)
Round 3 :
(1 sc, inc) x 6 (18)
Round 4 :
1 sc in each st (18)
Round 5 :
Change to cream/skin color. 1 sc in each st (18)
Round 6-8 :
1 sc in each st (18)
Round 9 :
(3 sc, dec) x 3 (15)
Round 10 :
1 sc in each st (15)
Round 11 :
(2 sc, dec) x 3 (12)
Round 12 :
1 sc in each st (12)
Round 13 :
(1 sc, dec) x 4 (8)
Round 14-18 :
1 sc in each st (8)
Info :
For the left hand, the maker sewed tiny items into the palm (suggested props). Leave tail for sewing. Stuff same as right arm to match weight for even posture.
— Hand Thumb Shaping (Both Hands) :
Round 1 :
Using skin color, on the palm area mark a place where thumb will go. Make a small 6 sc magic ring (6)
Round 2 :
6 inc into each st around the 6 sc ring (12)
Round 3 :
1 sc in each st (12)
Round 4 :
(1 sc, dec) x 4 (8)
Info :
Sew the thumb to the palm with a few hidden stitches, shaping slightly to create a thumb that appears seperate. Crochet thumbs small so they do not overpower the tiny hands.
— Right Leg (Make 1) :
Round 1 :
6 sc in magic ring (6)
Round 3 :
(1 sc, inc) x 6 (18)
Round 4 :
(2 sc, inc) x 6 (24)
Round 5-6 :
1 sc in each st (24)
Info :
Change to navy blue at Round 7 for the overalls leg. The sneakers will be worked after the leg tube is complete and attached. Keep lower leg slightly narrower than upper leg for sock cuff and shoe fit.
Round 7-14 :
1 sc in each st (24)
Round 15 :
(4 sc, inc) x 4 (28)
Round 16-20 :
1 sc in each st (28)
Info :
At round 20 the cuff fold is worked for the sock: change to striped colors (white, teal, red) in alternating rounds and work in BLO to create a ribbed folded cuff effect on the outside. For the photographed cuff, each color is worked for one round and then the cuff is folded down once shoe is sewn in place.
Round 21 :
Change to stripe sequence: 1 sc in each st BLO (28)
Round 22 :
Continue stripe change: 1 sc in each st BLO (28)
Round 23-24 :
Return to navy, 1 sc in each st (28)
Round 25 :
Leave a long tail and fasten off. Stuff leg lightly: foot area firmer than thigh. Prepare to sew shoe sole to bottom by holding shoe piece in place before attaching.
— Left Leg (Make 1) :
Round 1 :
6 sc in magic ring (6)
Round 3 :
(1 sc, inc) x 6 (18)
Round 4 :
(2 sc, inc) x 6 (24)
Round 5-6 :
1 sc in each st (24)
Round 7-14 :
Change to navy for overall leg, 1 sc in each st (24)
Round 15 :
(4 sc, inc) x 4 (28)
Round 16-20 :
1 sc in each st (28)
Round 21-22 :
Work striped cuff in BLO alternating white/teal/red rounds (28)
Round 23-25 :
Return to navy for the upper leg, 1 sc in each st (28)
Round 26 :
Fasten off leaving long tail; stuff leg as match to right leg
— Shoe / Sneaker (Make 2) :
Round 1 :
With red, ch 9, turn, 1 sc in 2nd ch from hook and across (8)
Round 2 :
Ch1, turn, 2 sc in first st, 1 sc in next 6 sts, 2 sc in last st (10)
Round 3 :
Ch1, turn, 1 sc in each st (10)
Round 4 :
Work around the piece adding 1 sc in each end to make a rounded sole: 2 sc in first, 1 sc in next 8, 2 sc in last (12)
Round 5 :
1 sc in each st (12)
Info :
These rounds produce a small flat sole. Press sole flat and check fit to bottom of stuffed leg. Adjust by adding or skipping a few stitches if necessary for proportion.
Round 6-8 :
Change to red and build the shoe upper: 1 sc in each st (12)
Round 9 :
Change to white, 1 sc in each st to create the sole edging (12)
Round 10-12 :
Work white decorative straps: surface slip stitch two straps across the top later, but make two small raised ridges by crocheting 2 ch, skip two st, sl st into next, repeat to make strap outlines. Fasten off and weave ends.
Info :
Sew or glue shoe sole to bottom of leg. The cuff is folded over on top of the shoe to hide the seam and create that rolled sock look; tack it down with a few stitches behind the ankle.
— Overalls Bib and Straps :
Round 1 :
With navy, ch 12, join to work as a slip strip across the chest to form the bib base, sc across ch (11)
Round 2 :
Turn and 1 sc in each st for 6 rounds to create a rectangular bib (11)
Round 3 :
Fold bib to shape and sew top edge to chest at round 14-15 area. Leave two long straps (ch 18 each) for overalls, attach at top edge, secure with orange button embellishments.
Info :
Sew straps to back around the waist line and tack to prevent slipping. Buttons are decorative and can be glued or sewn on; use small 6 mm orange buttons as pictured.
— Striped Sleeve (Make 2) :
Round 1 :
With main stripe sequence, ch 12, join and work in rounds to create a narrow tube that matches arm circumference. 12 sc in round 1 (12)
Round 2-3 :
Change color each round as: white, teal, green, blue, red sequence repeated; 1 sc each st (12)
Round 4-8 :
Repeat color sequence to reach length approx equal to arm sleeve length (12)
Info :
Work sleeves as separate tubes and slip over the stuffed arm before sewing the arm to the body so the seam is hidden under the cuff. The cuffs are finished in red with 1-2 rounds of FLO ribbing for a folded look.
— Hair (Yarn Strand Attachment) :
Info :
Hair is made by attaching multiple yarn strands folded in half across the head using a lark's head knot inserted into each stitch row. Use bright red worsted yarn. Pre-cut strands to twice desired final length (approx 16-18 cm each for the pictured bob). For a full head you will need approx 180-220 strands depending on thickness.
Step :
Fold a bundle of 3-4 strands in half, insert hook through a stitch at preferred hairline (usually between rounds 7-10 of head), pull the folded loop through and pull ends through loop to tighten. Repeat across head in rows until crown is covered. For a blunt bob, attach strands up to round 12 and trim evenly at the bottom to shape.
Info :
For body framing, create slightly longer strands toward center top to mimic the photo where hair falls below chin on the sides. Use scissors to even out length, then use a small dab of fabric glue at the base of some knots if extra security is desired.
— Facial Embroidery and Scar :
Info :
Use orange embroidery thread for eyebrows. Place eyebrow as an angled short satin stitch on rounds 11-13 about 5-7 stitches above the eye. The scar beside right eye uses black and red embroidery thread in small crossed stitches. Mark placement when head is stuffed and eyes placed. Use thin yarn or embroidery floss to avoid bulky stitches.
Step :
To embroider the scar: with red thread, make a short zig-zag line of 6-8 small straight stitches slanted outward from the outer corner of the eye (stitch across rounds 12-14). Then overlay with very small black straight stitches crossing the red line to imitate stitches. Knot and hide tails inside head.
Info :
Safety eyes must be attached before heavy stuffing. Position eyes symmetrically and use a ruler or stitch counts to confirm spacing. For the look shown, eyes are slightly oversized in proportion to the head for a stylized effect.
— Finishing Details and Buttons :
Step :
Sew two small orange buttons to the front of overalls at strap ends. Use matching thread or yarn and tack through bib so straps do not shift. Add a tiny red embroidery around the neckline to mimic the red collar in the original.
Info :
Trim any obvious yarn tails and weave ends into bodies using a yarn needle. If necessary, steam-block hair lightly (do not apply heat directly to safety eyes) to set the shape if your yarn allows.
— Extra Rounds: Texture & Reinforcement (Optional) :
Round 1 :
For added weight and balance, insert a small pellet bag or bag of beans at the bottom before final closure of the body. If using pellets, place them in a sealed small bag to prevent them moving inside the toy.
Round 2 :
Optionally, embroider small shoe laces or add surface slip stitch details on shoes to match the raised white straps pictured.
Info :
Check all attachment points by tugging gently; reinforce with extra passes of yarn if necessary so limbs remain secure during play or display.
This Chucky-inspired amigurumi pattern blends classic amigurumi construction with characterful details like the bright red yarn hair, embroidered scar, and tiny denim-like overalls. Every section is covered so you can confidently build, stuff, and assemble each piece into a finished collectible. The process is fun and satisfying — your finished doll will be full of personality and perfect for Halloween displays or as a quirky gift. 🧶👻