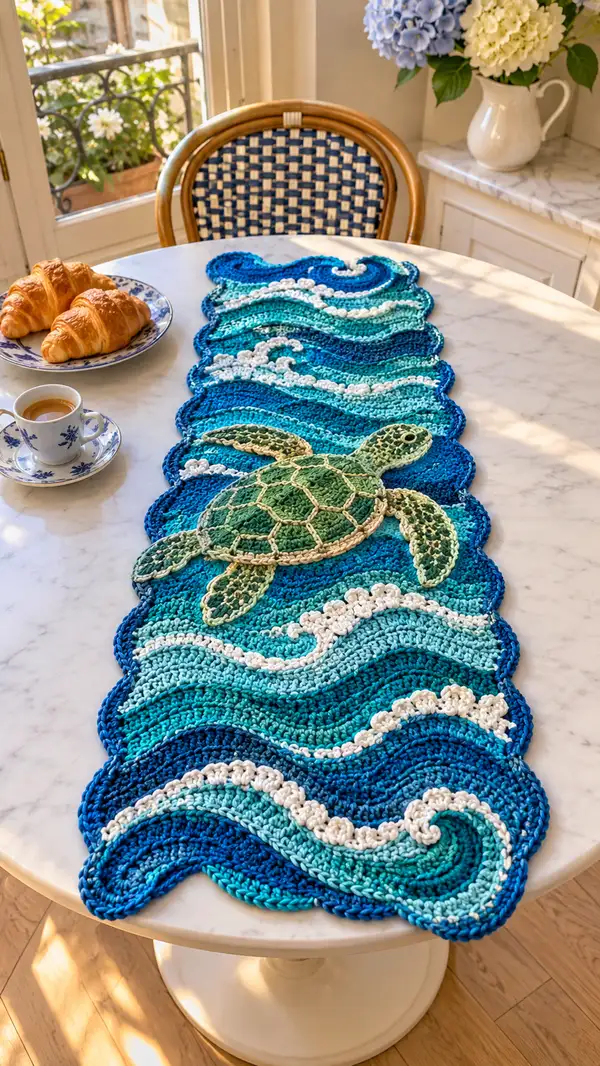
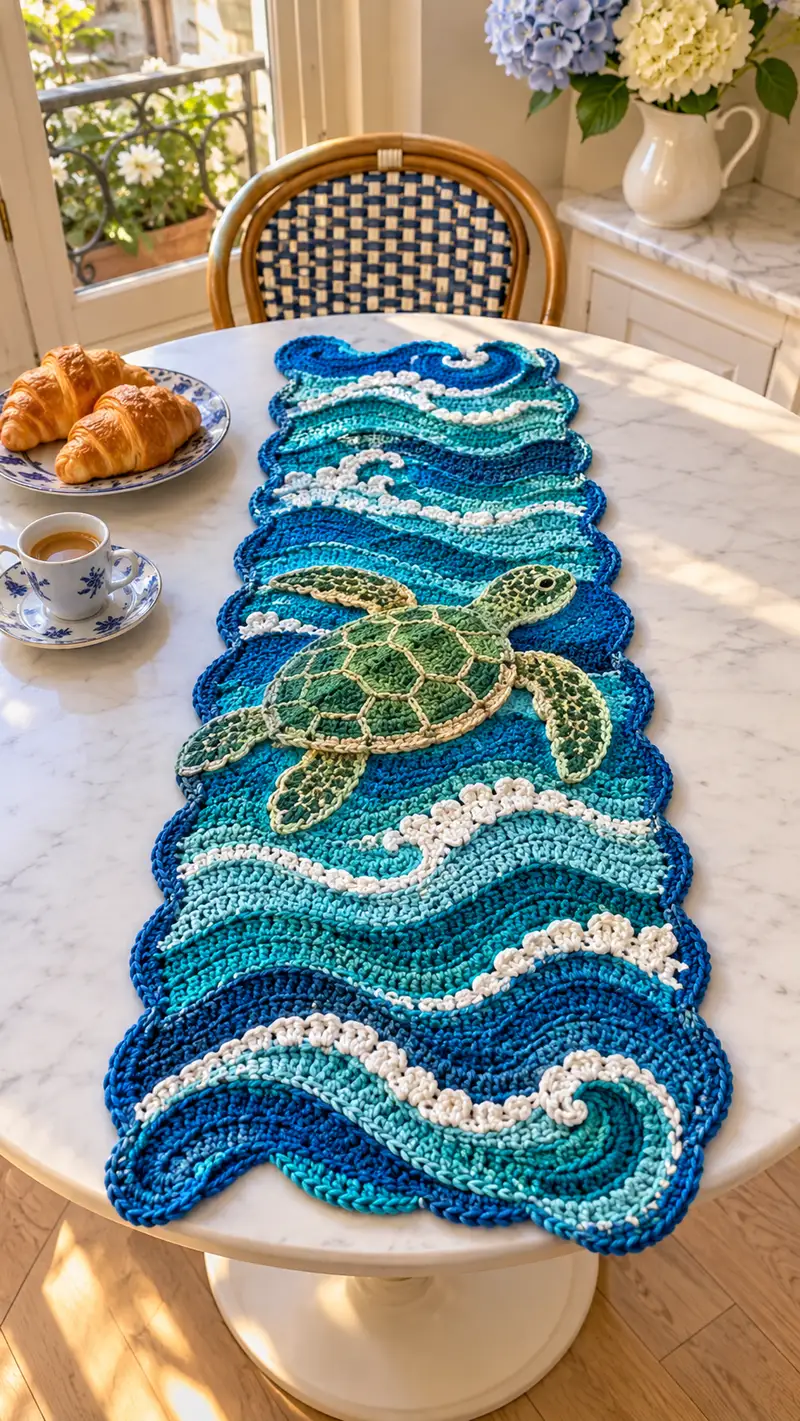
A stunning ocean-inspired table runner featuring undulating crochet waves in layered blues with foamy white accents and a raised, appliqued sea turtle. This runner blends textured stitches and color transitions to create a realistic surf scene perfect for dining and coastal decor. Worked in cotton-blend yarn, the piece lays flat with a scalloped edge and sits beautifully on a round or rectangular table. Includes step-by-step rounds for waves, border, turtle applique, and finishing tips.
Progress Tracker
0% Complete
— Wave Base Module (make 6 modules and join) :
Info :
This runner is made from six wave modules worked in the round and joined side-by-side to form an elongated runner. Each module is worked as a slightly oval scalloped disc to create a continuous wave edge when joined. Use 4.0mm hook and worsted cotton. Each module measures approximately 10-12 inches tall by 7-9 inches wide after blocking; join six modules end-to-end for the full runner shown. Adjust number of modules for length as desired.
Round 3 :
(1 sc, 1 inc) x 6 (18)
Round 4 :
(2 sc, 1 inc) x 6 (24)
Round 5 :
(3 sc, 1 inc) x 6 (30)
Info :
These first rounds form a circular base. To begin forming an elongated oval, we will add additional increases at two opposite sides of the disc in the next rounds to create lengthwise shaping. Use stitch markers at the two opposite increase points for consistent shaping.
Round 6 :
(4 sc, 1 inc) x 6 (36)
Round 7 :
(5 sc, 1 inc) x 6 (42)
Round 8 :
Work 1 sc into each of next 6 sts, then at opposite side work (1 sc, inc) into next st; repeat around to keep two small ribs at the ends to encourage oval shape (42)
Round 9 :
(6 sc, 1 inc) x 6 (48)
Round 10 :
1 sc in each st (48)
Info :
Change to next blue shade (cerulean) now if you want a striped gradient. Carry the unused navy inside or fasten off and weave in later. For smooth color transitions, change color on last yarn over of previous round.
Round 11 :
1 sc in each st (48)
Round 12 :
(7 sc, 1 inc) x 6 (54)
Round 13 :
1 sc in each st (54)
Round 14 :
(8 sc, 1 inc) x 6 (60)
Round 15 :
1 sc in each st (60)
Info :
We will now begin building a scalloped wave-top edge using shells and shell clusters. Decide whether this module will be a deeper-wave (use more rounds of shells) or a shallow wave—this pattern builds a medium-depth scallop at the top.
Round 16 :
*skip 1 st, 5 dc in next st (shell), skip 1 st, sl st in next st; rep from * around to create 12 shells (60)
Round 17 :
Ch 1, sc in each st and in each sl st and between shells around to form a tidy foundation (60)
Round 18 :
*(sc, hdc, 3 dc, hdc, sc) all in tip of shell (creates raised ridge), sc in each sc between shells; rep around (60)
Info :
To create deeper undulations, work the next 6 rounds with FLO to create ridges that will read as wave valleys when modules are joined. Use FLO on even-numbered solid rounds where indicated.
Round 19 :
1 sc in each st FLO (60)
Round 20 :
1 sc in each st (60)
Round 21 :
(3 sc, 1 dec) x 12 (48)
Round 22 :
1 sc in each st (48)
Info :
Change color to turquoise for the next stripe of the module. Plan a color sequence across modules so when joined you have an appealing gradient repeating along the runner.
Round 23 :
1 sc in each st (48)
Round 24 :
(2 sc, 1 dec) x 12 (36)
Round 25 :
1 sc in each st (36)
Round 26 :
(1 sc, 1 dec) x 12 (24)
Round 27 :
1 sc in each st (24)
Info :
At this stage the module forms a slightly medallion-like shape with scalloped top edge. Repeat color bands to create a layered wave look: you can fasten off here and make next module, or continue to alternate blues and whites to increase height. Make six modules total in matching or mirrored color order for attractive repeat.
Round 28 :
*(sc, ch2, sc) in every other st around edge to form small loops for joining later (24)
Info :
Fasten off and leave a 20-30 inch tail for joining. Make sure to weave in loose ends later after final blocking and joining. Block each module lightly to shape scallops and even out color transitions before assembly.
— Joining Wave Modules :
Info :
Lay six modules in desired order (or more/less for custom length) with scalloped edges aligned so peaks and troughs match. Use mattress stitch or whipstitch with a length of matching yarn and yarn needle. Join along the small loop edges formed in Round 28: connect corresponding loops with single whip stitches, aiming to make the join flexible but secure. Join modules sequentially to form a long runner strip.
Round 29 :
Align module A and B: with RS facing, insert needle through corresponding loop on module A then through the corresponding loop on module B and pull yarn to join; continue around edge to seam full side. Repeat for all seams (this is counted as a 'round' of assembly).
Info :
After joining all modules side-by-side, lay the joined strip flat and check for gaps. If seams pull too tight, pick up a few additional loops along the seam edge and crochet a small row of sc in the seam to flatten the join (see next rounds).
Round 30 :
With 4.0mm hook and deep navy, pick up sts along the long edges of the joined modules and work 1 sc in each loop around the entire runner edge to create a continuous foundation (count will vary depending on number of modules joined; expect approx 360–420 sts for 6 modules). Use markers at each module join to maintain alignment.
Round 31 :
1 sc in each st around (continuous count as picked up) (same)
Info :
Now we will begin working scallops and decorative shell rows along the long length to emphasize wave motion. Work in sections of 8–12 rounds across the full runner edge to build depth. Use different blue shades in waves for contrast; carry yarn inside or fasten off and weave ends neatly behind work.
Round 32 :
*skip next 2 sts, 7 dc in next st (shell), skip next 2 sts, sl st in next st; rep across long edge to create a large shell scallop (count depends on edge length)
Round 33 :
Ch 1, sc in each st and each sl st around to stabilize shell row (same)
Round 34 :
Work alternating rows of 1 sc around and 1 row of shells (as R32) three times to add three scalloped layers along the long edges. Maintain consistent stitch counts by working shells into roughly every 8th stitch along edge; adjust by adding or skipping a sc to end evenly.
Info :
At two ends of the runner, shape a rounded termination with increased shell clusters to form the swirled wave tips shown in the sample image. Use more shells and increases at each end for dramatic curl.
Round 35 :
At each end make 6 shells in a cluster to create a strong curl: (7 dc in same st) x 6 into a single end loop, then sl st to adjacent loop, repeat for the opposite end, then sc evenly around the remainder of the long edge to tidy (counts vary).
Round 36 :
1 sc in each st around (same)
Info :
Lightly wet-block or steam-block the entire runner now, pinning scalloped edges into nice curves. Let dry thoroughly before adding applique turtle and foam details to ensure pieces sit flat.
— Turtle Applique Overview :
Info :
The sea turtle is worked as multiple 3D applique pieces: shell top (domed), shell underside (flat), head, 4 flippers, and a small tail. The shell top is slightly stuffed for dimension and sewn onto the wave base. Use greens and a contrasting tan/gold for the shell ridges. Work all turtle pieces in 3.5mm or 4.0mm hook for a slightly denser fabric. Each piece is worked in rounds with magic ring starts for neat shaping.
— Turtle Shell Top (make 1) :
Round 3 :
(1 sc, 1 inc) x 6 (18)
Round 4 :
(2 sc, 1 inc) x 6 (24)
Round 5 :
(3 sc, 1 inc) x 6 (30)
Info :
Switch to next lighter green if working a gradient shell. Use slip-stitch color changes to create subtle banding. Place a stitch marker at the start of each round to track increases accurately.
Round 6 :
(4 sc, 1 inc) x 6 (36)
Round 7 :
(5 sc, 1 inc) x 6 (42)
Round 8 :
1 sc in each st (42)
Round 9 :
(6 sc, 1 inc) x 6 (48)
Round 10 :
1 sc in each st (48)
Round 11 :
(7 sc, 1 inc) x 6 (54)
Info :
We will now form a slightly domed shell by working a series of rounds with fewer increases and then even rounds to build height. Stuff lightly after several even rounds to get a gentle dome rather than a tight ball.
Round 12 :
1 sc in each st (54)
Round 13 :
1 sc in each st (54)
Round 14 :
(7 sc, 1 dec) x 6 (48)
Round 15 :
1 sc in each st (48)
Round 16 :
(6 sc, 1 dec) x 6 (42)
Round 17 :
1 sc in each st (42)
Round 18 :
(5 sc, 1 dec) x 6 (36)
Round 19 :
1 sc in each st (36)
Info :
Begin stuffing lightly through these even rounds—use small tufts of fiberfill to avoid lumps. The shell top should be gently rounded, about 6–8 mm of stuffing to maintain shape without being stiff.
Round 20 :
(4 sc, 1 dec) x 6 (30)
Round 21 :
(3 sc, 1 dec) x 6 (24)
Round 22 :
(2 sc, 1 dec) x 6 (18)
Round 23 :
(1 sc, 1 dec) x 6 (12)
Info :
Fasten off leaving a long tail for sewing to the shell underside. Do not close the last small opening; leave it so you can shape the shell rim firmly when attaching the underside. We will outline the shell with tan/gold ridges as decorative plating in the next section.
— Shell Ribbing and Hex Outline :
Round 25 :
Attach tan/gold yarn to the outermost stitch of shell top. Ch 1, sc evenly around the shell rim picking up both loops where possible to create a defined rim (approx 36 sts). (36)
Round 26 :
Working in surface slip stitch or embroidery: use tan yarn to embroider hexagon shapes on shell top: mark 6 radial lines with yarn needle from center to rim approximately 6 stitches apart; then connect lines with shallow arcs to create 12–15 hex cells. This is worked as embroidery rather than rounds; see Info for tips.
Info :
To embroider hex plate outlines: use a yarn needle and long tail of tan yarn. Bring the needle up through one center stitch, make a chain-like surface stitch along the marked radial line, then work small connecting stitches to define cell edges. Keep stitches snug but not too tight to avoid puckering. Alternatively, you can crochet narrow chain outlines in place but embroidery is faster and flatter.
— Shell Underside (make 1) :
Round 3 :
(1 sc, 1 inc) x 6 (18)
Round 4 :
(2 sc, 1 inc) x 6 (24)
Round 5 :
(3 sc, 1 inc) x 6 (30)
Round 6 :
1 sc in each st (30)
Round 7 :
1 sc in each st (30)
Round 8 :
(4 sc, 1 inc) x 6 (36)
Round 9 :
1 sc in each st (36)
Info :
The underside should be slightly convex to accommodate the gently domed top. We will leave an opening to insert light stuffing and then whipstitch the underside to the top around the rim. Match counts so that shell underside rim aligns with shell top rim—adjust stitches by adding or skipping a few sc evenly if needed.
Round 10 :
(5 sc, 1 inc) x 6 (42)
Round 11 :
1 sc in each st (42)
Round 12 :
*(sc, ch1, sc) in every third stitch around rim to create looped edge for sewing (42)
Info :
Leave a 6 cm opening unsewn to insert stuffing once top and underside are partially joined. When joining, sew through the looped edge on the underside to the rim of the top shell top (the tan rim previously made) with small tidy whip stitches for an invisible join.
— Turtle Head (make 1) :
Round 3 :
(1 sc, 1 inc) x 6 (18)
Round 4 :
(2 sc, 1 inc) x 6 (24)
Round 5 :
1 sc in each st (24)
Round 6 :
(3 sc, 1 inc) x 6 (30)
Round 7 :
1 sc in each st (30)
Info :
We will now shape the snout by working a few shorter rounds at one end. Place safety eye position markers after Round 7: mark two points approx 6–8 stitches apart depending on desired expression. If making for a child, embroider eyes instead of using safety eyes.
Round 8 :
Work 10 sc evenly across next 10 sts, dec in next 4 sts to narrow snout, then sc across remaining sts (approx 26) (26)
Round 9 :
(3 sc, 1 dec) x 6 (24)
Round 10 :
(2 sc, 1 dec) x 6 (18)
Round 11 :
(1 sc, 1 dec) x 6 (12)
Info :
Stuff head lightly, keeping shape narrow at snout. Fasten off leaving a long tail to sew the head to the shell underside at the front-most seam between the top and underside. Add embroidered nostrils by inserting a darker green or brown yarn through two tiny stitches on the snout after attaching.
— Flippers (Make 4: 2 front, 2 rear) :
Front Flipper Round 1 :
6 sc in mr (6)
Round 3 :
(1 sc, 1 inc) x 6 (18)
Round 4 :
(2 sc, 1 inc) x 6 (24)
Round 5 :
1 sc in each st (24)
Round 6 :
(3 sc, 1 inc) x 6 (30)
Round 7 :
1 sc in each st (30)
Info :
Flatten the working piece and shape into an elongated paddle by working a row of decreases on one side and even stitches on the other. This gives the flipper a tapered shape suitable for sewing to the shell.
Round 8 :
Fold flipper in half lengthwise; work 12 sc through both layers across one long edge to create a tapered paddle (12)
Round 9 :
(4 sc, 1 dec) x 2, sc across remaining (10)
Round 10 :
(3 sc, 1 dec) x 2, sc remaining (8)
Round 11 :
(2 sc, 1 dec) x 2, sc remaining (6)
Round 12 :
Fasten off leaving long tail for sewing. Make 3 more flippers. Slightly stuff only the base of front flippers for gentle lift; rear flippers remain flatter and are sewn more closely to the underside.
Info :
For a textured look on flippers, use front loop post stitches or alternate sc and hdc in a mottled green to mimic scale pattern. You can also embroider small tan fingerprint marks to tie in with shell hex plating.
— Turtle Tail (optional) :
Round 3 :
(1 sc, 1 inc) x 6 (18)
Round 4 :
(2 sc, 1 dec) x 6 (12)
Round 5 :
1 sc in each st (12)
Round 6 :
(1 sc, 1 dec) x 4 (8)
Round 7 :
Fasten off and leave tail to sew to back center underside of shell.
Info :
Tuck the tail flat under the rear seam; keep it subtle so it doesn’t catch on table items. Use a short tail and sew securely into seam of underside.
— Foam & Whitewater Embellishments :
Info :
To create the raised foamy surf, work small bobble and popcorn stitch clusters in white yarn, and surface crochet spirals for curl detail. Work several foam motifs to place along the long runner, especially at peaks and around the turtle to create the illusion of waves enveloping it.
Round 1 :
Make small foam clusters: ch 4, join into a small ring with sl st, work 7 dc into ring, pull tight, sl st to join. Fasten off leaving long tail for sewing. Make 24–30 clusters of varying sizes.
Round 2 :
Popcorn variation: ch 2, 5 dc in same st, remove hook, insert hook in first dc of the 5, pull loop through to create popcorn, sl st to secure. Use these to create dense foamy patches. Make approx 12–18 popcorns.
Round 3 :
Surface spiral: with white yarn and yarn needle, make surface slip-stitch spirals on top of wave peaks by drawing yarn along existing stitches: bring needle up at center of spiral, make surface sl st in a circular spiral path, working 2–3 passes to build height.
Info :
Sew foam clusters and popcorns to the runner with matching white tails, securing densely around the top of shell and at several other wave peaks to mimic frothy surf. Place clusters under a front-facing shell edge to appear like the turtle is pushing through the water.
— Border and Final Edge Finishing :
Round 1 :
With deep navy yarn and 4.0mm hook, sc evenly around entire runner edge picking up one loop from the last shell row to neaten the seam. Maintain even count by adjusting with occasional inc/dec to prevent puckering (expected count around 360–420 depending on modules); work until whole edge is covered.
Round 2 :
*(ch 2, skip 1 st, sc in next st) repeat around to create a subtle picot-like scallop (same)
Round 3 :
1 sc in each st around to firm the last round (same)
Round 4 :
Work a final decorative shell row in dark blue at the very edge: *5 dc in next st, skip next 2 sts, sl st in next; rep across long edges and around ends to create a continuous ocean wash look (same)
Info :
Fasten off and weave in all ends at the back of the runner. Give the finished runner a final blocking if desired to encourage scallops to lie flat and to set the overall shape.
— Final Turtle Assembly and Placement :
Info :
Sew the shell top to underside around the looped rim leaving a small hole to add the light stuffing before closing completely. Position turtle on runner roughly one-third from one end (as in photo) so its flippers overlap waves naturally. Use matching green yarn and small whip stitches to attach shell to runner, sewing through underside rim into runner to anchor the turtle firmly.
Round 1 :
Begin sewing flippers: pin each flipper in place to the shell underside and runner; for front flippers sew through both seam and runner fabric with small whip stitches to create a partially raised effect; for rear flippers sew flatter.
Info :
Attach head to the front of the underside seam with a few secure stitches; position slightly raised. Sew tail to rear center. Reinforce each attachment with 2–3 passes for durability on a table where items will be placed near the turtle.
Round 2 :
Use tan/gold yarn to add a decorative running outline around the turtle shell if desired. Work surface slip stitch or small sc loops spaced evenly around the shell perimeter for a plated look.
Info :
Once the turtle is attached, place foam clusters strategically under and around the turtle using the long tails left earlier to sew them in. Trim any stray threads and hide knots on the underside of the runner. The finished runner should be flexible and lie flat with sculpted, soft 3D elements for visual interest.
Finishing this Sea Turtle Ocean Wave Table Runner is such a rewarding craft journey—each scallop and shell outline brings the sea to your table. The textured waves and the charming appliqued turtle make a striking centerpiece that is both decorative and durable. I love seeing how the colors shift across the stripes and how light catches the scalloped edge. 🐢🌊 Add it to your home for a coastal touch, or give it as a thoughtful handmade gift. Happy stitching! 🧶