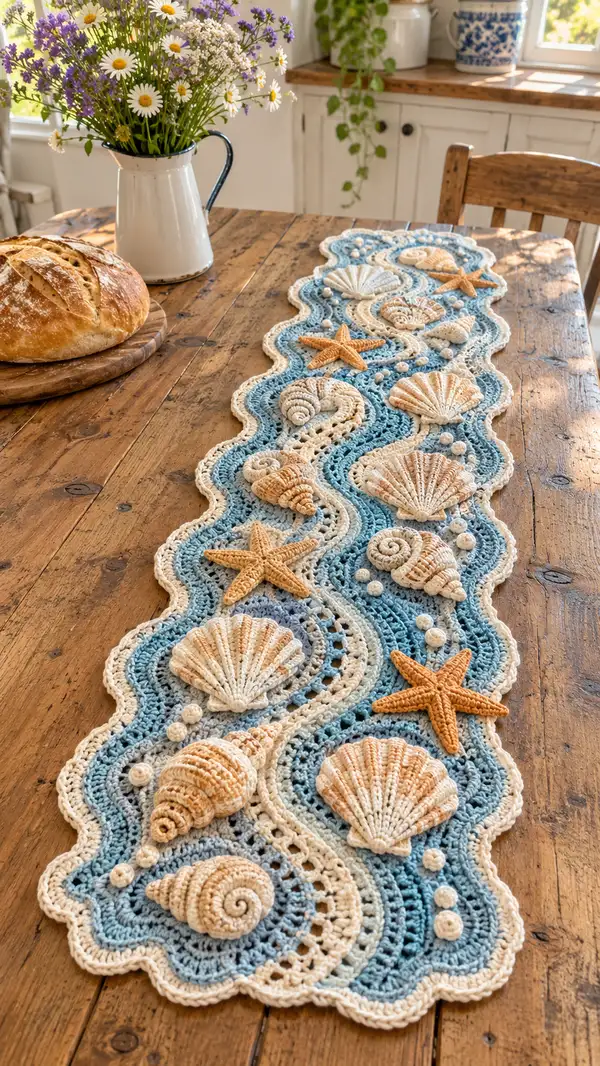
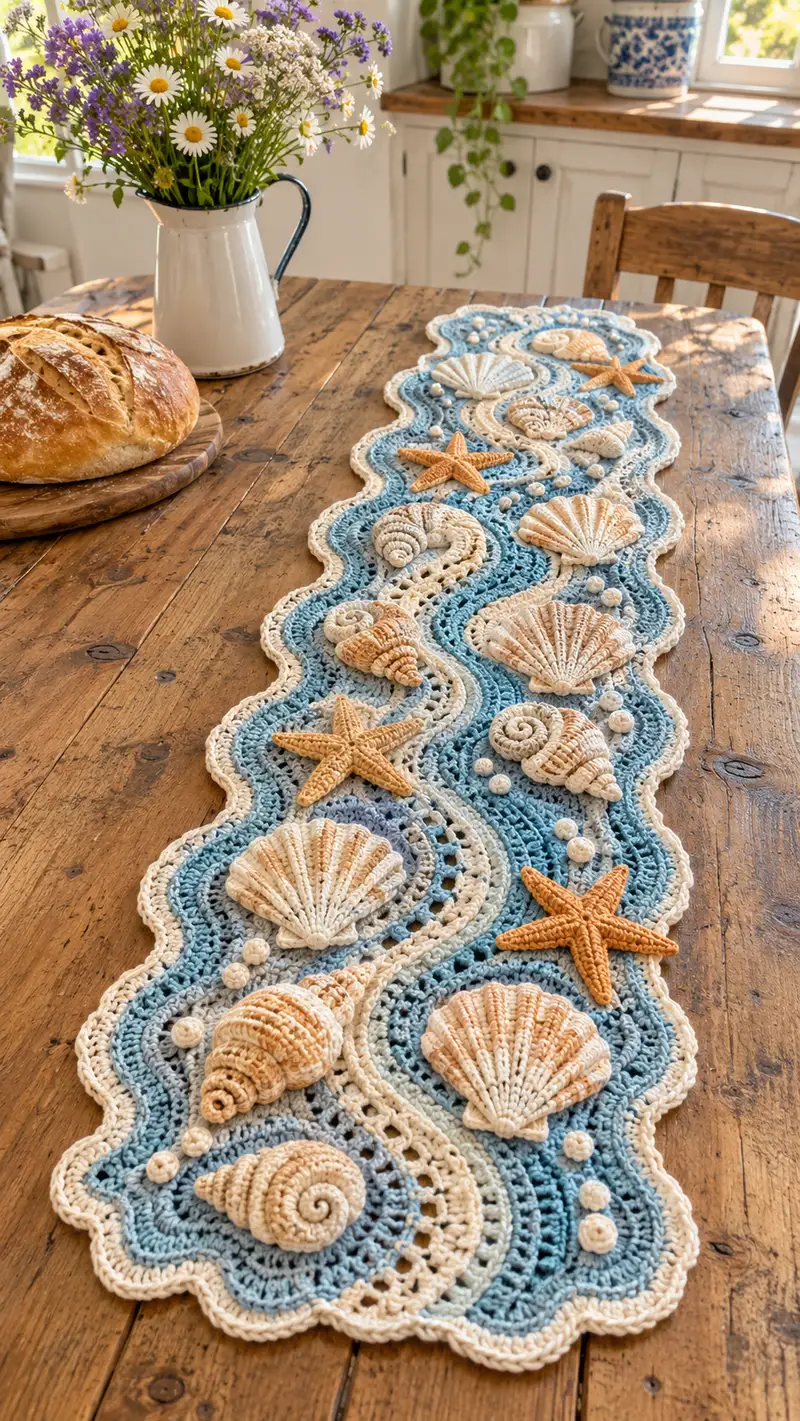
Bring the beach to your table with a richly textured crochet runner featuring wavy panels, raised scallop shells, spiral conch shells, starfish and pearl bobbles. This seaside table runner combines layered wave motifs in soft blues with warm sand and coral tones for dimensional coastal charm. Perfect as a centerpiece for summer tables or a beach-themed room, the runner is worked in individual motifs and joined to create a sinuous, scalloped edge. Detailed rounds and assembly notes guide you through each 3D applique and the border finishing.
Progress Tracker
0% Complete
— Runner Base Wave Panel :
Info :
Make two mirrored wave panels that will be joined center-to-center to create a long, sinuous runner. Each wave panel is worked in joined rounds (or continuous rounds) to build alternating openwork ribs and solid wave bands. Use 3.5mm hook and main sea blue shade. Gauge is flexible — aim for crisp stitches. Start with a foundation chain that determines width; the sample uses 86 ch to create a finished panel approx. 14cm (5.5in) wide when relaxed. Adjust chain in multiples of 6 + 2 if you need to change width.
Round 1 :
Ch 86 (or preferred multiple). Join with sl st to first ch to work in rounds, ch1 does not count. Work 1 sc in each ch around (86). Place marker at first sc.
Info :
Work tightly on the initial rounds to set a sturdy edge. If you prefer seams later to be less visible, use continuous rounds without joining and mark round starts with a removable marker.
Round 2 :
Ch3 (counts as dc), *sk 1 st, dc in next 4 sts, ch1, sk1, dc in next 1 st*; rep from * to * around, ending with dc in last st, join with sl st to top of ch3 (pattern creates a banded texture) (86)
Round 3 :
Ch1, 1 sc in each st and ch sp around (86)
Round 4 :
Ch2 (counts as hdc), *hdc in next 2 sts, ch2, skip 2 sts, hdc in next 3 sts*; rep around, join (86)
Round 5 :
Ch1, sc in each st and ch sp around (86)
Round 6 :
Ch3, *dc in next 5, ch1, sk1*; rep to end, join (86)
Info :
At Rounds 2-6 we build alternating meshes and ribs. Keep stitch count constant so the panel remains flat — adjust tension if waves cup.
Round 7 :
Ch1, sc in each stitch around (86)
Round 8 :
Change to mid ocean blue (Info: change to mid ocean blue now; carry main yarn along inside if you prefer stripes). Ch2, (hdc in next 4, ch2, sk 2) around, join (86)
Round 9 :
Ch1, sc in each st and ch sp around (86)
Round 10 :
Ch3, (dc in next 6, ch1) around, join (86)
Info :
Every 3–4 rounds alternate between openwork rows and solid sc/hdc rows to create a visual wave. Work Rounds 2-10 twice more, shifting color to deep sea teal at Round 14 for a gentle gradient. Keep counts consistent (86).
Round 11-20 :
Repeat rounds 2-10 changing color gradually (work 2 rounds in mid ocean blue, then 2 in deep sea teal) so you have built up a banded wave pattern approximately 20 rounds high. Maintain 86 stitches per round.
Info :
If you prefer a longer runner, make each panel longer by continuing alternating bands until desired length. The sample uses two panels each approx. 24in long, then joined center-to-center for a 48in runner.
Round 21 :
Ch1, sc in each st BLO (back loops only) to define a crisp ridge along the wave edge (86)
Round 22 :
Ch3, dc in each st around (86)
Round 23 :
Ch1, sc in each st around (86)
Round 24 :
Ch2, hdc in next st, *ch2, skip 2, hdc in next 3*; rep around to create small open arches along the inner shore where shells will attach (86)
Info :
Work two identical panels. Mirror the stitch direction of the second panel so when joined the waves create a continuous flowing line. Block both panels lightly to smooth stitches before assembly.
Round 25-28 :
Work 4 rounds of even sc in the same color to stabilize (86). Fasten off and weave in ends. Make a second mirrored panel following same rounds.
— Scallop Shell Motif (Make 6) :
Info :
These raised scallop shells are worked flat and domed with light stuffing. Use sand/beige and cream for highlights. Each shell is roughly 9cm (3.5in) wide in sample. Work with 3.0mm hook for tighter texture. Make 6 shells to arran ge along the runner.
Round 1 :
With sand color, mr, 6 sc in mr (6)
Round 3 :
(1 sc, inc) x6 (18)
Round 4 :
(2 sc, inc) x6 (24)
Round 5 :
(3 sc, inc) x6 (30)
Info :
Round 1-5 expand a base disk which will later be shaped into a fan. Keep the center well-closed for a neat shell apex.
Round 6 :
Ch1, (sc in next 4, 2 sc in next) x5, then sc in next 5 (36)
Round 7 :
Switch to cream for highlight (Info: change to cream at back of shell; carry sand inside or fasten off and weave in). Ch1, sc in each st around (36)
Round 8 :
Ch2, (dc in next 2, tr in next 2, dc in next 2) across creating raised ribs across the shell fan; join (36)
Round 9 :
Ch1, sc in each st BLO to emphasize ridges (36)
Round 10 :
Ch1, *skip 2, 5 dc cluster in next st, skip 2, sc in next*; rep across creating shell scallops (36)
Info :
Add light stuffing to the disk now: push a small amount of fiberfill into the center only to create a gentle dome — do not overstuff. The shell should remain relatively flat with raised ribs.
Round 11 :
Ch1, sc in each st around tightening the perimeter and covering the inner stuffing (36)
Round 12 :
Embroider radiating lines from center to edge using surface slip stitch in darker sand, 12 evenly spaced lines. Secure ends and weave through several stitches to hide.
Round 13 :
Using slip stitch edging in cream, work 1 sl st around to smooth edge and give neat finish. Fasten off leaving long tail for sewing. Make 6 shells total following same rounds.
— Spiral Conch Shell Motif (Make 4) :
Info :
These spiral conches are three-dimensional, worked in continuous rounds with incremental increases and strategic shaping to create a tapered spiral. Use 3.0mm hook and sand with cream highlights. Each finished conch is approximately 8cm long in sample.
Round 1 :
mr, 6 sc in mr (6)
Round 3 :
(1 sc, inc) x6 (18)
Round 4 :
(2 sc, inc) x6 (24)
Round 5 :
(3 sc, inc) x6 (30)
Info :
We will now create off-center increases and spiral shaping: do not join rounds if you want a continuous spiral effect; use a stitch marker to track round starts and shift increases slightly each round to build a spiral ridge.
Round 6 :
1 sc in each st around (30)
Round 7 :
(4 sc, inc) x5, sc in next 4 (35)
Round 8 :
1 sc in each st around (35)
Round 9 :
(5 sc, inc) x5, sc in next 5 (40)
Round 10 :
1 sc around (40)
Round 11 :
(6 sc, inc) x5, sc in next 6 (45)
Info :
From Round 6 onward, place an extra sc at the beginning of each round before your increases and shift increases by 1-2 stitches each round in the same direction to encourage a spiral growth. This creates the visual spiral of the conch.
Round 12 :
1 sc around (45)
Round 13 :
(7 sc, inc) x5, sc in next 7 (50)
Round 14 :
1 sc around (50)
Round 15 :
(5 sc, dec) x8 (42)
Round 16 :
(4 sc, dec) x7 (35)
Info :
Begin tapering the end of the conch by decreasing every few rounds. Add small amounts of stuffing after Round 13 to maintain a firm but natural spiral — concentrate filling toward the broader end and leave the tip tapered and lightly filled.
Round 17 :
(3 sc, dec) x7 (28)
Round 18 :
(2 sc, dec) x7 (21)
Round 19 :
(1 sc, dec) x7 (14)
Round 20 :
7 dec (7). Stuff final tip lightly, fasten off leaving long tail for sewing. Add cream highlight ridges with surface slip stitch along spiral and small embroidered bands for realism.
— Starfish Motif (Make 4) :
Info :
Starfish are worked flat in rounds then shaped into five arms by working small tubes for each arm and then attaching them to the center. Use warm coral with slightly smaller hook (3.0mm) for neat arms. Each starfish is approx. 7-9cm from arm tip to tip.
Round 1 :
mr, 5 sc in mr, join with sl st (5) — form the central disc
Round 2 :
Ch1, (inc) x5 (10)
Round 3 :
1 sc in each st around (10)
Round 4 :
Ch2, *work 6 dc into next st, sl st into next st to anchor one arm base*; rep 5 times creating 5 arm bases, join (10)
Info :
We will now build arms separately: after creating 5 small fans for arm bases, work each arm in continuous rounds as a short tube with increases near the base for a flared look, then decrease to a tip.
Arm 1 - Round 1 :
Attach yarn at the base of the first fan, ch1, sc in base st and in each fan dc around to form 8 sc total along the arm base (8)
Arm 1 - Round 2 :
(sc, inc) x4 (12)
Arm 1 - Round 3 :
1 sc around (12)
Arm 1 - Round 4 :
(2 sc, inc) x4 (16)
Arm 1 - Round 5-8 :
1 sc around for 4 rounds (16)
Arm 1 - Round 9 :
(2 sc, dec) x4 (12)
Arm 1 - Round 10 :
(1 sc, dec) x4 (8)
Arm 1 - Round 11 :
4 dec (4). Fasten off, leave tail. Stuff very lightly, shape and close tip with yarn needle.
Info :
Repeat Arm instructions for Arms 2-5 in the same manner. You will make 5 small tubes attached to the center disc — ensure arms are evenly spaced by counting anchor points on the central disc.
Round Final :
After all arms are made and attached, use surface slip stitch or embroidery to add texture: tiny raised French-knot-ish bobbles (make small bobble motifs described below) along each arm ridge. Fasten off and weave in ends.
— Small Bobble Pearls (Make multiple clusters) :
Info :
Small round bobbles approximate sea pearls and are used to fill gaps. Work with 2.75–3.0mm hook and cream yarn. Each bobble is 1.0–1.5cm wide.
Round 1 :
mr, 6 sc in mr (6)
Round 3 :
1 sc around (12) — do not stuff or only a tiny bit, flatten slightly and fasten off leaving tail for sewing. Make 18–24 bobbles for scattered accents.
— Border Scallop Edging (Around full runner) :
Info :
Once panels are joined and motifs attached, work a flowing scalloped border in cream to finish the edge. The scallop edge follows the wavy contours and is worked in continuous rounds. Use 3.5mm hook and cream yarn.
Round 1 :
With panels joined (see assembly), attach cream yarn at a wave crest. Ch1, sc evenly along outer edge placing 1 sc every 2-3 sts to follow curve (estimate 220–260 sc around full runner depending on length)
Round 2 :
*Skip 2 sts, 5 dc in next st, skip 2 sts, sc in next*; rep around creating shell-like scallops. Adjust spacing to keep scallops even and flowing.
Round 3 :
Ch1, sc in each st around covering the base of the scallops and evening the edge (same stitch count as Round 1)
Round 4 :
For a decorative final ridge, *sc, hdc, 3 dc, hdc, sc* in each scallop top; rep around. Fasten off and weave in ends neatly.
Info :
Blocking at this stage will smooth the scallops and help the motifs sit flat. Use a damp cloth and pin scallops into desired shape, allow to dry thoroughly.
— Joining Panels and Attaching Motifs :
Info :
Lay the two wave panels right sides up and position them so their inner edges (the edges with arch spaces) meet in a mirrored S-shape. Pin in place and check overall composition. You will join across the center seam with mattress stitch or slip stitch joining, then sew appliques into the arch spaces and on top of waves.
Round 1 :
Join panels by aligning inner ch2 arch rows. Using sand or cream for a subtle seam, whip stitch through both panel edges, making stitches approximately every 4–6 loops to allow a little give (work entire length). Alternatively, use a row of sc across both panels to create a decorative ridge (stitch count will equal combined panel edges).
Info :
Place large motifs first (scallop shells) into wider bays; conch shells fit nicely into narrower arches and starfish near crests. Use many pins to check spacing and balance. Keep heavier items closer to the runner center so edges lie flat.
Round 2 :
Sew each shell with long tail using ladder stitch or whip stitch through the perimeter rounds (for the scallop shell, sew through Round 11 perimeter). Make invisible stitches by catching single loops beneath the edge. Reinforce with extra passes for stability.
Round 3 :
Sew conch shells with tail from Round 20. Align spiral to follow runner curve. Add a line of surface slip stitch beneath conch to anchor and prevent flipping. Sew starfish attaching center first then each arm base securely through 2–3 rounds into the runner fabric.
Info :
Add the pearl bobbles by sewing through their flattened base into the runner, adding 2–4 stitches per bobble. Place bobbles in clusters to mimic foam bubbles. Use a small dab of fabric glue on the underside for extra hold if needed.
— Final Surface Details and Shading :
Info :
Use a darker sand/brown in duplicate-strand embroidery to add subtle lines and shadow at the base of shells and along conch spirals. Use surface slip stitch and single-strand yarn to pull faint ridges. Add tiny contrast stitches on starfish arms to mimic texture. Lightly steam-block the finished runner, taking care not to crush bobbles or shells; provide shape with pins while damp.
Round 1 :
Work a final pass around each sewn motif with small stitches to ensure edges are flush. Take time to trim stray fibers and weave in all ends on the back of the runner to prevent catching.
Info :
If you prefer a reversible runner, sew motifs only with a few secure stitches that can be removed and repositioned; otherwise, permanently secure motifs for heirloom durability.
This beach-inspired table runner brings a little shore-side magic to any table — textured waves, raised shells and starfish create a beautiful and tactile centerpiece. Each handmade detail adds unique charm and the modular build allows you to customize layout and color. Enjoy the meditative process of crocheting the motifs and arranging your own miniature seaside scene. 🧶🌊✨