🧢 Beautiful ✨ Detailed πŸ’ Adorable

Seven Dwarfs Amigurumi Pattern

Seven Dwarfs Amigurumi Pattern
4.3β˜… Rating
5-7 Hours Time Needed
1.1K Made This
βœ‚οΈ

Intermediate Level

Ideal for those with basic crochet experience, featuring slightly more advanced stitches and techniques to expand your skills.

⏱️

Weekend Treat

Takes 5-7 hours, making it an enjoyable project to finish over a couple of days.

🧸

Cute Companion

An adorable friend to cherish, handcrafted with love to bring comfort and joy for years to come.

About This Seven Dwarfs Amigurumi Pattern

This pattern teaches you how to crochet seven tiny dwarf amigurumi characters complete with hats, noses, ears, and beards. Each dwarf is built from the same core pieces with variations in facial embroidery and beard style to create distinct personalities. The instructions are written in US terms and include color change notes to match the sample Sneezy. Perfect for making a set of playful handmade toys or gifts.

Seven Dwarfs Amigurumi Pattern crochet pattern - detailed view of completed project

The pattern uses YarnArt Jeans yarn and a small 2–2.5 mm hook to create compact, well-shaped dolls. Step-by-step assembly photos and clear finishing notes help you add eyes, noses, hats, and beards with confidence.

Why You'll Love This Seven Dwarfs Amigurumi Pattern

I absolutely love this pattern because it turns simple shapes into charming characters with very little fuss. I enjoy how one core pattern can be customized to create seven unique personalities by changing hat color, beard length, and eyebrow embroidery. The use of bobble stitches for the beards gives such a delightful texture that really brings each dwarf to life. Sewing and finishing are satisfying and quick, so you get a finished, gift-ready set in just a few sessions.

Seven Dwarfs Amigurumi Pattern step 1 - construction progress Seven Dwarfs Amigurumi Pattern step 2 - assembly progress Seven Dwarfs Amigurumi Pattern step 3 - details and accessories Seven Dwarfs Amigurumi Pattern step 4 - final assembly and finishing

Switch Things Up

I love how easy it is to customize these dwarfs by simply changing hat and body colors to create new characters.

I often swap YarnArt Jeans for a slightly thicker DK yarn and a larger hook to make chunky, cuddly versions that are great for kids.

I also experiment with different beard lengths: make only the short beard for a tidy look or attach the long beard for a dramatic, storybook character.

I add blush with a little pink pastel or embroidery floss to give cheeks a warm, rosy expression that varies by dwarf.

Want posable arms? I sometimes insert thin craft wire into the arms before stuffing so the dwarfs can hold tiny props.

Try swapping safety eyes for embroidered eyes for a softer, baby-friendly toyβ€”just embroider the whites and pupils before assembling.

I like to make keychain versions by using finer yarn and attaching a small keyring to the top of the hat for portable charms.

For seasonal variations, I switch hat colors to red and green for Christmas or autumn tones for a cozy fall set.

I enjoy adding tiny accessories like a crocheted lantern, scarf, or tiny felt props to tell a story with each dwarf.

Finally, embroidering different eyebrow shapes and mouth positions is my favorite way to change personalityβ€”playful, grumpy, sleepy, or bashful, it’s all in the details!

Common Mistakes & How to Fix Them

βœ— Skipping stitch markers while joining legs to the body can make the seam uneven; place a marker at the join and count stitches carefully before continuing. βœ— Overstuffing the head or body often causes seams to bulge and distort the shape; stuff gradually and shape as you go to maintain smooth curves. βœ— Changing yarn colors without securing ends can lead to loose tails inside the piece; weave in color change ends as you go or secure them with a knot before continuing. βœ— Not placing safety eyes at the correct round will give the face the wrong expression; insert the 6mm safety eyes between rounds 12 and 13 as instructed and check spacing. βœ— Failing to fold and sew the ears properly will result in floppy ears; fold the ear in half and sew two edges together before attaching to the head.

Seven Dwarfs Amigurumi Pattern

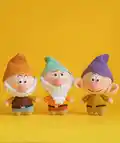
Make a charming set of seven dwarf amigurumi dolls with this detailed crochet pattern. You will create small, characterful figures with hats, beards, and expressive faces that are perfect for gifts or home display. The pattern includes full stitch-by-stitch instructions, materials list, and assembly guidance so you can follow along easily. Enjoy making a whole family of playful, handmade dwarfs!

Intermediate 5-7 Hours

Materials Needed for Seven Dwarfs Amigurumi Pattern

β€” Main Fabric

  • 01
    Color A: skin color YarnArt Jeans 73 (50g, 160m)
  • 02
    Color B: light brown YarnArt Jeans 48 (50g, 160m)
  • 03
    Color C: dark brown YarnArt Jeans 70 (50g, 160m)
  • 04
    Color D: black YarnArt Jeans 53 (50g, 160m)
  • 05
    Color E: yellow YarnArt Jeans 35 (50g, 160m)
  • 06
    Color F: beige YarnArt Jeans 07 (50g, 160m)
  • 07
    Color G: light pink YarnArt Jeans 36 (50g, 160m)
  • 08
    Color H: white YarnArt Jeans 03 (50g, 160m)
  • 09
    Color I: orange YarnArt Jeans 85 (50g, 160m)

β€” Tools Required

  • 01
    Crochet hook size 2-2.5mm
  • 02
    Black safety eyes 6mm
  • 03
    White felt for eye backing
  • 04
    Tapestry needles
  • 05
    Pins for positioning
  • 06
    Stitch markers
  • 07
    Scissors
  • 08
    Polyester stuffing

Progress Tracker

0% Complete

β€” Legs :

Round 1 :

sc 6 into a magic loop (6)

Round 2 :

[sc 1, inc] 3x (9)

Round 3 :

[sc 2, inc] 3x (12)

Round 4 :

[sc 3, inc] 3x (15)

Info :

Break the yarn, make the second leg in the same way, but don’t break the yarn this time. connect with 1st leg with 1 slst. Continue to crochet: sc 15 (leg 1) + sc 15 (leg 2) = 30. Move to the Body part, change to yarn C
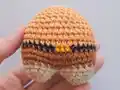
β€” Body :

Round 1 :

[sc 4, inc] 6x (36)

Round 2-3 :

sc 36 (2 rows), change to yarn D (36)

Round 4 :

sc 16, change to yarn E, sc 3, change to yarn D, sc 17, change to yarn F (36)

Round 5-7 :

sc 36 (3 rows) (36)

Round 8 :

[sc 4, dec] 6x (30)

Round 9 :

sc 30 (30)

Round 10 :

[sc 3, dec] 6x (24)

Round 11 :

sc 24 (24)

Round 12 :

[sc 2, dec] 6x (18)

Round 13 :

sc 18 (18)

Info :

Break the yarn with a long rest. Stuff.

β€” Nose :

Round 1 :

sc 6 into a magic loop (6)

Round 2 :

inc 6 (12)

Round 3 :

[sc 1, inc] 6x (18)

Round 4-5 :

sc 18 (2 rows) (18)

Round 6 :

dec 9 (9)

Info :

Break the yarn with a long rest to sew later. Stuff slightly.

β€” Arms :

Round 1 :

sc 6 into a magic loop (6)

Round 2 :

[sc 1, inc] 3x (9)

Round 3 :

sc 9, change to yarn F (9)

Round 4-9 :

sc 9 (6 rows) (9)

Info :

Break the yarn with a long rest. Stuff slightly. Sew 2 edges together.
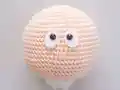
β€” Head :

Round 1 :

sc 6 into a magic loop (6)

Round 2 :

inc 6 (12)

Round 3 :

[sc 1, inc] 6x (18)

Round 4 :

sc 1, inc, [sc 2, inc] 5x, sc 1 (24)

Round 5 :

[sc 3, inc] 6x (30)

Round 6 :

sc 2, inc, [sc 4, inc] 5x, sc 2 (36)

Round 7 :

[sc 5, inc] 6x (42)

Round 8 :

sc 3, inc, [sc 6, inc] 5x, sc 3 (48)

Round 9 :

[sc 7, inc] 6x (54)

Round 10 :

sc 54 (54)

Round 11 :

sc 4, inc, [sc 8, inc] 5x, sc 4 (60)

Round 12-19 :

sc 60 (8 rows), insert 6mm safety eyes onto 2 oval white felts and place between the 12th & 13th rnd (60)

Round 20 :

[sc 8, dec] 6x (54)

Round 21 :

sc 54 (54)

Round 22 :

[sc 7, dec] 6x (48)

Round 23 :

[sc 6, dec] 6x (42)

Round 24 :

[sc 5, dec] 6x (36)

Round 25 :

[sc 4, dec] 6x (30)

Round 26 :

[sc 3, dec] 6x (24)

Round 27 :

[sc 2, dec] 6x (18)

Info :

Break the yarn with a long rest to sew later. Stuff.
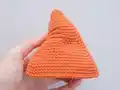
β€” HAT :

Round 1 :

sc 6 into a magic loop (6)

Round 2 :

[sc 1, inc] 3x (9)

Round 3 :

[sc 2, inc] 3x (12)

Round 4 :

[sc 3, inc] 3x (15)

Round 5 :

[sc 4, inc] 3x (18)

Round 6 :

[sc 5, inc] 3x (21)

Round 7 :

[sc 6, inc] 3x (24)

Round 8 :

[sc 7, inc] 3x (27)

Round 9 :

[sc 8, inc] 3x (30)

Round 10 :

slst 15, sc 15 (30)

Round 11 :

[sc 9, inc] 3x (33)

Round 12 :

slst 17, sc 16 (33)

Round 13 :

[sc 10, inc] 3x (36)

Round 14 :

slst 19, sc 17 (36)

Round 15 :

[sc 11, inc] 3x (39)

Round 16 :

[sc 12, inc] 3x (42)

Round 17 :

[sc 13, inc] 3x (45)

Round 18 :

[sc 14, inc] 3x (48)

Round 19 :

[sc 15, inc] 3x (51)

Round 20 :

[sc 16, inc] 3x (54)

Round 21 :

[sc 17, inc] 3x (57)

Round 22 :

[sc 18, inc] 3x (60)

Round 23 :

[sc 19, inc] 3x (63)

Round 24-27 :

sc 63 (63)

Info :

Break the yarn with a long rest to sew later.

β€” Short Beard :

Round 1 :

ch 34, start on the 3rd stitch from the hook, [Bobble 1, hdc 1] 16x, turn (32)

Round 2 :

ch 1, [sc 6, dec 1] 4x, turn (28)

Round 3 :

ch 2, [Bobble 1, hdc 1] 14x, turn (28)

Info :

Break the yarn with a long rest to sew later.

β€” Long Beard :

Round 1-3 :

Crochet as 1-3 rnd of Short Beard (28)

Round 4 :

ch 1, [sc 5, dec 1] 4x, turn (24)

Round 5 :

slst 6, ch 2, [Bobble 1, hdc 1] 6x, turn (12)

Round 6 :

ch 1, dec 1, sc 8, dec 1, turn (10)

Round 7 :

ch 2, [Bobble 1, hdc 1] 5x, turn (10)

Round 8 :

ch 1, dec 1, sc 6, dec 1, turn (8)

Round 9 :

ch 2, [Bobble 1, hdc 1] 4x, turn (8)

Round 10 :

ch 1, dec 4, turn (4)

Round 11 :

ch 2, [Bobble 1, hdc 1] 2x (4)

Info :

Break the yarn with a long rest to sew later.

β€” Ears :

Round 1 :

sc 6 into a magic loop (6)

Round 2 :

[sc 1, inc] 3x (9)

Round 3 :

[sc 2, inc] 3x (12)

Round 4 :

[sc 3, inc] 3x (15)

Round 5 :

[sc 4, inc] 3x (18)

Round 6 :

[sc 2, inc] 6x (24)

Round 7-8 :

sc 24 (2 rows) (24)

Round 9 :

[sc 2, dec] 6x (18)

Round 10 :

[sc 1, dec] 6x (12)

Info :

Break the yarn, fold the ears in half and sew 2 edges together

Assembly Instructions

  • Attach the Body to the Head by aligning the top of the body opening to the neck area of the head and sewing securely using a tapestry needle and whipstitch.
  • Attach the Arms to the Body by positioning them on either side between the upper body rounds and sewing the open edges together so the seam is hidden.
  • Attach the Hat to the Head, sew to the Head by needle, shaping the hat so it sits naturally over the top rounds of the head.
  • Attach the Nose under the eyes, centering it on the face and sewing through the base to secure it firmly.
  • Use the tapestry needle to sew the Beard under the Nose, aligning the top of the beard with the lower edge of the nose and stitching across to secure.
  • Fold and sew the Ears then position them on either side of the head and stitch them down so they are symmetrical and stable.

Important Notes

  • πŸ’‘Use stitch markers and count stitches regularly, especially when joining legs and changing colors for the body sections.
  • πŸ’‘Stuff pieces gradually and check shape frequently; under-stuffing causes flat parts while overstuffing distorts shaping.
  • πŸ’‘Insert 6mm safety eyes between rounds 12 and 13 of the head and back them with oval white felt before final sewing to hold them securely.
  • πŸ’‘Fold ears before sewing two edges together to create a neat, 3D ear shape and pin them in position before attaching to the head.

This charming Seven Dwarfs set brings classic character and handcrafted warmth to your home. Each tiny dwarf is packed with personality through hat colors, beard styles, and embroidered faces. Make a full set for display, gifts, or imaginative playβ€”these little dolls are quick to stitch and delightful to finish. 🧢✨

You ask,

we answer.

FAQs

What size will the finished piece be?

The finished amigurumi measures approximately 12 cm tall when using the recommended YarnArt Jeans yarn and a 2–2.5 mm hook, though size will vary with yarn and hook choices.

Can I use different yarn weights for this pattern?

Yes, you can use different yarn weights, but this will affect the final size and texture; choose an appropriate hook for your yarn and adjust stuffing accordingly for best results.

Do I need prior crochet experience for this pattern?

This pattern is rated intermediate, so basic knowledge of amigurumi techniques, working in the round, increases and decreases, and bobble stitches is recommended for best results.

How long does this project typically take to complete?

Most crocheters complete one dwarf in a few hours; making all seven will typically take 5-7 hours total depending on experience and finishing details.