🧢 Beautiful ✨ Detailed πŸ’ Adorable

Snowflake Ornament Pattern

Snowflake Ornament Pattern
4.3β˜… Rating
1-2 Hours Time Needed
1.3K Made This
βœ‚οΈ

Beginner Friendly Level

Perfect for those just starting their crochet journey, with clear instructions and simple techniques

⏱️

Quick Make

Complete in under 2 hoursβ€”lightning fast fun for instant gratification and quick gifts.

πŸŽ„

Holiday Cheer

Festive fun for the season, bringing handmade magic to celebrations and creating new family traditions.

About This Snowflake Ornament Pattern

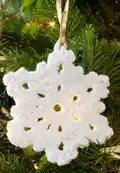
This pattern creates a pretty lacy snowflake ornament worked in a lightweight worsted-like yarn to measure approximately 13 cm (5") across. The design uses basic crochet stitches such as chains, double crochet, half treble, and treble crochet to form the openwork points. Youll get a crisp, decorative finish that looks beautiful on a tree or as gift decor.

Snowflake Ornament Pattern crochet pattern - detailed view of completed project

The pattern is easy to follow with four clear rounds and simple finishing instructions. A hanging loop can be added in your preferred style to complete the ornament.

Why You'll Love This Snowflake Ornament Pattern

I absolutely love this pattern because it makes a delicate, festive ornament with very little yarn and time commitment. The openwork design feels classic and elegant, and the six points give a perfectly balanced shape that blocks beautifully. I enjoy how customizable it is β€” change the yarn or add a metallic thread for a different look. It is satisfying to make several at once and see them transformed into charming holiday decorations.

Snowflake Ornament Pattern step 1 - construction progress Snowflake Ornament Pattern step 2 - assembly progress Snowflake Ornament Pattern step 3 - details and accessories Snowflake Ornament Pattern step 4 - final assembly and finishing

Switch Things Up

I love experimenting with yarn choices to change the look of this snowflake; try cotton for a crisp finish or a sparkly blended yarn for festive shimmer.

I sometimes use metallic thread held with the main yarn to give a subtle shine that catches tree lights beautifully.

To make a delicate, lacy version I switch to fingering weight yarn and a smaller hook for an elegant, smaller ornament.

For chunky, cozy snowflakes I use bulky yarn and a larger hook to create oversized decorations for wreaths or garlands.

I often add beads to the ch-3 spaces before joining to add sparkle and weight to the points for a different effect.

I recommend blocking each variation to exactly the same dimensions if youre making a matching set so they hang uniformly.

I sometimes stitch a small felt backing to the center and glue a button or gem for a vintage look and extra stability.

I also turn these into gift tags by embroidering names in the center or adding a small paper tag to the hanging loop.

For a rustic style, I replace the ribbon with twine and use natural-colored yarn to match farmhouse decor.

I like to create a mobile of snowflakes in graduated sizes by varying hook and yarn weight and suspending them at different lengths for a charming display.

Common Mistakes & How to Fix Them

βœ— Skipping the initial joining slip stitch can make your center hole uneven; always join ch 6 with a slip stitch to form a neat ring before beginning Round 1. βœ— Not creating consistent ch-3 spaces in Round 2 will cause uneven points; count and make sure you have exactly twelve ch-3 spaces after Round 2 before continuing. βœ— Failing to work the (2 tr, ch 3, 2 tr) cluster into the same space will distort the shape; place that entire cluster into the next ch-3 space as written to form even points. βœ— Forgetting to join rounds with a slip stitch in the specified stitch will change the stitch alignment; join each round exactly where directed to maintain symmetry. βœ— Working with inconsistent tension makes the snowflake diameter vary from the stated 13 cm; check your gauge and use a different hook size if necessary to achieve the correct measurement.

Snowflake Ornament Pattern

Create a delicate snowflake ornament to update your holiday decor or give as a handmade gift. This easy crochet pattern guides you through each round to make a 13 cm (5") snowflake with crisp points and pretty openwork. Youll love how quickly it comes together and how lovely it looks on the tree or as a tag on a present.

Beginner Friendly 1-2 Hours

Materials Needed for Snowflake Ornament Pattern

β€” Main Fabric

  • 01
    Red Heart Niki (medium #4), Color 02034 White A - 1 ball (50 g / 1.76 oz, 106 m / 116 yd)

β€” Tools Required

  • 01
    Crochet hook 3.75mm (US F-5)
  • 02
    Yarn needle
  • 03
    Ribbon or yarn for hanging loop (your choice for finishing)

Progress Tracker

0% Complete

β€” Snowflake :

Info :

Snowflake measures 13 cm [5"] in diameter.

Info :

With A, ch 6; join with a slip st to form a ring.

Round 1 :

Ch 1, 12 dc in ring; join with a slip st in first dc – 12 dc.

Round 2 :

Ch 1, dc in first st, [ch 3, dc in next dc] 11 times; htr in first dc to join and form last space – 12 ch-3 spaces.

Round 3 :

Ch 1, dc over htr, *(2 tr, ch 3, 2 tr) in next space**, dc in next space; repeat from * around, ending last repeat at **; join with a slip st in first dc.

Round 4 :

Ch 4, slip st in same st as joining, *ch 2, (dc, ch 3, dc, ch 5, dc, ch 3, dc) in next ch-3 space, ch 2**, (slip st, ch 4, slip st) in next dc; repeat from * around, ending last repeat at **; join with a slip st in slip st of last round. Fasten off.

β€” Finishing :

Info :

Weave in ends. Add hanging loop of your choice.

β€” Abbreviations :

Infos :

ch = chain; cm = centimeters; dc = double crochet; htr = half treble crochet; mm = millimeters; st(s) = stitch(es); tr = triple or treble crochet; [] = work directions in brackets the number of times specified; * or ** = repeat whatever follows the * or ** as indicated.

Assembly Instructions

  • Weave in all yarn ends securely using a yarn needle so the joins are hidden and tidy.
  • Add a hanging loop of ribbon or yarn by threading through a point or ch-5 picot area, knotting securely and trimming excess.
  • Block the snowflake gently to shape the points: pin to a flat surface in correct shape and mist lightly with water, then let dry.
  • Ensure joins between rounds are slipped into the exact stitches as written so the pattern lays flat; if necessary, press lightly after blocking for a crisp finish.
  • If making multiples, arrange them by size and color before adding loops so they coordinate as a set for gifts or an ornament garland.

Important Notes

  • πŸ’‘Check your tension/gauge: the finished snowflake should measure about 13 cm (5") across to match the pattern.
  • πŸ’‘Use any size hook necessary to obtain the tension/gauge; the pattern recommends 3.75 mm (US F-5) as a starting point.
  • πŸ’‘Weave in ends and secure the hanging loop well to avoid it coming loose when displayed.
  • πŸ’‘Block the piece after finishing to open the lace and shape the points for the best visual result.

Update your tree this year with pretty white snowflakes that catch the light and add handmade charm. These ornaments are quick to make and look stunning hung singly or in groups on garlands. Make a set in white or add metallic thread for festive sparkle. β„οΈπŸŽ

You ask,

we answer.

FAQs

What size will the finished piece be?

The finished snowflake measures approximately 13 cm (5") in diameter using the recommended yarn and 3.75 mm hook.

Can I use different yarn weights for this pattern?

Yes, you can use a different yarn weight but it will change the final size; adjust your hook accordingly and check your gauge to achieve the desired 13 cm diameter.

Do I need prior crochet experience for this pattern?

This pattern is simple and labeled easy, so basic knowledge of chains, double crochet, treble crochet, and slip stitches is sufficient to complete the ornament.

How should I finish and hang the snowflake?

Weave in ends, then add a hanging loop of ribbon or yarn through a point or ch-5 space; block the snowflake first for best shape before attaching the loop.