๐Ÿงถ Beautiful โœจ Detailed ๐Ÿ’ Adorable

Snowman Amigurumi Pattern

Snowman Amigurumi Pattern
4.7โ˜… Rating
5-7 Hours Time Needed
2.5K Made This
โœ‚๏ธ

Intermediate Level

Ideal for those with basic crochet experience, featuring slightly more advanced stitches and techniques to expand your skills.

โฑ๏ธ

Weekend Treat

Takes 5-7 hours, making it an enjoyable project to finish over a couple of days.

๐Ÿงธ

Cute Companion

An adorable friend to cherish, handcrafted with love to bring comfort and joy for years to come.

About This Snowman Amigurumi Pattern

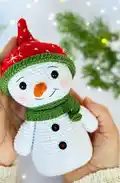
This pattern makes a 15 cm tall snowman amigurumi using white, red and green yarns with a sweet hat and scarf. The project includes full round-by-round instructions for the body, nose, arms, hat and scarf plus finishing tips. You will embroider simple facial details and sew on buttons and eyes to complete the look.

Snowman Amigurumi Pattern crochet pattern - detailed view of completed project

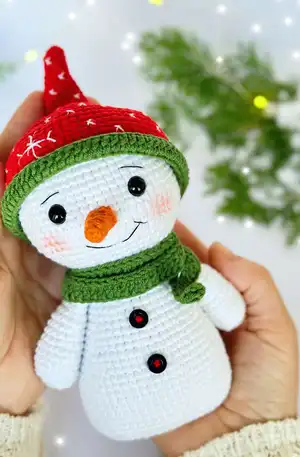
The pattern uses basic amigurumi techniques with shaping and color changes for the hat brim. Photos are provided to guide assembly and placement. Suitable for crocheters comfortable with increases, decreases and working in the BLO.

Why You'll Love This Snowman Amigurumi Pattern

I absolutely love this pattern because it balances simple shapes with charming details that bring the snowman to life. The hat and scarf give so much personality with only small extra steps, and embroidering the snowflakes is a fun finishing touch. I enjoy how the construction is straightforward but still allows for customization with colors and facial expressions. Making several in different colors is addictive and perfect for gifting or table decor.

Snowman Amigurumi Pattern step 1 - construction progress Snowman Amigurumi Pattern step 2 - assembly progress Snowman Amigurumi Pattern step 3 - details and accessories Snowman Amigurumi Pattern step 4 - final assembly and finishing

Switch Things Up

I love how easily this snowman pattern can be customized by changing yarn colors and facial details to create unique characters.

I often swap the red hat for a blue or pastel shade for a softer, modern look that works well as nursery decor.

Want a mini keychain version? Use thinner yarn and a smaller hook to scale the pattern down and add a small loop to the hat top.

For a chunkier, cuddlier toy, choose a bulkier yarn and larger hook โ€” the shape will remain the same but the finished feel becomes plush and huggable.

I sometimes embroider different expressions by moving the mouth placement or using different thread colors to change the personality.

You can replace safety eyes with embroidered eyes for a child-safe version or to achieve a more handmade look.

Try adding tiny accessories like a pompom on the hat, a little crocheted broom, or tiny mittens to expand this into a set of characters.

I recommend experimenting with stitch tension and stuffing amounts to fine-tune the silhouette โ€” firmer stuffing gives structure while softer stuffing gives a squishier feel.

If you prefer a rustic style, use natural or variegated yarns and a looser tension to create a homespun aesthetic.

Finally, I love grouping several snowmen in contrasting sizes and colors as a festive centerpiece; mix hooks and yarns to make a coordinated collection.

Common Mistakes & How to Fix Them

โœ— Skipping stuffing as you go leads to lumps and poor shaping; remember to fill in the pieces gradually while following the rounds to keep smooth curves.
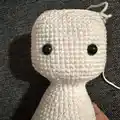
 โœ— Placing safety eyes without counting rows can misalign the face; attach the eyes to the 43rd and 44th rows, 9 stitches apart, and double-check spacing before securing. โœ— Ignoring BLO instructions when specified will change the intended edge finish; work BLO (back loops only) exactly where directed for the correct texture and construction. โœ— Not crocheting the two scarf/arm edges together will leave raw edges; crochet the edges together at the same time as instructed to create a neat, finished seam. โœ— Overstuffing the top of the body causes a misshapen head area; stuff lightly at first and add more gradually until the shape matches the photos.

Snowman Amigurumi Pattern

Make a charming handmade snowman amigurumi with this detailed pattern that walks you through each round and finishing step. You will enjoy shaping the body, crocheting cute accessories like the hat and scarf, and adding sweet facial details. Perfect for holiday gifting or a cozy winter decoration, this pattern gives clear step-by-step instructions so you can create a lovable snowman you will cherish.

Intermediate 5-7 Hours

Materials Needed for Snowman Amigurumi Pattern

โ€” Main Fabric

  • 01
    White yarn suitable for 1.80-2.00 mm hook (YarnArt Jeans brand yarn was used in the project)
  • 02
    Green yarn suitable for 1.80-2.00 mm hook
  • 03
    Red yarn suitable for 1.80-2.00 mm hook
  • 04
    White and black sewing yarn for facial embroidery

โ€” Tools Required

  • 01
    Crochet hook 1.80-2.00 mm
  • 02
    White and black sewing yarn
  • 03
    2 small buttons
  • 04
    Needle
  • 05
    Fiberfill (polyester stuffing)
  • 06
    8 mm safety eyes or sew-on eyes

Progress Tracker

0% Complete

โ€” Snowman :

Info :

Start with white color.

Round 1 :

15 ch, starking from 2nd ch inc, 12 sc, 3 sc in 1 stitch (work on the other side of tihe chain) 13 sc. (30)

Round 2 :

2 inc, 12 sc, 3 inc, 12 sc, inc. (36)

Round 3 :

(sc, inc) 2 times, 13 sc, (inc, sc) 3 times, 12 sc, inc. (42)

Round 4 :

(2 sc, inc) 2 times, 14 sc, (inc, 2 sc) 3 times,12 sc, inc. (48)

Round 5 :

BLO sc around. (48)

Round 6 :

sc around. (48)

Round 7 :

(7 sc, inc) 6 times. (54)

Round 8-14 :

sc around. (54)

Round 15 :

(7 sc, dec) 6 times. (48)

Round 16-17 :

sc around. (48)

Round 18 :

(6 sc,dec) 6 times. (42)

Round 19-20 :

sc around. (42)

Round 21 :

(5 sc, dec) 6 times. (36)

Round 22-23 :

sc around. (36)

Round 24 :

(4 sc, dec) 6 times. (30)

Round 25-26 :

sc around. (30)

Round 27 :

(3 sc, dec) 6 times. (24)

Round 28-29 :

sc around. (24)

Round 30 :

(3sc, inc) 6 times. (30)

Round 31 :

(4 sc, inc) 6 times.(36)

Round 32 :

(5 sc, inc) 6 times.(42)

Round 33 :

(6 sc,inc) 6 times. (48)

Round 34 :

(7 sc,inc) 6 times. (54)

Round 35 :

(8 sc,inc) 6 times. (60)

Round 36-48 :

sc around. (60)

Round 49 :

(8 sc,dec) 6 times. (54)

Round 50 :

(7 sc,dec) 6 times. (48)

Round 51 :

(6 sc,dec) 6 times.(42)

Round 52 :

(5 sc,dec) 6 times.(36)

Round 53 :

(4 sc,dec) 6 times. (30)

Round 54 :

(3 sc,dec) 6 times. (24)

Round 55 :

(2 sc,dec) 6 times. (18)

Round 56 :

(sc,dec) 6 times. (12)

Info :

Attach the eyes to the 43rd and 44th rows, 9 stitches apart.

โ€” Nose :

Info :

Start whit orange color.

Round 1 :

4 sc into a magic ring. (4)

Round 2 :

( sc,inc) 2 times. (6)

Round 3 :

sc around. (6)

Round 4 :

(2 sc,inc) 2 times. (8)

Round 5 :

sc around. (8)

Round 6 :

(3 sc,inc) 2 times. (10)

Round 7 :

sc around. (10)

โ€” Arms :

Info :

Start with white color.

Round 1 :

6 sc into a magic ring. (6)

Round 2 :

(inc) 6 times. (12)

Round 3 :

(sc,inc) 6 times. (18)

Round 4 :

BLO sc around. (18)

Round 5-7 :

sc around. (18)

Round 8 :

(4 sc,dec) 3 times. (15)

Round 9-11 :

sc around. (15)

Round 12 :

(3 sc,dec) (12)

Info :

Crochet the two edges together at the same time.

Info :

Sew arms to the body.

โ€” Scarf :

Round 1 :

98 ch, starking from 3nd ch 96 dc.

โ€” Hat :

Info :

Start with color red.

Round 1 :

6 sc into a magic ring. (6)

Round 2 :

5 sc, inc. (7)

Round 3 :

6 sc, inc. (8)

Round 4 :

7 sc, inc. (9)

Round 5 :

8 sc, inc. (10)

Round 6 :

9 sc, inc. (11)

Round 7 :

10 sc, inc. (12)

Round 8 :

11 sc, inc. (13)

Round 9 :

12 sc, inc. (14)

Round 10 :

13 sc, inc. (15)

Round 11 :

14 sc,inc. (16)

Round 12 :

15 sc, inc. (17)

Round 13 :

16 sc, inc. (18)

Round 14 :

(2 sc, inc) 6 times. (24)

Round 15 :

(3sc, inc) 6 times. (30)

Round 16 :

(4 sc, inc) 6 times.(36)

Round 17 :

(5 sc, inc) 6 times.(42)

Round 18 :

(6 sc,inc) 6 times. (48)

Round 19 :

(7 sc,inc) 6 times. (54)

Round 20 :

(8 sc,inc) 6 times. (60)

Round 21 :

(9 sc, inc) 6 times.(66)

Round 22-30 :

sc around. (66)

Info :

change color. (green)

Round 31-32 :

sc around. (66)

Round 33 :

BLO Go back, 2 chains, 66 dc.

Info :

Embroider snowflake details onto the red hat with white sewing yarn as shown in photos.

Assembly Instructions

  • Attach the eyes to the 43rd and 44th rows, placing them 9 stitches apart for proper spacing and facial symmetry.
  • Sew the nose to the center of the face between the eyes, then embroider the mouth and eyebrows with black sewing yarn following the face seam photos.
  • Crochet the two edges of the arm opening together at the same time as indicated, then sew the finished arms to the body on either side at the shoulder area.
  • Sew the hat brim (green) to the red hat piece and embroider the snowflake details with white sewing yarn; place the finished hat on the head.
  • Sew two small buttons to the front of the body spaced evenly as shown in the photographs.

Important Notes

  • ๐Ÿ’กRemember to fill in the pieces as you go; stuffing gradually produces a smooth, even shape.
  • ๐Ÿ’กThe size of the doll will vary depending on the yarn used; using the same YarnArt Jeans yarn will yield an approximate finished size of 15 cm.
  • ๐Ÿ’กWork BLO (back loops only) rounds exactly where noted to achieve the correct edge finish and assembly points.
  • ๐Ÿ’กPin pieces in place before sewing to ensure correct alignment and symmetry during assembly.

This sweet snowman is a cozy handmade companion perfect for holiday displays or thoughtful gifts. The pattern includes full round-by-round instructions, accessory pieces, and finishing tips to make assembly easy and fun. Make one in classic red and green, or customize the colors for a personal touch. โ„๏ธ๐Ÿงถ

You ask,

we answer.

FAQs

What size will the finished piece be?

The finished amigurumi measures approximately 15 cm tall when using the recommended YarnArt Jeans yarn and a 1.80-2.00 mm hook.

Can I use a different yarn weight or hook size?

Yes, you can use different yarn weights, but the finished size will change. Match the hook size to your yarn and expect the snowman to be larger with thicker yarn or smaller with thinner yarn.

Do I need advanced skills to make this pattern?

This pattern is rated intermediate; you should be comfortable working in rounds, reading increase/decrease sequences, and working BLO for the best results.

How long does this project typically take?

Most crocheters complete this project in 5-7 hours, though time may vary based on experience level and the amount of detail you add for embroidery and finishing.

How do I place the eyes correctly?

Attach the eyes on the 43rd and 44th rows, placing them 9 stitches apart; check placement before securing to ensure the face looks balanced.