🧢 Beautiful ✨ Detailed πŸ’ Adorable

SpaceBall Amigurumi Pattern

SpaceBall Amigurumi Pattern
4.2β˜… Rating
5-7 Hours Time Needed
2.0K Made This
βœ‚οΈ

Intermediate Level

Ideal for those with basic crochet experience, featuring slightly more advanced stitches and techniques to expand your skills.

⏱️

Weekend Treat

Takes 5-7 hours, making it an enjoyable project to finish over a couple of days.

🧸

Cute Companion

An adorable friend to cherish, handcrafted with love to bring comfort and joy for years to come.

About This SpaceBall Amigurumi Pattern

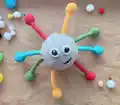
This SpaceBall pattern creates a soft, colorful amigurumi toy with eight movable arms that can be pulled and rotated safely, perfect for sensory play. The design uses simple single crochet shaping and straightforward attachment methods so you can assemble everything cleanly. You will learn how to join long tubular arm pieces into the body, sew eyes, and add embroidered details for personality.

SpaceBall Amigurumi Pattern crochet pattern - detailed view of completed project

The finished toy measures roughly like the sample when worked with recommended yarn and a 2 mm hook, and the arms reach about 30 cm. It is suitable for children aged 1 year and older when finished securely.

Why You'll Love This SpaceBall Amigurumi Pattern

I absolutely love this pattern because it combines simple amigurumi techniques with playful, interactive features that really engage little hands. I enjoy the way the long tubular arms become a sensory elementβ€”children can pull and move them without damaging the toy. The pattern is versatile, letting me pick bright yarn colors to create a cheerful, educational toy. I also love that the construction teaches useful skills like working long tubes, attaching pieces in-round, and neat finishing with embroidery.

SpaceBall Amigurumi Pattern step 1 - construction progress SpaceBall Amigurumi Pattern step 2 - assembly progress SpaceBall Amigurumi Pattern step 3 - details and accessories SpaceBall Amigurumi Pattern step 4 - final assembly and finishing

Switch Things Up

I love customizing this pattern by changing the colors of the arms to match a theme; try pastel shades for a nursery-friendly version or neon brights for a playful look.

You can make the toy bigger or smaller by switching yarn weight and adjusting the hook size; bulky yarn and a larger hook create a chunky, cuddly SpaceBall while finer yarn makes a mini keychain-sized version.

I sometimes embroider different expressions instead of the standard smile to change personality β€” try a small grin, surprised O, or sleepy line to vary moods.

For a safer baby toy, skip detachable parts and embroider eyes completely instead of crocheted or sewn eye pieces to avoid choking hazards.

I often add small felt decorations or appliques to the head to create themed characters like aliens or stars; these are sewn on after finishing the toy.

If you want posable arms, consider adding thin craft wire inside the arm pipes before stuffing; test the wire for safety and cover it well inside the stuffing.

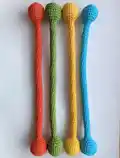
Try different arm end shapes: make the tips triangular, flat discs, or slightly larger spheres for varied tactile feedback.

I like to use variegated yarn for one or two arms to add instant visual texture without extra work.

Make a matching set by crocheting multiple SpaceBalls in coordinated colorways to form a playful mobile or decor collection.

When gifting, I add a small loop of yarn at the top and a tag with care instructions; suggest hand wash and reshape stuffing after gentle washing.

Common Mistakes & How to Fix Them
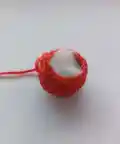
βœ— Forgetting to leave the central pipe section hollow when instructed will prevent the arm from moving; follow the instruction to leave 9 SC hollow and crochet the tube section separately. βœ— Skipping the instruction to place arms opposite each other can make the toy lopsided; mark placement points and insert arms symmetrically during the specified rounds. βœ— Overstuffing the body too early makes inserting arms and arranging stuffing difficult; stuff gradually and leave room to position arms before final stuffing. βœ— Not securing loose ends inside the body can allow stuffing to escape when arms are pulled; weave and secure ends inside the toy and single crochet around openings as recommended.

SpaceBall Amigurumi Pattern

Make a playful SpaceBall toy that delights little hands and develops fine motor skills. This amigurumi features eight pullable arms that move safely in every direction and colorful embroidered details to make playtime more engaging. The pattern includes complete stitch-by-stitch instructions, materials list, and helpful assembly notes so you can crochet a bright, sturdy toy for children aged 1 and up. Enjoy making a tactile, educational companion for curious kids.

Intermediate 5-7 Hours

Materials Needed for SpaceBall Amigurumi Pattern

β€” Main Fabric

  • 01
    YarnArt Jeans 50 g / 160 m; 55% cotton, 45% acrylic - Grey (shade 80) for body
  • 02
    YarnArt Jeans 50 g / 160 m; 55% cotton, 45% acrylic - Black (shade 53) for eye centres
  • 03
    YarnArt Jeans 50 g / 160 m; 55% cotton, 45% acrylic - White (shade 03) for eye highlights
  • 04
    YarnArt Jeans 50 g / 160 m; 55% cotton, 45% acrylic - Red (shade 26) for one arm
  • 05
    YarnArt Jeans 50 g / 160 m; 55% cotton, 45% acrylic - Green (shade 69) for one arm
  • 06
    YarnArt Jeans 50 g / 160 m; 55% cotton, 45% acrylic - Yellow (shade 35) for one arm
  • 07
    YarnArt Jeans 50 g / 160 m; 55% cotton, 45% acrylic - Blue (shade 33) for one arm
  • 08
    Fiber filler - sufficient amount to stuff body and arm ends (recommended amount to fully stuff the sample)

β€” Tools Required

  • 01
    Crochet hook size 2.0 mm
  • 02
    Scissors
  • 03
    Large eye needle for sewing and embroidery
  • 04
    Wooden stick or chopstick for pushing filler back into openings
  • 05
    Stitch markers (optional)
  • 06
    Yarn needle for weaving ends
  • 07
    Pins for positioning pieces during assembly

Progress Tracker

0% Complete

β€” Arms (make 4) :

Info :

Begin crocheting in any color you like. You should make pieces in 4 different colors. I used red, green, yellow, and blue. I began with red.

Round 1 :

6 MR (6)

Round 2 :

INC *6 (12)

Round 3 :

(1 SC, INC)*6 (18)

Round 4 :

(2 SC, INC)*6 (24)

Round 5-8 :

4 rnds straight: 24 SC

Round 9 :

(DEC, 2 SC)*6 (18)

Info :

Stuff tightly.

Round 10 :

(DEC, 1 SC)*6 (12)

Round 11 :

(DEC, 2 SC)*3 (9)

Info :

Further on leave the pipe part of 9 SC hollow. Go on crocheting 60 rows.

Round 12-71 :

60 rnds straight: 9 SC

Round 72 :

(INC, 2 SC)*3 (12)

Round 73 :

(1 SC, INC)*6 (18)

Round 74 :

(2 SC, INC)*6 (24)

Round 75-78 :

4 rnds straight: 24 SC

Round 79 :

(DEC, 2 SC)*6 (18)

Info :

Stuff tightly.

Round 80 :

(DEC, 1 SC)*6 (12)

Round 81 :

DEC*6, fasten off.

β€” Body :

Info :

Begin crocheting with grey yarn. Be very attentive, as you are going to attach arms pieces as you crochet the body.

Round 1 :

6 MR (6)

Round 2 :

INC *6 (12)

Round 3 :

(1 SC, INC)*6 (18)

Round 4 :

(2 SC, INC)*6 (24)

Round 5 :

(3 SC, INC)*6 (30)

Round 6 :

(4 SC, INC)*6 (36)

Round 7 :

(5 SC, INC)*6 (42)

Info :

Take red and yellow arm pieces at this stage.

Round 8 :

Chain 3, skip 3 SC, put the yellow arm and continue crocheting the round. 3 SC, INC, (6 SC, INS)*2, 3 CH, put the red arm, 3 SC, INC, (6 SC, INC)*2. The arms should be placed opposite each other symmetrically. (48)

Round 9 :

(7 SC, INC)*6 (54) (work 1 SC into each CH)

Round 10 :

(8 SC, INC)*6 (60)

Round 11 :

(9 SC, INC)*6 (66)

Round 12 :

(10 SC, INC)*6 (72)

Round 13 :

(11 SC, INC)*6 (78)

Round 14 :

(12 SC, INC)*6 (84)

Round 15-18 :

4 rnds straight : 84 SC

Round 19 :

In this round you want to attach green and blue arms. 6 SC, 3 CH, skip 3 SC, put the green arm, 39 SC, 3 CH, skip 3 SC, put the blue arm, 33 SC.

Round 20-24 :

5 rnds straight: 84 SC.

Round 25 :

In this round place the remaining loose ends of blue and green arms. 3 SC, 3 CH, skip 3 SC, put the blue arm, 39 SC, 3 CH, skip 3 SC, put the green arm, 36 SC (84). Yellow and red pieces should go between the green and blue pieces inside the toy.

Round 26-29 :

4 rnds straight: 84 SC.

Info :

Further on work decreases.

Round 30 :

(DEC, 12 SC)*6 (78)

Round 31 :

(DEC, 11 SC)*6 (72). Stuff the piece.

Round 32 :

(DEC, 10 SC)*6 (66)

Round 33 :

(DEC, 9 SC)*6 (60)

Round 34 :

(DEC, 8 SC)*6 (54)

Round 35 :

(DEC, 7 SC)*6 (48)

Round 36 :

In this round attach the loose ends of red and yellow arm pieces. DEC, 1 SC, 3 CH, skip 3 SC, put the red arm, 2 SC, DEC, (6 SC, DEC)*2, 1 SC, 3 CH, skip 3 SC, put the yellow arm, 2 SC, (DEC, 6 SC)*2 (42)

Round 37 :

(DEC, 5 SC)*6 (36). Work 1 SC into each CH.

Round 38 :

(DEC, 4 SC)*6 (30). Stuff tightly. Shape a nice sphere.

Round 39 :

(DEC, 3 SC)*6 (24)

Round 40 :

(DEC, 2 SC)*6 (18)

Round 41 :

(DEC, 1 SC)*6 (12)

Round 42 :

DEC*6, fasten off.

β€” Eyes (make 2) :

Info :

Begin crocheting in black yarn.

Round 1 :

6 MR (6)

Round 2 :

INC *6 (12)

Round 3 :

(1 SC, INC)*6 (18), SL ST, fasten off.

Info :

Place the eyes between rounds 25 to 29, 4 SC apart. Secure them in place with white thread, embroider 3 white stitches on top of the eyes and stitch semicircles at the bottom of each eye.

Info :

Now you need to single crochet round the eyes. Insert your hook into the body and work 15 SC around the eyes. Do 2 rounds.

β€” Embroidery :

Info :

Embroider a mouth in black under the left eye between rounds 30 and 32, make 2 stitches.

Info :

Embroider small spots over the top of the head above the right eye and over the back using red, yellow, green, and blue yarn with cross-stitch. You can add these spots wherever and however you like to make the toy bright and attractive.

β€” Please note :

Info :

Quite tricky is the issue of the filler, which might come out when the arms are pulled. I always test the arms, push the filler back in with a chopstick, and cut the excess stuffing with scissors.

Info :

For the best effect, single crochet round each opening where the arms come out (8 openings). Insert your hook into the corner of the hole on the body and work 3 SC, 2 SC to the corner, 3 SC, 2 SC - round 1 is done. Round 2 - 10 SC, SL ST.

Assembly Instructions

  • Insert each arm tube through its assigned opening while crocheting the body rounds as instructed (red and yellow at round 8, green and blue at round 19, remaining placements at round 25), then continue crocheting to secure the arm inside the body.
  • Arrange arms symmetrically and ensure yellow and red pieces lie between green and blue pieces inside the toy before closing the body so they do not tangle.
  • Stuff each spherical end and the body progressively; finish stuffing firmly but not overpacked before final decreases and close the opening with the final DEC rounds.
  • Place and secure the black crocheted eye pieces between rounds 25–29, about 4 SC apart, then stitch 3 white highlights on top of each eye and single crochet two rounds around the eyes in the body for a tidy finish.
  • Embroider the mouth between rounds 30 and 32 with black yarn (two stitches) and add colorful cross-stitch spots on the top/back of the head as desired.
  • Single crochet round each arm opening as described in the 'Please note' section to reduce filler leakage and tidy hole edges before final finishing.

Important Notes

  • πŸ’‘Work arms as long tubes leaving the central 9 SC hollow for the pipe section so the arm remains flexible and moveable.
  • πŸ’‘Attach arms while crocheting the body rounds as specified β€” pin and double-check placement before continuing to avoid asymmetry.
  • πŸ’‘Use a wooden stick or chopstick to push filler back if it comes out when testing arm movement, and trim excess stuffing to prevent bulging.

This bright SpaceBall toy is a joyful, tactile companion perfect for curious little hands and sensory play. It mixes playful, movable arms with sweet embroidered details for an engaging handmade gift. Crocheting this amigurumi is a warm, creative project that makes a lasting keepsake. 🧢✨😊

You ask,

we answer.

FAQs

What size will the finished piece be?

The finished toy's arm length with the recommended materials is approximately 30 cm; the central body is similar in size to the sample shown and will vary slightly by tension and yarn.

Can I use different yarn weights for this pattern?

Yes, you can substitute yarn weights, but this will change the final size; if using thicker yarn, increase hook size and expect larger arms and a bigger body.

Do I need prior crochet experience for this pattern?

Basic amigurumi skills are recommended β€” knowledge of MR, SC, INC, DEC and working in rounds will make this much easier; pattern is rated intermediate.

How long does this project typically take to complete?

Most crocheters complete this project in 5-7 hours, depending on experience and how much time you spend on embroidery and finishing.