🧢 Beautiful ✨ Detailed πŸ’ Adorable

Spinderella The Spider Amigurumi Pattern

Spinderella The Spider Amigurumi Pattern
4.4β˜… Rating
2-4 Hours Time Needed
4.0K Made This
βœ‚οΈ

Intermediate Level

Ideal for those with basic crochet experience, featuring slightly more advanced stitches and techniques to expand your skills.

⏱️

Bite-Sized Project

Finishes in 2-4 hoursβ€”perfect for an afternoon of creative relaxation.

🧸

Cute Companion

An adorable friend to cherish, handcrafted with love to bring comfort and joy for years to come.

About This Spinderella The Spider Amigurumi Pattern

This pattern creates a small, striped spider amigurumi complete with a tiny pumpkin hat and eight curvy legs. It uses YarnArt Jeans yarn and a 2.5mm hook to produce a neat, dense fabric that keeps the stuffing hidden. You will crochet the body and head in joined rounds, make separate legs and eyes, then sew everything together with clear assembly steps.

Spinderella The Spider Amigurumi Pattern crochet pattern - detailed view of completed project

Designed to be colorful and playful, Spinderella is a great seasonal make or a gift for anyone who loves quirky creatures. Clear stitch counts and photo-assisted assembly make it easier to follow even with color changes.

Why You'll Love This Spinderella The Spider Amigurumi Pattern

I absolutely love this pattern because it balances simple shapes with playful details, like the pumpkin hat and the striped body. I love how the short rounds and BLO technique create a ribbed effect that looks like real spider segments. I enjoy making the tiny shoes on the legs β€” they add such a charming finish and personality. I also like that the project is small enough to finish in an afternoon, which makes it perfect for gifting or using up scraps.

Spinderella The Spider Amigurumi Pattern step 1 - construction progress Spinderella The Spider Amigurumi Pattern step 2 - assembly progress Spinderella The Spider Amigurumi Pattern step 3 - details and accessories Spinderella The Spider Amigurumi Pattern step 4 - final assembly and finishing

Switch Things Up

I love to switch up the color palette to create very different characters from the same pattern: try pastels for a soft toy or neon stripes for a modern, playful look.

If you want a chunkier spider, use a bulkier yarn and a larger hookβ€”this will give you a super squishy, huggable version that works well for kids.

To make tiny keychain spiders, use finer yarn and a 1.75–2.0mm hook and shorten the legs to keep proportions cute and compact.

I often add embroidery details to the face to change expressions; experiment with a small smile or angled eyelids to give different personalities.

Swap the pumpkin hat for a tiny bow, crown, or a felt accessory to theme your spider for parties or gifts.

Try varying the leg length for a spider with a quirky gaitβ€”longer front legs make a playful pose while uniform legs look neat and classic.

For a more realistic texture, change to a fluffy or boucle yarn for the body while keeping legs and details in smoother yarns for contrast.

Add a small loop or button on the back to hang the spider as an ornament or to attach it to bags and backpacks.

I also like to stuff the legs lightly and insert a small piece of flexible wire to make poseable legs that hold their shape perfectly.

Finally, mix-and-match eyes: safety eyes, small buttons, embroidered dots, or felt circles all give a totally different lookβ€”try a few before committing.

Common Mistakes & How to Fix Them

βœ— Skipping the BLO instruction on the body rounds will change the texture and stripe effect; make sure to crochet in the back loops only where indicated to get the ribbed stripes. βœ— Not changing colors every two lines can result in uneven stripes and misaligned color edges; plan your color changes and carry yarn tidily or fasten off so each stripe is consistent. βœ— Forgetting to stuff gradually leads to lumps and poor shaping; stuff a little at a time while crocheting and shape as you go to maintain a smooth silhouette. βœ— Placing safety eyes after too many rounds can distort the face; insert the safety eyes at the recommended rounds (between rnd 26 & 27 of the head) and check spacing before securing. βœ— Sewing legs in without pinning can make them uneven around the body; pin each leg in place and compare spacing and height before permanently sewing them on.

Spinderella The Spider Amigurumi Pattern

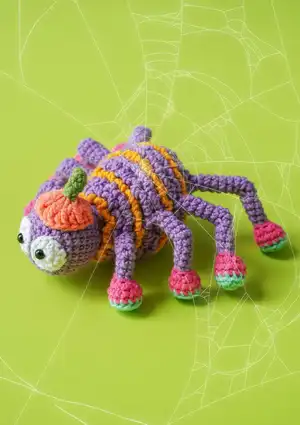
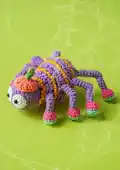
Make a playful little spider with colorful stripes and tiny pumpkin hat β€” perfect as a pocket-sized gift or seasonal decoration. You will work short rounds, color changes and simple sewn-on parts, so it is a fun way to practice shaping and finishing. The pattern uses accessible stitches and step-by-step assembly photos to help you along.

Intermediate 2-4 Hours

Materials Needed for Spinderella The Spider Amigurumi Pattern

β€” Main Fabric

  • 01
    Color A: purple YarnArt Jeans 72 (50g, 160m)
  • 02
    Color B: yellow YarnArt Jeans 35 (50g, 160m)
  • 03
    Color C: white YarnArt Jeans 01 (50g, 160m)
  • 04
    Color D: coral YarnArt Jeans 61 (50g, 160m)
  • 05
    Color E: green YarnArt Jeans 69 (50g, 160m)
  • 06
    Color F: turquoise YarnArt Jeans 79 (50g, 160m)
  • 07
    Color G: fuchsia YarnArt Jeans 59 (50g, 160m)

β€” Tools Required

  • 01
    Crochet hook size 2.5mm
  • 02
    1 pair of safety eyes size 6mm
  • 03
    Tapestry needles
  • 04
    Pins for assembly
  • 05
    Stitch markers
  • 06
    Scissors
  • 07
    Polyester fiberfill

Progress Tracker

0% Complete

β€” Eyes :

Round 1 :

sc 6 into a magic loop (6)

Round 2 :

inc 6, slst (12)

Info :

Break the yarn, leave a long thread to sew later.

β€” Body :

Info :

Note: Crochet BLO on all the rnds on the Body. And we will change to color each 2 lines, the color will change as the word colors: Yarn A: Black, Yarn B: Red

Round 1 :

sc 6 into a magic loop (6)

Round 2 :

(blo) inc 6 (12)

Round 3 :

(blo) [sc 1, inc] 6x (18)

Round 4 :

(blo) [sc 2, inc] 6x (24)

Round 5 :

(blo) [sc 3, inc] 6x (30)

Round 6 :

(blo) [sc 4, inc] 6x (36)

Round 7-8 :

(blo) sc 36 (2 rnds) (36)

Round 9 :

(blo) sc 36 (36)

Round 10-11 :

(blo) sc 36 (2 rnds) (36)

Round 12 :

(blo) sc 12, dec 6, sc 12 (30)

Round 13 :

(blo) sc 30 (30)

Round 14 :

(blo) sc 9, dec 6, sc 9 (24)

Round 15 :

(blo) sc 24 (24)

Round 16 :

(blo) sc 6, dec 6, sc 6 (18)

Round 17 :

(blo) sc 18, start stuffing (18)

Info :

Do not break the yarn, move to crochet the Head.

β€” Head :

Round 18 :

[sc 2, inc] 6x (24)

Round 19 :

[sc 3, inc] 6x (30)

Round 20-24 :

sc 30 (5 rnds) (30)

Round 25 :

[sc 3, dec] 6x (24)

Info :

Break the yarn, weave in the last 6 sts, hide the remaining yarn.

β€” Pumpkin\'s Hat :

Round 1 :

MR, ch 2 (do not count as a hdc), dc 9, slst on the ch 2 (9)

Round 2 :

ch 2 (do not count as a hdc), (dc 1, FPDC 1 on the same stitch) 9x, slst in the ch 2 (18)

Info :

Break the yarn, leave a long thread to sew later. Continue to crochet the Stem.

β€” Stem :

Round 1 :

sc 5 into a magic loop (5)

Round 2-4 :

sc 5 (3 rnds) (5)

Info :

Break the yarn, leave a long thread to sew later.

β€” Leg 1 :

Round 1 :

sc 6 into a magic loop (6)

Round 2 :

inc 6, change to yarn G (12)

Round 3 :

sc 12 blo (12)

Round 4 :

sc 12 (12)

Round 5 :

dec 6, change to yarn A (6)

Round 6 :

sc 6 blo, stuff slightly (6)

Round 7-8 :

sc 6 (2 rnds) (6)

Round 9 :

sc 3 blo, sc 3 (6)

Round 10 :

sc 6, (stuff the shoes only) (6)

Round 11 :

sc 3 in the flo of the 3sts on rnd 9, sc 3 on the last 3sts of rnd 10 (6)

Round 12-13 :

sc 6 (2 rnds) (6)

Info :

Break the yarn, leave a long thread to sew later.

β€” Leg 2 :

Round 1-6 :

Repeat 1-6 of the Leg 1 (6)

Round 7-9 :

sc 6 (3 rnds) (6)

Round 10 :

sc 3 blo, sc 3 (6)

Round 11 :

sc 6 (6)

Round 12 :

sc 3 in the flo of the 3sts on rnd 10, sc 3 on the last 3sts of rnd 11 (6)

Round 13-15 :

sc 6 (3 rnds) (6)

Info :

Break the yarn, leave a long thread to sew later.

β€” Leg 3 :

Round 1-6 :

Repeat 1-6 of the Leg 1 (6)

Round 7-10 :

sc 6 (4 rnds) (6)

Info :

Break the yarn, leave a long thread to sew later.

β€” Leg 4 :

Round 1-6 :

Repeat 1-6 of the Leg 1 (6)

Round 7-11 :

sc 6 (5 rnds) (6)

Round 12 :

sc 3 blo, sc 3 (6)

Round 13 :

sc 6 (6)

Round 14 :

sc 3 in the flo of the 3sts on rnd 12, sc 3 on the last 3sts of rnd 13 (6)

Round 15-19 :

sc 6 (5 rnds) (6)

Info :

Break the yarn, leave a long thread to sew later.

β€” Assembling :

Info :

Crochet the body & head as instructed. Stuff gradually while crocheting. Stop when you finish crochet rnd 27 of the Head.

Info :

Crochet 2 eyes as instructed. Insert black safety eye 6mm into the eye. Insert the eyes between rnd 26 & 27 of the head. Put the eye lids on. Crochet the last rnd of the head.

Info :

Use the tapestry needle to weave in the last 6 sts and hide the remaining yarn. Hide the remaining yarn. Join yarn A on the 1st of the 2nd rnd of the Body and continue crocheting *ch 3, slst 1 on the next st* in the flo of rnd 2-17 to create stripes for the spider.

Info :

Crochet the pumpkin\'s hat and stem as instructed and sew the hat on the head. Attach the 1st legs as shown in photos, then attach the other 3 legs with spacing: the distance between each leg is 1 rnd and 1 st higher than the previous leg.

Info :

Secure all parts with the tapestry needle, hide loose ends, and adjust stuffing if needed for a neat finish.

Assembly Instructions

  • Insert the eyes between rnd 26 & 27 of the head and put the eyelid pieces over them before crocheting the last round of the head to lock them in place.
  • Use the tapestry needle to weave in the last 6 sts of the head and hide the remaining yarn before sewing the pumpkin hat on top.
  • Join yarn A on the 1st stitch of the 2nd rnd of the Body and crochet *ch 3, slst 1 on the next st* on the remaining loop of rnd 2-17 to create the color stripes, changing color every two lines as instructed.
  • Attach the first pair of legs to the body as shown in the photo reference, then attach the remaining three legs on each side spaced one rnd and one stitch higher than the previous leg.
  • Sew the pumpkin\'s hat and stem securely to the top of the head and ensure the hat is centered before finishing sewing.
  • Weave in and hide all remaining yarn tails and make final adjustments to stuffing so the spider sits evenly.

Important Notes

  • πŸ’‘Always work the body rounds in BLO (back loop only) to create the ribbed stripe texture for the spider.
  • πŸ’‘Place safety eyes before finishing the head rounds and finishing stuffing to avoid distorting the face; recommended between rnd 26 and 27.
  • πŸ’‘Stuff gradually while crocheting to maintain an even shape and avoid lumps.
  • πŸ’‘Pin legs in place before sewing to check spacing and symmetry around the body.
  • πŸ’‘Weave in ends and hide tails as you go to keep finishing quick and tidy.

Bring Spinderella to life with bright stripes and a tiny pumpkin hat β€” a little friend with lots of personality. Perfect for gifts, shelves, or seasonal displays, this cheerful spider is quick to make and fun to customize. πŸ§ΆπŸ•·οΈπŸŽƒ

You ask,

we answer.

FAQs

What size will the finished piece be?

The finished spider measures approximately 12-15 cm long when using the recommended yarn and 2.5mm hook; exact size depends on tension and stuffing.

Can I use different yarn weights for this pattern?

Yes, you can use different yarn weights, but this will affect the final size and stitch counts; choose an appropriate hook to maintain density and consider adjusting stitch counts for larger scales.

Do I need prior crochet experience for this pattern?

This pattern is rated intermediate, so basic knowledge of single crochet, increases, decreases, working in the round, and back loop only (BLO) is recommended for best results.

How long does this project typically take to complete?

Most crocheters complete this project in 2-4 hours, though time may vary based on experience level, color changes, and how much time you spend on assembly.

When should I insert the safety eyes?

Insert safety eyes between rnd 26 and 27 of the head as noted in the instructions so they sit securely and the final round locks them in place.