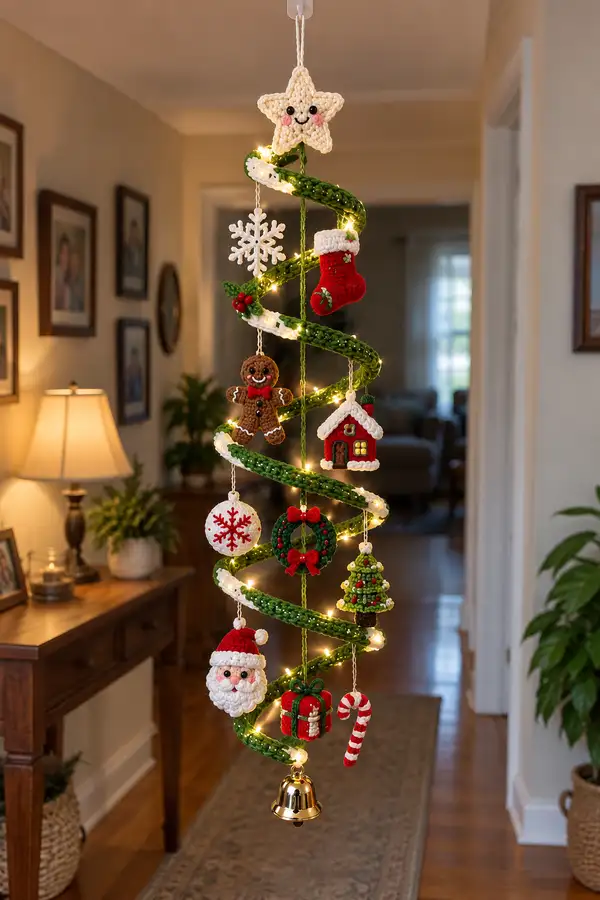
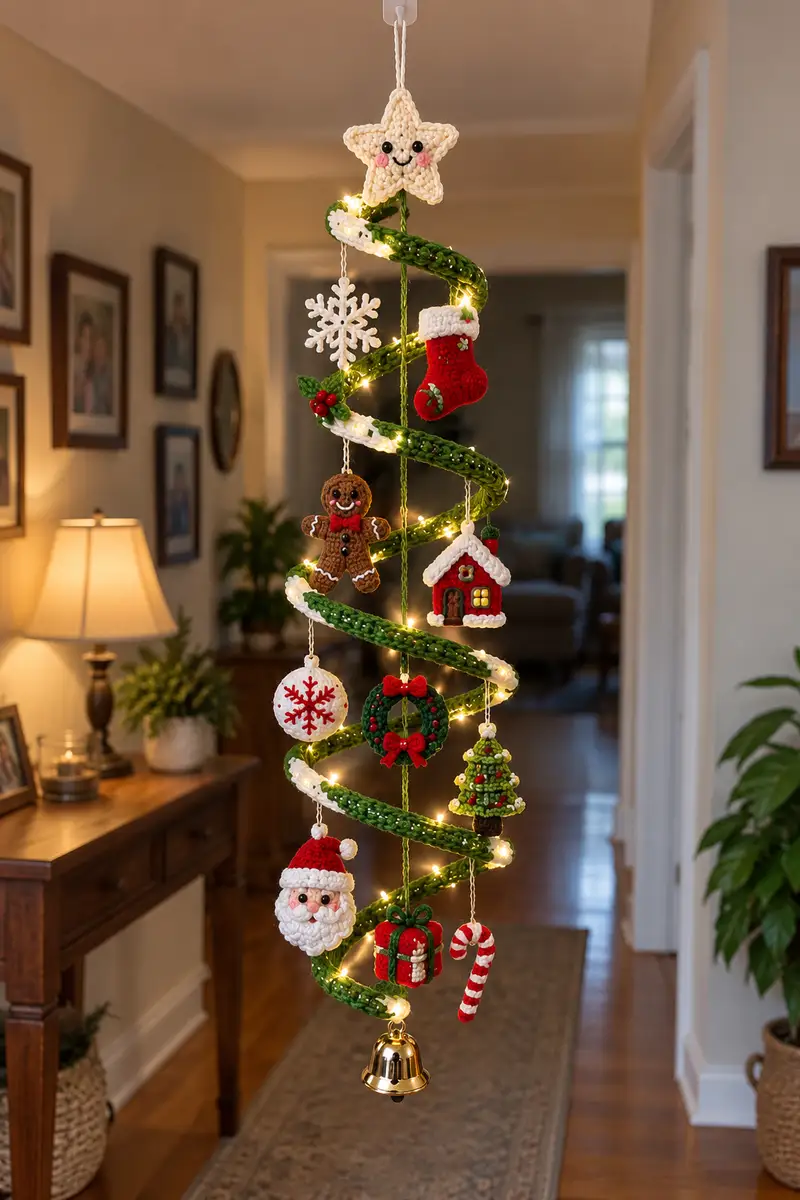
Create a charming spiral Christmas garland with a full set of tiny hanging ornaments — star topper, stockings, gingerbread, Santa face, wreath, tiny house, baubles, candy cane and more. The design features a green spiraled tube trimmed in white, tiny LED-friendly spaces, and many sweet amigurumi decorations. This pattern breaks every piece into clear rounds and assembly steps so you can recreate the festive mobile exactly as shown.
Progress Tracker
0% Complete
— Materials & Gauge :
Info :
Gauge is not critical for ornaments but for consistent size aim for 18 sc x 20 rows = 10cm using 3.5mm hook and worsted yarn. Use tight tension for amigurumi so stuffing doesn't show.
— General Notes :
Info :
Work in continuous rounds unless noted otherwise. Use stitch marker to mark first stitch of each round. When changing colors, finish the last stitch of the previous color with the new color to avoid a visible join. Embroider small details after assembly for best placement.
— Spiral Tube (make 1 long spiral) :
Round 1 :
6 sc in magic ring (6)
Round 3 :
(1 sc, 1 inc) x 6 (18)
Round 4 :
(2 sc, 1 inc) x 6 (24)
Round 5 :
(3 sc, 1 inc) x 6 (30)
Round 6 :
(4 sc, 1 inc) x 6 (36)
Round 7 :
(5 sc, 1 inc) x 6 (42)
Round 8 :
(6 sc, 1 inc) x 6 (48)
Info :
You now have a tube circumference of 48 stitches. Work an extended length with even rounds to create the long spiral. If you want a thicker spiral, you can increase up to 60 sts using (7 sc, 1 inc) x 6 to reach 54 then (8 sc,1 inc) x6 to 60.
Round 9-36 :
1 sc in each st (48) — 28 rounds even to create length (48)
Info :
If adding integrated lights, weave the LED micro-string down the center of the tube before closing the final rounds. Stuff tube lightly with polyester fill so it keeps a spiral shape but remains flexible.
Round 37 :
(6 sc, 1 dec) x 6 (42)
Round 38 :
(5 sc, 1 dec) x 6 (36)
Round 39 :
(4 sc, 1 dec) x 6 (30)
Round 40 :
(3 sc, 1 dec) x 6 (24)
Round 41 :
(2 sc, 1 dec) x 6 (18)
Round 42 :
(1 sc, 1 dec) x 6 (12)
Info :
Fasten off leaving a long tail for stitching the spiral into a coiled shape. Insert a thin hanging wire or cord along the center if you want the spiral to keep a rigid coil. Sew the final small opening closed and weave in ends.
— White Trim for Spiral Edges (make 2 long chains to wrap edges) :
Info :
Work two identical long strips to sew along the spiral edges for snowy trim. These are worked flat in rows; length should match spiral circumference when wrapped. Use white worsted yarn and 3.5mm hook.
Row 1 :
Ch 3, 10 sc in 2nd ch from hook, turn (10)
Row 2-150 :
Work 1 sc in each st across continue until strip matches spiral length. Fasten off and make a second identical strip. Tip: make two strips approximately 150 rows long if your spiral length used 28 even rounds; adjust as needed for your spiral length.
Info :
Sew the white trims to the spiral edge using small invisible stitches. Add small puffs of stuffing under the trim every 8-10 cm to create a snowy roping effect.
— Star Topper :
Round 1 :
6 sc in magic ring (6)
Round 3 :
(2 sc, 1 inc) x 4, 4 sc (16)
Round 4 :
1 sc in each st (16)
Info :
From here we will form 5 points by working short shaping sections. Keep a stitch marker to mark the base center of each point.
Point 1 - Round 5 :
Ch 2, hdc in next st, 2 dc in next, hdc in next, sl st to base to form point (worked into the base of star)
Point 1 - Round 6 :
Continue around base, repeat point shaping into next base area. Repeat for points 2-5 to form a 5-point star
Round 7 :
Using 1 sc in each base st around to tidy (16)
Round 8 :
Work in BLO 1 sc in each st to create edge ridge (16)
Info :
Mark eye placement on the center front between two points: position safety eyes about 6 stitches apart. Flatten star on a small bit of stuffing to give it a gentle plump look.
Round 9 :
Stuff lightly and finish with 1 sc around if needed to close small gaps. Fasten off leaving long tail for sewing to top of spiral.
Round 10 :
Optional: sew safety eyes (6mm) and embroider smile using black yarn. Add small pink felt or embroidered cheeks.
— Stocking Ornament (Make 1) :
Round 1 :
6 sc in magic ring (6)
Round 3 :
(1 sc, 1 inc) x 6 (18)
Round 4 :
(2 sc, 1 inc) x 6 (24)
Round 5-8 :
1 sc in each st (24) — work 4 rounds even to form cuff base
Info :
Switch to white for cuff: join white yarn at the beginning of next round and work 2-3 rounds to form fluffy cuff using BLO for texture if desired.
Round 9 :
Change to red yarn and work 1 sc in each st (24)
Round 10 :
(3 sc, 1 dec) x 6 (18)
Round 11 :
1 sc in each st (18)
Round 12 :
Work in FLO for heel shaping: (1 sc, 1 inc) x 6 (24)
Round 13 :
1 sc in each st (24)
Round 14 :
(4 sc, 1 dec) x 4 (20)
Round 15 :
(2 sc, 1 dec) x 5 (15)
Round 16 :
1 sc in each st (15)
Round 17-18 :
Stuff toe area lightly and finish with decreases if needed: (1 sc, 1 dec) x 5 (10) then 5 dec (5). Fasten off leaving long tail for sewing to spiral.
Info :
Embroider holly leaves and berries using green and red yarn small chain-and-stitch motifs sewn onto the cuff. Create a hanging loop from white yarn and attach firmly at cuff center.
— Snowflake Ornament (Make 1) :
Round 1 :
6 sc in magic ring (6)
Round 3 :
(1 sc, 1 inc) x 6 (18)
Info :
Work flat outward to create 6 arms. The snowflake is best worked by making a central ring then making 6 identical spike motifs attached to each base stitch.
Round 4-9 :
For each arm: ch 6, (sc in 2nd ch from hook, hdc, dc, tr) then sl st back into a base stitch. Repeat for 6 arms. After all arms are attached, tidy with a round of single crochet around to secure (18)
Round 10 :
Embellish with tiny picots on each arm tip: (ch 3, sl st into tip) for delicate points. Fasten off and weave in ends.
Info :
Use crochet thread or a lighter yarn for delicate snowflake look. Starch lightly to stiffen if you want the snowflake to hold shape.
— Holly Leaves & Berry Cluster (Make Several) :
Leaf 1 - Round 1 :
Ch 6, sc in 2nd ch from hook, hdc, dc, hdc, sc across to make a small leaf. Fasten off. Make 3 leaves per cluster and sew together at base.
Info :
Leaves are worked flat; block lightly if desired then arrange with 3 small red beads or tiny crocheted berries (make small MR of 4 sc) at the center.
— Gingerbread Person Ornament :
Head - Round 1 :
6 sc in magic ring (6)
Head - Round 2 :
6 inc (12)
Head - Round 3 :
(1 sc, 1 inc) x 6 (18)
Head - Round 4-6 :
1 sc in each st (18) — 3 rounds even for head height
Info :
Place eye placement between rounds 4 and 5, approx 4 stitches apart. Use 4mm-6mm safety eyes or embroider eyes for child-safe toy.
Head - Round 7 :
(2 sc, 1 dec) x 6 (12)
Head - Round 8 :
6 dec (6) Fasten off leaving long tail for sewing head to body. Stuff head lightly.
Body - Round 1 :
6 sc in magic ring (6)
Body - Round 2 :
6 inc (12)
Body - Round 3 :
(1 sc, 1 inc) x 6 (18)
Body - Round 4 :
(2 sc, 1 inc) x 6 (24)
Body - Round 5-8 :
1 sc in each st (24) — work 4 rounds even for torso width
Info :
For arms and legs, we will make 4 small stubs that attach to sides and bottom of the body. Add decorative icing using white yarn surface slip stitch or embroidery after assembling.
Body - Round 9 :
(3 sc, 1 dec) x 6 (18)
Body - Round 10 :
(2 sc, 1 dec) x 6 (12)
Body - Round 11 :
Fasten off leaving tail for sewing. Stuff body moderately.
Limbs x4 :
Ch 4, sc in 2nd ch from hook and next two ch, join to body with sl st or sew as small stubby limbs. Alternatively make small MR 5 sc for slightly rounder limbs, fasten off and sew in place.
Info :
Use embroidery for eyes, smile, icing lines on arms and legs. Sew a tiny red bow tie on chest using a small rectangle folded and stitched in the center.
— Little Gingerbread Bow and Buttons :
Bow - Round 1 :
Ch 6, hdc in 3rd ch from hook, 2 hdc next, sl st to form a small bow loop; wrap a short yarn length around center and sew to chest.
Buttons :
Sew 2-3 tiny French knots or use seed beads for buttons down center of torso.
— Little House Ornament :
Base - Round 1 :
6 sc in magic ring (6)
Round 3 :
(1 sc, 1 inc) x 6 (18)
Round 4 :
(2 sc, 1 inc) x 6 (24)
Round 5-8 :
1 sc in each st (24) — work even to build wall height (4 rounds)
Info :
Switch to red yarn for walls after round 4 to create a white base snow trim. Make a second flat roof piece separately and sew to top.
Door & Window :
For door: work a small oval by ch 6, sc across then gather and sew into place. For window: embroider yellow or use felt squares sewn onto wall. Add white scalloped trim using small loops of sc along roof edge.
Roof :
Ch 12, hdc across to make roof triangle, fold and sew center seam to make peaked roof. Attach to top of walls and embellish with white 'snow' bobbles using small puff stitches.
Info :
Lightly stuff the house to keep shape. Sew a small hanging loop into the roof seam before final closing.
— Round Bauble Ornament :
Round 1 :
6 sc in magic ring (6)
Round 3 :
(1 sc, 1 inc) x 6 (18)
Round 4 :
(2 sc, 1 inc) x 6 (24)
Round 5 :
(3 sc, 1 inc) x 6 (30)
Round 6-9 :
1 sc in each st (30) — 4 rounds even for bauble body
Round 10 :
(3 sc, 1 dec) x 6 (24)
Round 11 :
(2 sc, 1 dec) x 6 (18)
Round 12 :
(1 sc, 1 dec) x 6 (12)
Round 13 :
6 dec (6) — finish and fasten off. Add embroidered snowflake motif to the surface in contrasting red yarn.
Info :
Stuff ball firmly so it keeps round shape. Make a small top cap by folding an oval and sewing, then attach hanging loop.
— Christmas Wreath :
Round 1 :
Ch 12, join with sl st to form ring, 1 sc in each ch around (12)
Round 2 :
Work 2 sc in each st around to puff up ring (24)
Round 3-6 :
1 sc in each st (24) — work 4 rounds even for wreath thickness
Round 7 :
BLO 1 sc in each st (24) to create inner ridge
Round 8-10 :
Make leaf clusters: *ch 3, sl st into next st* repeat around to create little scallops which resemble leaves. Fasten off.
Info :
Sew tiny red bead 'berries' and a small red bow to wreath center front. Use a contrasting green or gloss thread for extra shimmer.
— Mini Christmas Tree Ornament :
Round 1 :
6 sc in magic ring (6)
Round 3 :
(1 sc, 1 inc) x 6 (18)
Round 4 :
(2 sc, 1 inc) x 6 (24)
Round 5-8 :
1 sc in each st (24) — work 4 rounds even to build conical tiers
Round 9 :
(3 sc, 1 dec) x 6 (18)
Round 10 :
(2 sc, 1 dec) x 6 (12)
Round 11 :
Fasten off leaving long tail for sewing. Attach small yellow bead or French knot at top for tree star. Sew tiny seed beads randomly for baubles.
Info :
Use a small cone of brown yarn for trunk by making MR 4 sc and working 2 rounds even then closing and sewing under tree base.
— Santa Face Ornament (Head) :
Round 1 :
6 sc in magic ring (6)
Round 3 :
(1 sc, 1 inc) x 6 (18)
Round 4 :
(2 sc, 1 inc) x 6 (24)
Round 5 :
(3 sc, 1 inc) x 6 (30)
Round 6-12 :
1 sc in each st (30) — 7 rounds even to shape head height
Info :
Place safety eyes between rounds 8 and 9 about 6-8 stitches apart. Embroider nose and mouth later; insert a small amount of stuffing before finishing facial decreases.
Round 13 :
(4 sc, 1 dec) x 5 (25)
Round 14 :
(3 sc, 1 dec) x 5 (20)
Round 15 :
(2 sc, 1 dec) x 5 (15)
Round 16 :
(1 sc, 1 dec) x 5 (10)
Round 17 :
5 dec (5) — fasten off, leave a long tail for attaching to Santa hat or body. Do not overstuff; face should be slightly flattened to allow beard attachment.
Beard & Hat :
Beard: With white yarn, ch 8, sc across to make a short rectangle, add picot or loop stitches across bottom for curly beard, fold and sew under chin. Hat: Make a small cone: ch 10, hdc back, decrease towards top to form hat cone, add white pom-pom and trim with white round of bobbles.
Info :
Sew beard to lower front of head and hat to top, leaving small gap for rosy cheeks. Embroider eyes if you avoided safety eyes for child-safe ornament.
— Small Gift Box :
Round 1 :
Ch 6 join to form ring, 1 sc in each ch (6)
Round 2 :
2 sc in each st around (12)
Round 3 :
(1 sc, 1 inc) x 6 (18)
Round 4-6 :
1 sc in each st (18) — form box height
Round 7 :
Fold flat and seam sides to create square box shape, stuff lightly then sew top closed leaving a small hole for ribbon.
Bow :
Make a small bow using ch 6, hdc in next 4 sts, fold in half and tie with a short yarn tail. Sew bow onto top of box and wrap contrasting yarn as ribbon around box sides.
Info :
Use a bright red box with green ribbon for classic look. Add tiny embroidered tag if desired.
— Candy Cane Ornament :
Round 1 :
Ch 12, sc in 2nd ch from hook across to create long rope (11)
Round 2 :
For spiral stripe: join red yarn and work sc alternating colors every 2 stitches along rope to create stripes
Round 3 :
Form hook by bending the top 4-5 ch into a curve and sew the tip securely to the side to make candy cane shape. Fasten off and weave ends.
Info :
Stuff lightly before finishing to keep cane slightly puffy. Use surface slip stitch in contrasting color to sharpen stripe edges.
— Small Bell Cap (crochet topper for metal bell) :
Round 1 :
6 sc in magic ring (6)
Round 3 :
1 sc in each st (12)
Round 4 :
(2 sc, 1 dec) x 4 (9)
Round 5 :
1 sc in each st (9) — fasten off leaving long tail to sew over top of metal bell. Add a small hanging loop within cap.
Info :
Slip crocheted bell cap over metal bell and secure with a few stitches around the rim. This is purely decorative and provides a secure crochet-to-metal join.
— Assembly & Hanging Loops :
Info :
All ornaments will be attached to the spiral with short lengths of yarn or thin cord. Make hanging loops by chaining 12-20 stitches (depending on how far you want ornaments to dangle) and securing both ends to the top of the ornament. Space ornaments evenly along the spiral ensuring weight balance.
Info :
Arrange heavier pieces lower (gift, bell) and lighter at top (star, snowflake). When sewing onto the spiral, sew through the spiral tube into the core yarn to prevent slipping.
Info :
Use a tally: hang star at top center, then in descending order with roughly equal vertical spacing: snowflake, stocking, holly cluster, gingerbread, house, round bauble, wreath, mini tree, Santa, gift, candy cane and bell as bottom weight. Adjust spacing visually so the spiral hangs freely without ornaments colliding.
Final Touches :
Weave in all loose ends and use tiny stitches to secure heavy ornaments additionally with a few extra passes. If using LED lights, tuck battery pack at top behind star or in a loop above the spiral so it is hidden. Test hanging balance on a hook before finalizing.
You've reached the end of this joyful project — congratulations! This spiral garland with tiny ornaments makes a delightful, space-saving holiday display that's perfect for porches, entryways, or cozy corners. Every tiny ornament adds personality, and assembling them into the spiral is where the magic happens. 🧶🎁 Hang it, light it up, and enjoy the warm festive glow it brings to your home. Happy crocheting and don’t forget to show off your creation! ✨