🧢 Beautiful ✨ Detailed πŸ’ Adorable

Spiral Gnome Hanging Garland Amigurumi Pattern

Spiral Gnome Hanging Garland Amigurumi Pattern
4.2β˜… Rating
8-10 Hours Time Needed
3.4K Made This
βœ‚οΈ

Intermediate Level

Ideal for those with basic crochet experience, featuring slightly more advanced stitches and techniques to expand your skills.

⏱️

All-Day Adventure

Requires 8-10 hours, ideal for a full day of immersive crocheting.

🧸

Cute Companion

An adorable friend to cherish, handcrafted with love to bring comfort and joy for years to come.

🧢 Jump to Pattern ↓

About This Spiral Gnome Hanging Garland Amigurumi Pattern

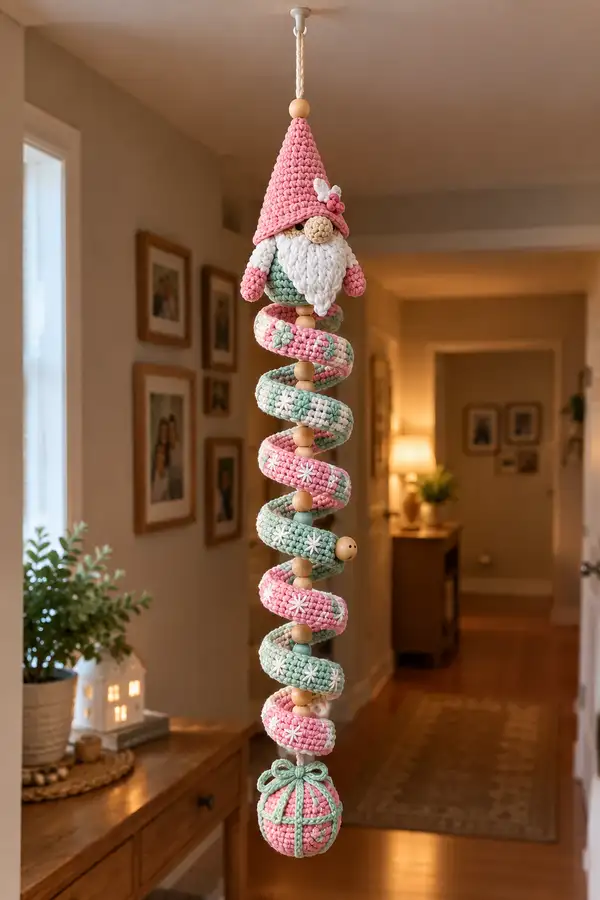
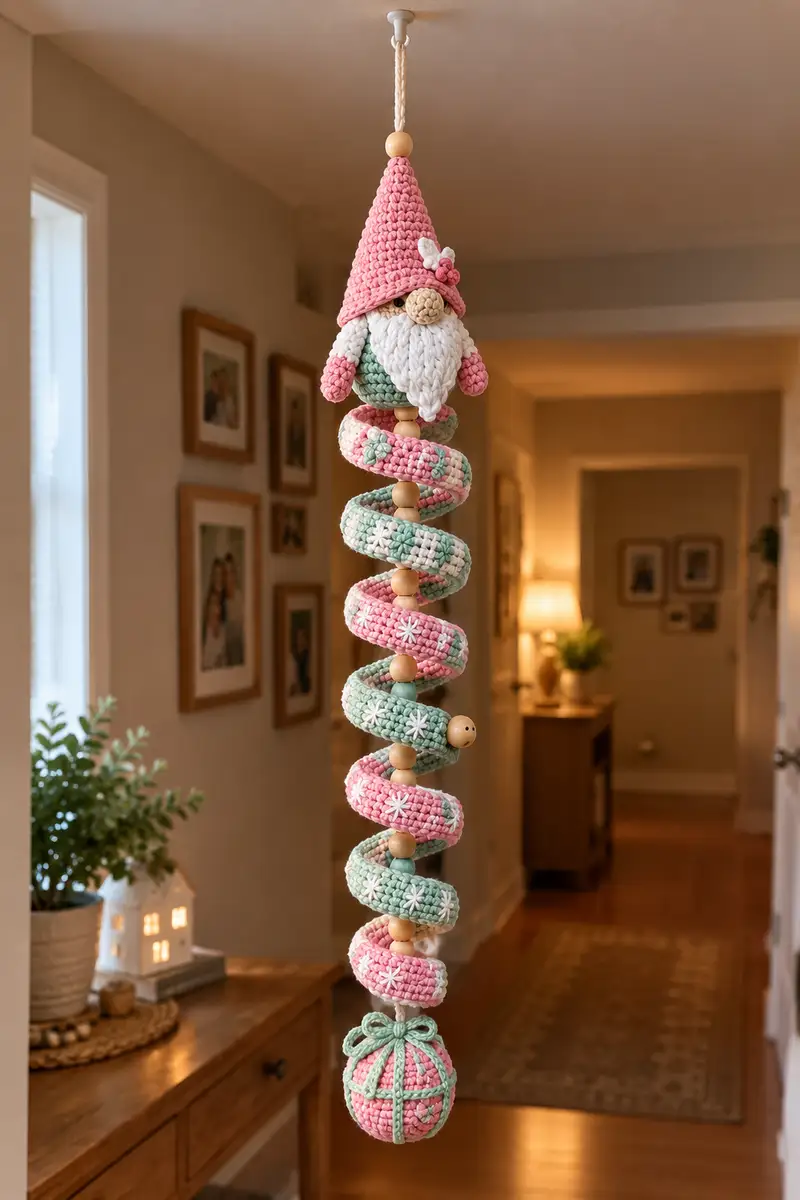
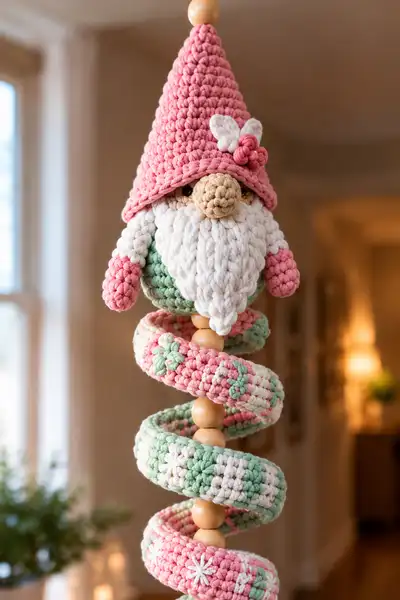
This pattern recreates a charming hanging gnome garland with stacked spirals, chunky wooden beads and a decorative gift-ball at the bottom. The gnome features a tall pointed hat, a rounded cream nose, plump arms, a looped textured beard and a small floral accent on the hat. The spiral tiers are crochet tubes coiled into donut rings in alternating pink, mint and cream, threaded on a central cord with wood beads that give separation and weight.

Spiral Gnome Hanging Garland Amigurumi Pattern crochet pattern - detailed view of completed project

The design uses super-bulky cotton or t-shirt yarn to achieve the plush rounded rings and the rich texture of the gnome. The pattern includes clear round-by-round instructions, color change notes and assembly steps so you can recreate this hanging garland exactly or customize it for your home.

Why You'll Love This Spiral Gnome Hanging Garland Amigurumi Pattern

I love this pattern because it brings together sculptural crochet and playful color in a simple hanging form. The tall slouchy hat and lush loop-beard add irresistible character, while the spiral rings create a fun vertical rhythm. I also appreciate how easy it is to adapt colors and bead spacing to match any decor or season.

Spiral Gnome Hanging Garland Amigurumi Pattern step 1 - construction progress Spiral Gnome Hanging Garland Amigurumi Pattern step 2 - assembly progress Spiral Gnome Hanging Garland Amigurumi Pattern step 3 - details and accessories Spiral Gnome Hanging Garland Amigurumi Pattern step 4 - final assembly and finishing

Switch Things Up

I absolutely loved designing this pattern because it offers so many opportunities for creative customization while maintaining a structure that's fun and manageable to crochet. The tall slouchy hat and bold loop-beard are perfect places to add personality: try a pompom, a tiny embroidered heart, or a sequined pin for holiday sparkle.

What I find most exciting about this pattern is how easily you can personalize it to match your own vision. Swap the pastel pink and mint for rich autumn tones, or use variegated yarn for each spiral ring to create a lively textured column. You can also adjust the number of rings, bead sizes, or the length of the central cord to create a mini mobile or a long doorway garland.

I particularly enjoy adding little custom touches like embroidered daisy motifs on alternating spirals, changing the beard style to plaited braids, or making the bottom ball into a tiny wrapped present with contrasting stripes. Don't be afraid to make this pattern your own β€” it adapts beautifully to seasonal colorways and personal flair.

Common Mistakes & How to Fix Them

βœ— Skipping stitch markers at round starts can cause misaligned features and uneven shaping; always mark your first stitch of each round βœ— Inconsistent tension between rounds creates lumpy or uneven surfaces; practice maintaining steady, even tension throughout the entire project βœ— Not stuffing gradually as you work causes difficulty reaching inside later; stuff sections as you complete them for best results βœ— For tubular rings, joining poorly or missing a turning stitch can cause a twist; join and count carefully before continuing even rounds βœ— Changing color without fastening off cleanly can leave long tails inside the tube; carry the yarn neatly or weave ends inside the tube before stuffing βœ— Placing safety eyes after filling the head too firmly prevents repositioning; position and secure eyes when instructed before final stuffing βœ— Sewing pieces without pinning first often leads to crooked placement; pin and check symmetry before permanently sewing βœ— Overstuffing rings will prevent them from coiling neatly around the cord; stuff just enough to keep the tube round but still flexible

Spiral Gnome Hanging Garland Amigurumi Pattern

A whimsical hanging gnome garland featuring a chunky crochet gnome head, a tall slouchy hat, braided beard, stacked spiral donut rings, wooden beads and a decorative bottom ball. Soft pastel palette of pink, mint and cream gives a modern, cozy look. Designed to hang in a hallway or doorway as a sweet seasonal accent or year-round charm.

Intermediate 8-10 Hours

Materials Needed for Spiral Gnome Hanging Garland Amigurumi Pattern

β€” Main Fabric

  • 01
    Super bulky cotton/t-shirt yarn (#6) or chunky cotton rope, approximately 250-300g in main pink color (seen: soft rose pink)
  • 02
    200-230g in mint green or pastel green (accent)
  • 03
    150-200g in cream/off-white for beard and small accents
  • 04
    Small amounts (25-40g) in skin/beige for nose and small details
  • 05
    Optional: small amount (10g) variegated or speckled yarn for mixed-color rings if desired

β€” Tools Required

  • 01
    6.5mm to 8mm crochet hook (use slightly smaller than yarn recommendation if needed for tight stitches)
  • 02
    5.5mm crochet hook for very dense details (optional)
  • 03
    Polyester fiberfill stuffing
  • 04
    Wooden beads (10–12 medium beads, sizes range 20-30mm depending on desired spacing)
  • 05
    Strong cotton cord or macrame rope for hanging centre (approx. 80-120cm depending on final length)
  • 06
    Yarn needle for sewing and weaving ends
  • 07
    Stitch markers (at least 6-8)
  • 08
    Scissors
  • 09
    Pins for assembly and blocking
  • 10
    Optional: floral wire or pipe cleaners for poseable arm cores
  • 11
    Optional: fabric glue for securing knots or small embellishments

Progress Tracker

0% Complete

β€” Head :

Round 1 :

6 sc in magic ring (6)

Round 2 :

6 inc (12)

Round 3 :

(1 sc, inc) x 6 (18)

Round 4 :

(2 sc, inc) x 6 (24)

Round 5 :

(3 sc, inc) x 6 (30)

Round 6 :

(4 sc, inc) x 6 (36)

Round 7 :

(5 sc, inc) x 6 (42)

Round 8 :

(6 sc, inc) x 6 (48)

Round 9-12 :

1 sc in each st (48)

Info :

Place safety eyes between rounds 10-11, approximately 9-12 stitches apart depending on the expression you want. For this hanging gnome use 10-12 stitches apart so eyes peek from under the hat brim. Mark the first stitch of each round.

Round 13 :

(6 sc, dec) x 6 (42)

Round 14 :

(5 sc, dec) x 6 (36)

Round 15 :

(4 sc, dec) x 6 (30)

Info :

Start stuffing head fairly firmly at this point so the gnome keeps shape under the hat. Use small tufts of fiberfill and push in with a stuffing tool or blunt pencil for even coverage.

Round 16 :

(3 sc, dec) x 6 (24)

Round 17 :

(2 sc, dec) x 6 (18)

Round 18 :

(1 sc, dec) x 6 (12)

Round 19 :

6 dec (6)

Info :

Fasten off leaving long tail for sewing the head into the body or onto the top bead. Weave tail through remaining 6 sts and pull tight to close, then weave tail to the inside. Ensure eyes are secure and washers applied on safety eyes if used.

β€” Nose :

Round 1 :

4 sc in magic ring (4)

Round 2 :

4 inc (8)

Round 3 :

1 sc in each st (8)

Round 4 :

(1 sc, dec) x 2, 2 sc (6)

Info :

Stuff lightly and shape into a slightly oval nose. Sew nose centered between eyes slightly under brim. Secure with several whip stitches and weave end through head inside for stability.

β€” Beard & Mustache (Looped Texture) :

Round 1 :

With cream yarn, ch 2 at center-front of head base and attach with sl st, ch 20 for the first loop strand (adjust length to reach chest area), fasten off. Repeat to attach multiple loop strands across the chin area, spacing strands closely to form a full beard (approx 12-14 loop strands for full coverage)

Round 2 :

Create a second layer of slightly shorter loop strands above the first row for fuller beard (10-12 strands). Secure each with a slip knot and weave ends inside the head to hide.

Round 3 :

Trim the bottom of looped strands if desired to even length or leave loops intact for chunky yarn effect. For the pointed beard center, group 3-4 longer strands, braid loosely and stitch top to base to create a central pendant beard.

Info :

Using loop strands with super-bulky yarn creates the dramatic rope-like beard seen in the photo. If you prefer a neater look, use multiple loop attachments and comb the loops gently before trimming.

β€” Hat (cone slouch hat) :

Round 1 :

6 sc in magic ring (6)

Round 2 :

6 inc (12)

Round 3 :

(1 sc, inc) x 6 (18)

Round 4 :

(2 sc, inc) x 6 (24)

Round 5 :

(3 sc, inc) x 6 (30)

Round 6 :

(4 sc, inc) x 6 (36)

Round 7 :

(5 sc, inc) x 6 (42)

Round 8 :

(6 sc, inc) x 6 (48)

Round 9-14 :

1 sc in each st (48)

Info :

Work even until hat measures approximately 10-12cm from crown for a tall slouch. If you want a taller or shorter hat, add or reduce even rounds. Fold brim up 1-2 rounds to create a neat edge or leave slouch for a more relaxed look.

Round 15 :

(6 sc, dec) x 6 (42)

Round 16 :

(5 sc, dec) x 6 (36)

Round 17 :

1 sc in each st (36)

Info :

For the turned-under brim seen in photo, fold up the last two rounds and sew evenly around to keep fold in place. Add small flower motif to side as described in the Accessories section.

Round 18 :

Fasten off leaving long tail for sewing to head top. Stuff lightly if you want the hat to keep its cone shape, or leave unstuffed for a slouchy look.

β€” Body (mounting ball to top of spiral) :

Round 1 :

6 sc in magic ring (6)

Round 2 :

6 inc (12)

Round 3 :

(1 sc, inc) x 6 (18)

Round 4 :

(2 sc, inc) x 6 (24)

Round 5 :

(3 sc, inc) x 6 (30)

Round 6-9 :

1 sc in each st (30)

Info :

Change to mint green if you want the body to be two-tone. Work the next two rounds in BLO to create a subtle ridge under the beard for definition if desired.

Round 10 :

1 sc in each st BLO (30)

Round 11-14 :

1 sc in each st (30)

Info :

Begin stuffing body moderately; keep the lower part slightly softer to allow the spiral rings to stack below when suspended. The gnome body sits above the first spiral so balance the stuffing accordingly.

Round 15 :

(3 sc, dec) x 6 (24)

Round 16 :

(2 sc, dec) x 6 (18)

Round 17 :

(1 sc, dec) x 6 (12)

Round 18 :

6 dec (6)

Info :

Fasten off leaving long tail. Use this tail to whip stitch the body around the top wooden bead so the gnome sits neatly on the bead spacer. Alternatively sew the body to the bead by sewing around the bead with the tail.

β€” Arms (Make 2) :

Round 1 :

6 sc in magic ring (6)

Round 2 :

6 inc (12)

Round 3 :

1 sc in each st (12)

Round 4 :

(3 sc, inc) x 3 (15)

Info :

Round 1-4 form the hand. For the pink mitt seen in the image, change to pink at Round 4. Stuff the hand firmly but not overstuffed so the arm can bend slightly.

Round 5-8 :

1 sc in each st (15)

Round 9 :

(2 sc, dec) x 3 (12)

Round 10-13 :

1 sc in each st (12)

Info :

Leave a long tail at the top of the arm for sewing. Add a short length of wire inside the arm if you want poseable limbsβ€”push the wire into the arm and encase with stuffing. Sew arms to sides of body between rounds 8-12 to mimic the pictured placement.

Round 14 :

(1 sc, dec) x 4 (8)

Round 15 :

1 sc in each st (8)

Round 16 :

Fasten off leaving long tail for sewing (8)

β€” Decorative Hat Flower (Make 1) :

Round 1 :

6 sc in magic ring (6)

Round 2 :

Slip stitch into next st, ch2, (2 dc, ch2, sl st) into same st to form petal; repeat 5 more times to create 6 petals. Fasten off and sew to hat brim.

Info :

Use a contrasting cream for petals and a small pink knot for center to match the photo. Sew securely.

β€” Spiral Rings (Make 8 alternating colors) :

Info :

Each spiral ring is made as a round tubular donut. Work each ring as a small round vessel then coil it around the center cord and sew a seam to close if needed. Rings in the photo alternate pink, mixed, mint, repeated. Use same stitch counts for all rings for uniform size.

Round 1 :

6 sc in magic ring (6)

Round 2 :

6 inc (12)

Round 3 :

(1 sc, inc) x 6 (18)

Round 4 :

(2 sc, inc) x 6 (24)

Round 5 :

(3 sc, inc) x 6 (30)

Round 6 :

(4 sc, inc) x 6 (36)

Round 7-10 :

1 sc in each st (36)

Info :

Make 8 tubes using this same 10-round formula. Change color before Round 1 of each tube as follows for the pictured order: Topmost under gnome = pink, 2nd = mixed/pastel blend, 3rd = mint, 4th = pink, 5th = mint, 6th = mixed, 7th = pink, 8th = mint. Carry yarn inside tube or fasten off cleanly between rings.

Round 11 :

After finishing each tube, fold tube into a ring by overlapping ends and using whip stitch or single crochet through both ends to join securely. Stuff tube lightly before closing so rings keep rounded shape but remain flexible for coiling.

Info :

To achieve the textured star/daisy motifs visible on alternating rings, embroider small star stitches with contrasting cream yarn across the surface after tubes are closed. Use an embroidery needle and yarn to make a five- or six-point star knot on selected ring faces.

β€” Ring Decorative Star Embroidery :

Round 1 :

Thread cream yarn into a yarn needle. Bring needle up at center of chosen ring area, work 6 straight stitches radiating out and return to center, pass needle through center and pull yarn through to create a star-like daisylike motif. Repeat spaced evenly around ring (3-4 motifs per ring) depending on space.

Info :

Keep embroidered motifs flat to preserve coilability. Knot securely inside ring and weave ends into interior. Use smaller yarn for embroidery if working on thick tubes to avoid bulky knots.

β€” Bottom Ball (Decorative Present Ball) :

Round 1 :

6 sc in magic ring (6)

Round 2 :

6 inc (12)

Round 3 :

(1 sc, inc) x 6 (18)

Round 4 :

(2 sc, inc) x 6 (24)

Round 5 :

(3 sc, inc) x 6 (30)

Round 6 :

(4 sc, inc) x 6 (36)

Round 7-10 :

1 sc in each st (36)

Round 11 :

(4 sc, dec) x 6 (30)

Round 12 :

(3 sc, dec) x 6 (24)

Round 13 :

(2 sc, dec) x 6 (18)

Round 14 :

(1 sc, dec) x 6 (12)

Round 15 :

6 dec (6)

Info :

Stuff bottom ball firmly before final decreases to give a solid weighted base. Add a cord loop through the center before closing to attach to the hanging cord. Decorate with contrasting stripes or crosses using surface slip stitch to look like a wrapped present.

β€” Small Accent Beads & Central Cord Assembly :

Info :

Use a strong central cord. Thread a knot at top, place a large wooden bead on top, then sew or place the gnome body onto the top bead. Under the gnome, alternate a wooden bead between each spiral ring (as seen in photo) to create separation and allow the spirals to coil freely. You will need approximately 9-11 wooden beads spaced between rings and below body to bottom ball.

Instruction :

Start assembly from top: knot cord through ceiling hook or loop, slide top bead, position gnome by sewing body base to the bead or secure with hot glue (optional). Then slide next wooden bead down, slip ring 1 over cord and rest on bead. Repeat bead, ring, bead, ring for all rings until you reach the bottom. Add bottom bead then attach bottom ball on loop and tie off with decorative bow.

β€” Assembly & Final Details :

Info :

Before final assembly, pin each piece in place to check spacing. Adjust bead count to ensure rings sit with even gaps and the overall length matches your space. Use extra beads where you need more separation or fewer for closer spiral stacking.

Instruction :

Sew hat to top of head: use long tail to whip stitch hat brim to head rounds so it sits slightly over the eyes. Attach nose and beard securely so they do not shift when hanging. Add small embroidered cheeks or blush if desired using a tiny amount of pastel fabric paint or dry blush carefully applied to yarn surface.

Info :

Weave all loose tails into the interior pieces, trim close. For extra durability, knot ends and add a small drop of fabric glue to knots hidden inside pieces. Check bead holes and cord strengthβ€”replace with stronger cord if you notice any slippage.

Assembly Instructions

  • Attach head to top bead by seating the body base over the bead and sewing with long tail around the bead (use rounds 1-6 of body as reference). Secure with multiple passes to prevent rotation.
  • Position arms on the body between rounds 8-12 of the body, roughly 6-8 sts down from the top of the body circumference. Sew each arm through the body wall with ladder stitch for invisible join.
  • Thread central cord with a top knot and top bead, then slide gnome assembly down onto bead to sit snugly on the top. Add a bead below the gnome to separate the top ring.
  • Place each spiral ring onto the cord and sit it against a wooden bead spacer. Alternate bead and ring: bead, ring, bead, ring, ensuring rings alternate colors and embroidered motifs as planned.
  • Sew or join each ring seam after coiling and stuffing so the ring holds its circular shape. Tuck closing seam into underside of ring to hide.
  • Attach bottom ball to cord by threading cord through its center before final closure and securing with multiple knots. Tie a decorative bow and sew in place using color-matching yarn.
  • Pin the hat flower and any leaf motifs in position before final sewing. Sew firmly through hat brim and weave in ends into the inner hat to hide.
  • Test hanging balance on a hook before final installation; adjust bead spacing if rings bunch or the gnome tilts to one side.

Important Notes

  • πŸ’‘Use stitch markers consistently at the beginning of each round to avoid counting errors and maintain proper shaping
  • πŸ’‘Stuff body parts gradually as you work rather than waiting until the end, especially for narrow openings like arms and rings
  • πŸ’‘For safety eyes, position and secure before stuffing head fully - they cannot be repositioned once locked in place
  • πŸ’‘Maintain consistent tension throughout the project; too tight creates stiff, small pieces, too loose creates floppy, holey fabric
  • πŸ’‘When sewing pieces together, use yarn slightly thinner than working yarn for neater, less visible seams
  • πŸ’‘Pin all pieces in position before final sewing to ensure proper placement and symmetry
  • πŸ’‘For spiral rings, do not overstuff; rings need some flexibility to coil naturally around the cord
  • πŸ’‘Embroider motifs after rings are closed to avoid distorting stitch placement during joining

This delightful spiral gnome garland combines chunky crochet textures, soft pastels and natural wooden beads to create a whimsical hanging accent for your home. Each ring and bead stacks into a playful vertical spiral while the gnome adds character with its tall hat and rope-like beard. Whether you make one for a hallway, a nursery or as a gift, you'll love how each part comes together to create movement and charm. 🧢🌸✨

You ask,

we answer.

FAQs

What is the finished size of this amigurumi?

Based on the specified bulky yarn and bead sizes, the finished hanging garland measures approximately 70-90cm (28-36in) from top bead loop to bottom ball. Using thicker yarn or larger beads will increase length and width proportionally.

Can I use different yarn weights for this pattern?

Yes! You can use thinner yarn but adjust the hook size down and expect the rings to be slimmer and require more rounds to reach the same circumference. Using thicker yarn will make larger rings; ensure bead holes are wide enough to slide the rings over the cord.

Do I need to use safety eyes or can I embroider them?

Both options work beautifully. Safety eyes give a polished look, while embroidered eyes are safer for children and provide more expression variety. Position eyes between rounds 10-11 of the head while the head is partially stuffed.

How much stuffing will I need?

For this size project, approximately 150-250 grams of polyester fiberfill will be sufficient for the gnome, rings and bottom ball (heavier if you fully stuff every ring). Stuff rings lightly to keep coils flexible.

Can I make the arms poseable?

Absolutely! Insert pipe cleaners or floral wire before stuffing limbs completely. Bend wire to desired shape, ensuring ends are folded over safely, then continue stuffing around the wire for poseable arms.

What if my stitch count is off?

If you notice a counting error, it's best to unravel back to where the count was correct. Trying to compensate later often creates visible distortions. Using a stitch marker at round starts helps prevent counting mistakes.

How do I prevent holes when stuffing the spiral tubes?

Work with tight, consistent tension and use a hook slightly smaller than the yarn recommendation. When stuffing, distribute fiberfill in small amounts and press firmly into the tube interior rather than pushing large clumps in all at once.

Can I customize colors and details?

Definitely! Feel free to change the color palette, bead sizes, and embroidered motifs to match your decor. You can also adjust ring count and spacing for a longer or shorter hanging garland.