🧢 Beautiful ✨ Detailed πŸ’ Adorable

Spring Teapot House Amigurumi Pattern

Spring Teapot House Amigurumi Pattern
4.4β˜… Rating
12-15 Hours Time Needed
2.2K Made This
βœ‚οΈ

Intermediate Level

Ideal for those with basic crochet experience, featuring slightly more advanced stitches and techniques to expand your skills.

⏱️

Multi-Day Project

A rewarding 12+ hour journeyβ€”perfect for dedicated crafters who love detailed work.

🧸

Cute Companion

An adorable friend to cherish, handcrafted with love to bring comfort and joy for years to come.

About This Spring Teapot House Amigurumi Pattern

This pattern creates a whimsical Spring Teapot House amigurumi with a removable lid, a sculpted spout, a wired handle, windows with shutters, a tiny door, and floral decorations. It uses cotton blend yarns and includes full round-by-round instructions for the teapot body, spout, handle, lid, door, windows, shutters and flowers. The design is perfect as a decorative piece or a keepsake gift that brightens any shelf or nursery.

Spring Teapot House Amigurumi Pattern crochet pattern - detailed view of completed project

Detailed photos and clear stitch counts guide you through shaping and assembly, including how to insert a hard plastic base for stability. Materials list and stitch key are included for easy preparation.

Why You'll Love This Spring Teapot House Amigurumi Pattern

I absolutely love this pattern because it transforms simple stitches into a charming little house full of personality. I enjoy the contrast of structured shaping (for the teapot body and spout) with soft decorative touches like the rolled shutters and tiny flowers. The wired handle option makes the piece both pretty and functional, and I especially love how the little lid and door give the teapot a storybook feel. Making this pattern feels like crafting a tiny home you can cherish or gift to someone special.

Spring Teapot House Amigurumi Pattern step 1 - construction progress Spring Teapot House Amigurumi Pattern step 2 - assembly progress Spring Teapot House Amigurumi Pattern step 3 - details and accessories Spring Teapot House Amigurumi Pattern step 4 - final assembly and finishing

Switch Things Up

I love to customize this teapot house by changing the color palette; try pastel greens and creams for a vintage look or bright primaries for a playful version.

I often swap Yarn Art Jeans for a slightly thicker cotton blend and increase the hook size to make a chunkier, larger teapot for a display shelf.

I sometimes embroider extra window details or add tiny buttons and beads as doorknobs to personalize each piece.

For a more whimsical look I add felt curtains behind the windows or tiny crocheted curtains using contrasting thread.

I recommend experimenting with the number of flower clusters and their placement until the composition feels balanced to you.

If you want a sturdier handle, replace the chenille wire with a wrapped metal craft wire and cover it with crocheted stitches.

I like making matching mini accessories β€” a tiny teacup or a little bunting β€” to turn this into a themed set for gifting.

Try using variegated yarn for the body or accents to get a subtle color change without switching yarns mid-project.

For a child-friendly toy, securely sew all small pieces and avoid hot glue; use extra reinforcement threads where parts are under tension.

I also enjoy creating a tiny removable cushion or felt mat that sits inside the teapot base for an extra delightful interior detail.

Common Mistakes & How to Fix Them

βœ— Skipping a stitch marker during the rounds causes you to lose track of round starts; use a contrasting yarn or stitch marker at the beginning of every round to keep counts accurate. βœ— Understuffing the spout or lid leads to limp shapes and gaps; stuff gradually and firmly where needed, using extra stuffing in wider parts and less in narrow sections for correct shaping. βœ— Ignoring stitch counts after increases and decreases creates uneven shaping; count your stitches after each shaping round to ensure the intended silhouette. βœ— Sewing the spout or handle without pinning first can misplace pieces and distort the teapot; pin parts in place, check orientation (marker alignment), and sew gradually while removing pins. βœ— Not inserting the plastic base flush to the wrong side may create lumps; cut the plastic exactly to size and glue it to the wrong side before continuing to secure a flat bottom. βœ— Tension changes while crocheting the body produce uneven rounds; maintain even, moderate tension and practice one section to stabilize gauge before proceeding.

Spring Teapot House Amigurumi Pattern

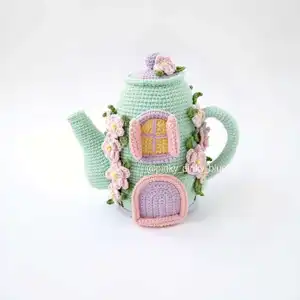
Make a charming spring teapot house amigurumi that doubles as a decorative little home full of sweet details. You will love the delicate windows, rolled shutters, tiny flowers, and a sewn-in spout and handle. The pattern includes step-by-step rounds, assembly guidance, and clear photos so you can create a collectible teapot house for display or gifting.

Intermediate 12-15 Hours

Materials Needed for Spring Teapot House Amigurumi Pattern

β€” Main Fabric

  • 01
    Yarn Art Jeans (55% cotton, 45% acrylic, 160 m/50 g) mint 79 - a little more than 1 skein (main color)
  • 02
    Yarn Art Jeans lilac 19 - small quantity for lid and accents
  • 03
    Yarn Art Jeans light yellow 88 - small quantity for window interior
  • 04
    Yarn Art Jeans light pink 18 - small quantity for shutters and flowers
  • 05
    Yarn Art Jeans green 69 - small quantity for leaves and vines
  • 06
    Yarn Art Jeans brown 40 - small quantity for small details
  • 07
    Alize Cotton Gold Hobby (55% cotton, 45% acrylic, 165 m/50 g) pink 393 - small quantity for door frame detail

β€” Tools Required

  • 01
    Crochet hook size 2.25 mm (hook size may vary depending on your crocheting gauge)
  • 02
    Big-eyed needle
  • 03
    Hot glue gun
  • 04
    Scissors
  • 05
    Water erasable marker
  • 06
    Sewing pins
  • 07
    Synthetic fiberfill (stuffing)
  • 08
    A piece of hard plastic (for example a thick plastic paper folder or cutting board) for the base
  • 09
    Chenille wire (pipe cleaners) 4 pcs of 30 cm long (for handle core)
  • 10
    Stitch markers or a contrasting yarn piece to mark rounds

Progress Tracker

0% Complete

β€” Teapot Bottom :

Info :

Start crocheting from the teapot bottom with mint yarn. Use a piece of yarn of contrasting color as a marker for easy rounds counting.

Round 1 :

6 sc in AR (6)

Round 2 :

inc*6=12 sc (12)

Round 3 :

(1 sc, inc)*6=18 sc (18)

Round 4 :

1 sc, inc, (2 sc, inc)*5, 1 sc =24 sc (24)

Round 5 :

(3 sc, inc)*6=30 sc (30)

Round 6 :

2 sc, inc, (4 sc, inc)*5, 2 sc=36 sc (36)

Round 7 :

(5 sc, inc)*6=42 sc (42)

Round 8 :

3 sc, inc, (6 sc, inc)*5, 3 sc=48 sc (48)

Round 9 :

(7 sc, inc)*6=54 sc (54)

Round 10 :

4 sc, inc, (8 sc, inc)*5, 4 sc=60 sc (60)

Round 11 :

(9 sc, inc)*6=66 sc (66)

Round 12 :

5 sc, inc, (10 sc, inc)*5, 5 sc=72 sc (72)

Round 13 :

(11 sc, inc)*6=78 sc (78)

Round 14 :

6 sc, inc, (12 sc, inc)*5, 6 sc=84 sc (84). Finish with a sl st, do not cut the yarn.

Info :

Cut out from plastic a circle according to the size of crocheted detail and glue it on the wrong side. I used a leftover of hard plastic canvas for it.

Round 15 :

84 sc through the back loops (84)

Round 16-24 :

9 rounds of 84 sc (84)

Round 25 :

(12 sc, dec)*6=78 sc (78)

Round 26-34 :

9 rounds of 78 sc (78)

Round 35 :

(11 sc, dec)*6=72 sc (72)

Round 36-43 :

8 rounds of 72 sc (72)

Round 44 :

(10 sc, dec)*6=66 sc (66)

Round 45-50 :

6 rounds of 66 sc (66)

Round 51 :

(9 sc, dec)*6=60 sc (60)

Round 52 :

60 sc (60)

Round 53 :

(8 sc, dec)*6=54 sc (54)

Round 54 :

(7 sc, dec)*6=48 sc (48)

Info :

Stuff.

Round 55 :

Change yarn to lilac, sc 48 through the back loops (48)

Round 56 :

48 sc through both loops (48)

Round 57 :

(6 sc, dec)*6=42 sc (42)

Round 58 :

(5 sc, dec)*6=36 sc (36)

Round 59 :

(4 sc, dec)*6=30 sc (30)

Round 60 :

(3 sc, dec)*6=24 sc (24)

Round 61 :

(2 sc, dec)*6=18 sc (18)

Round 62 :

(1 sc, dec)*6=12 sc (12)

Round 63 :

Dec every st until the opening closes (add fiberfill if necessary). Cut the yarn and fix the end.

Info :

Join the mint yarn to the 54th round and crochet through the front loops: 3 sc, inc, (7 sc, inc)*5, 4 sc =54 sc.

Round :

Crochet 2 rounds more of 54 sc each. Finish with a sl st, leave a long end.

Info :

Thread the end of the yarn into the needle. Fold the edge inward and stitch around.

Info :

Join lilac yarn to the bottom line and sl st through the front loops.

Info :

Sc 1 round through the back loops of sl st.

Info :

Sl st one more round. Cut the yarn and fix the end.

β€” Spout :

Round 1 :

6 sc in AR (6)

Round 2 :

inc*6=12 sc (12)

Round 3 :

(1 sc, inc)*6=18 sc (18)

Info :

Crochet one more sc after the last inc and finish with a sl st. Do not cut the yarn.

Round 4 :

18 sc through the back loops (18)

Round 5-7 :

18 sc (18)

Round 8 :

inc, 17 sc =19 sc (19)

Round 9 :

2 sc, inc, 16 sc =20 sc (20)

Round 10 :

2 sc, inc, 17 sc =21 sc (21)

Round 11 :

2 sc, inc, 18 sc =22 sc (22)

Round 12 :

2 sc, inc, 19 sc =23 sc (23)

Round 13 :

2 sc, inc, 20 sc =24 sc (24)

Round 14 :

24 sc (24)

Round 15 :

(3 sc, inc)*6=30 sc (30)

Round 16-17 :

30 sc (30)

Round 18 :

(4 sc, inc)*6=36 sc (36)

Round 19-20 :

36 sc (36)

Round 21 :

(5 sc, inc)*6=42 sc (42)

Round 22-23 :

42 sc (42)

Round 24 :

(6 sc, inc)*6=48 sc (48)

Round 25-27 :

48 sc (48)

Round 28 :

(6 sc, dec)*6=42 sc (42)

Round 29 :

(5 sc, dec)*6=36 sc (36). Stuff the narrow part tightly and the wide part looser.

Round 30 :

(4 sc, dec)*6=30 sc (30)

Round 31 :

(3 sc, dec)*6=24 sc (24)

Round 32 :

(2 sc, dec)*6=18 sc (18)

Round 33 :

(1 sc, dec)*6=12 sc (12)

Round 34 :

dec*6. Cut the yarn and fix the end.

Info :

Join yarn to the 3d round and sc 18 through the front loops.

Round :

Crochet one more round of 18 sc and the last one 18 sl st. Cut the yarn and fix the end.

Info :

The spout needs to be attached to the teapot so that the marker on the first rows looks at the teapot.

Info :

Slightly flatten the lower wide part of the spout and attach to the teapot with pins.

Info :

Start sewing from the lower center point, gradually removing the pins.

Info :

Neatly sew around.

β€” Handle :

Round 1 :

For handle sc 6 in AR (6)

Round 2 :

inc*6 in the second round (12)

Info :

Then crochet spiral rounds up without inc.

Info :

Put 4 chenille wires together, fold in half and twist them together. Crochet the handle of the fitting length.

Info :

Put the wire inside and sew the opened end with the end of the yarn.

Info :

Bend the flat end of the handle and sew to the teapot.

Info :

Sew the second end close to the bottom.

β€” Lid and Lid Handle :

Info :

Join the mint yarn to the 54th round and crochet the lid rim as instructed above. Fold and sew the edge inward.

Round 1 :

For lid handle with lilac yarn: 6 sc in AR (6)

Round 2 :

inc*6=12 sc (12)

Round 3-4 :

2 rounds of 12 sc. Stuff.

Round 5 :

dec*6, cut the yarn, leave a long end.

Info :

Sew to the lid with the end of the yarn.

β€” Door :

Info :

Crochet door with lilac yarn. Chain 10, crochet U-shaped rows with a turning ch in the beginning of every row.

Row 1 :

8 sc, 3 inc the last loop, 8 sc along the bottom side of the chain =19 sc (19)

Row 2 :

8 sc, inc*3, 8 sc =22 sc (22)

Row 3 :

8 sc, (1 sc, inc)*3, 8 sc =25 sc (25)

Row 4 :

8 sc, (2 sc, inc)*3, 8 sc =28 sc (28)

Row 5 :

8 sc, (3 sc, inc)*3, 8 sc =31 sc (31)

Row 6 :

8 sc, (4 sc, inc)*3, 8 sc =34 sc (34)

Row 7 :

Change yarn to the pink, crochet through the back loops: 8 sc, (5 sc, inc)*3, 8 sc =37 sc (37)

Row 8 :

Crochet through the back loops 37 sc (37)

Row 9-10 :

2 more rows of 37 sc through both loops. Leave a long end.

Info :

Thread the end of the pink yarn into the needle. Fold the pink part in half (outwards) and sew the edge to the front loops of the 7th row.

Info :

Join the pink yarn to the bottom side of the door and sc 7 rows of 13 sc. Leave a long end.

Info :

Roll the pink part inwards and sew with the end of the yarn. Sew the corners.

β€” Window :

Info :

Crochet window with light yellow yarn. Chain 8, crochet like the door U-shaped rows.

Row 1 :

6 sc, 3 sc in the last loop, 6 sc along the bottom side of the chain =15 sc (15)

Row 2 :

6 sc, inc*3, 6 sc =18 sc (18)

Row 3 :

6 sc, (1 sc, inc)*3, 6 sc =21 sc (21)

Row 4 :

6 sc, (2 sc, inc)*3, 6 sc =24 sc (24)

Row 5 :

Change yarn to the lilac, crochet through the back loops: 6 sc, (3 sc, inc)*3, 6 sc =30 sc (30)

Row 6 :

30 sc through the back loops (30)

Row 7-8 :

2 rows of 30 sc through both loops. Leave a long end.

Info :

Fold the lilac part outwards and sew.

Round :

Sc 4 rows of 10 sc with lilac yarn along the bottom side of the window.

Info :

Fold inwards, sew with the end of the yarn. Sew the corners.

Info :

Stitch a cross-shaped frame on the window.

β€” Shutters :

Info :

Crochet the shutters in pink: make 2 pcs like light yellow parts of the window. Leave long ends.

Info :

Fold in half and sew all the opened sides over the edge.

Info :

Sew to the window.

β€” Flowers and Embellishments :

Info :

Crochet the flowers with light pink yarn: Chain 5, close into the ring with a sl st.

Info :

Crochet in the ring (not into every loop) 2 ch, 2 dc, 2 ch, sl st – it should be one petal. Repeat to make petals and assemble flowers.

β€” Assembly :

Info :

Glue or sew the door and one window above it.

Info :

Attach the second window at the opposite side of the teapot.

Info :

Make another window, change the colors of the frame and the shutter in places to create pairs.

Info :

Sew flowers and leaves around the windows and along the teapot surface as shown in photos; use pins to arrange before final sewing.

Assembly Instructions

  • Attach the spout to the teapot aligning the marker so the first rows of the spout face the teapot; pin the lower wide part flat and sew from the lower center point, removing pins as you go.
  • Position the handle on the opposite side, insert the twisted chenille wires, shape the handle into the desired arc and sew both flattened ends securely to the teapot body.
  • Glue or sew the door centered on the front lower panel, then sew one window directly above it and the second window on the opposite side of the teapot.
  • Fold and sew the rolled pink door edge inward, and attach shutters to the window by sewing folded edges to the window frame for a neat finish.
  • Sew the lid knob (lilac handle) to the lid, and attach the finished lid to the top opening; tuck and stitch the lid edge for a clean seam.
  • Arrange and sew flowers and leaves with pins first to check composition, then stitch them in place; secure thread ends and weave them into the inside.

Important Notes

  • πŸ’‘Use a stitch marker or contrasting yarn to mark the start of each round for consistent counting and shaping.
  • πŸ’‘Stuff parts progressively and adjust stuffing density (tighter in narrow necks, looser in wider bulbs) for correct proportions.
  • πŸ’‘Cut a plastic circle to fit the bottom and glue it to the wrong side before continuing to ensure a flat, stable base.
  • πŸ’‘Pin all appliques (door, windows, spout) before sewing so you can check placement and symmetry, then sew gradually.

This Spring Teapot House brings a touch of handmade magic to your shelf and doubles as a tiny storybook home. Create windows, shutters, and flowers for a whimsical finish. Perfect as a thoughtful gift or a cheerful decor piece. 🏑🧢✨

You ask,

we answer.

FAQs

What size will the finished piece be?

The height of the finished toy from recommended yarn is about 18.5 cm when using the specified yarn and hook size.

Can I use different yarn weights for this pattern?

Yes, you can use different yarn weights but it will change the final size; choose an appropriate hook for the yarn and expect adjustments in fill and shaping.

Do I need special tools for the handle?

You need chenille wire or pipe cleaners (4 pieces folded and twisted) to create a sturdy, bendable core for the handle, which is then crocheted over.

How do I make the bottom stable?

Cut a circle of thick plastic (plastic folder or cutting board) to fit the inside of the base and glue it to the wrong side before continuing; this creates a clear, flat bottom line.

Is this pattern suitable for beginners?

This pattern is rated intermediate due to shaping, many rounds, and assembly steps like attaching the spout and wired handle, but careful following of the rounds and photos will help you succeed.