🧢 Beautiful ✨ Detailed πŸ’ Adorable

Standing and Sitting Goofy Amigurumi Pattern

Standing and Sitting Goofy Amigurumi Pattern
4.2β˜… Rating
5-7 Hours Time Needed
1.4K Made This
βœ‚οΈ

Intermediate Level

Ideal for those with basic crochet experience, featuring slightly more advanced stitches and techniques to expand your skills.

⏱️

Weekend Treat

Takes 5-7 hours, making it an enjoyable project to finish over a couple of days.

🧸

Cute Companion

An adorable friend to cherish, handcrafted with love to bring comfort and joy for years to come.

About This Standing and Sitting Goofy Amigurumi Pattern

This pattern creates two versions of Goofy β€” a standing and a sitting amigurumi β€” worked in 4-ply cotton yarn for crisp stitches. It includes full round-by-round instructions for head, ears, arms, legs, body, jacket, nose and hat with color notes. Techniques include single crochet, increases, decreases, HDC and FLO work for shaping.

Standing and Sitting Goofy Amigurumi Pattern crochet pattern - detailed view of completed project

You will find optional notes for stuffing, wire insertion and assembly placement to make finishing easier. Clear abbreviations and materials list are provided so you can gather everything before starting.

Why You'll Love This Standing and Sitting Goofy Amigurumi Pattern

I absolutely love this pattern because it captures Goofy’s playful character with simple shaping and charming details. I enjoy the balance of repetition and small shaping challenges that keep the project relaxing but interesting. The two size options β€” standing and sitting β€” let me create a matching pair for display or gifting. I also appreciate how easy it is to customize colors and small accessories for a personal touch. Every finished toy always brings a smile when I imagine it being gifted or kept on a shelf.

Standing and Sitting Goofy Amigurumi Pattern step 1 - construction progress Standing and Sitting Goofy Amigurumi Pattern step 2 - assembly progress Standing and Sitting Goofy Amigurumi Pattern step 3 - details and accessories Standing and Sitting Goofy Amigurumi Pattern step 4 - final assembly and finishing

Switch Things Up

I love experimenting with colors on this pattern; you can swap the orange jacket for red or purple to create a new outfit.

I often use a slightly thicker yarn and a larger hook to make a chunkier, cuddlier version that works well as a small plush.

To make a miniature keychain version, use thinner thread-weight yarn and a very small hook, and replace the stuffing with a small amount.

I sometimes insert a short piece of soft wire in the ears to make them poseable; be sure to cover the wire end so it doesn't poke through the crochet.

I enjoy adding embroidered eyebrows or mouth lines for different expressions β€” moving the eyes slightly higher or lower changes the personality.

Try mixing textures by using boucle or slightly fuzzy yarn for the jacket or hat to add visual interest.

Accessorize with tiny crocheted items like a scarf or a little bag to give Goofy a unique look and more character.

If you want a realistic vintage look, choose muted or pastel yarn colors and lightly brush the finished toy for a softer appearance.

For machine-washable toys, choose a cotton-blend yarn and secure all attachments with extra stitching; avoid inserting metal wire if the toy will be washed.

I recommend making a test swatch to practice the FLO rounds and HDC clusters so your tension matches the pattern before starting the main pieces.

Common Mistakes & How to Fix Them

βœ— Skipping stitch markers during rounds can make it hard to know where a round ends; use a stitch marker or a scrap of yarn to mark the end of each round and move it as you go. βœ— Forgetting to start stuffing early causes difficulty shaping the head or body later; begin lightly stuffing at the recommended round (for example start cotton on R11/R24 as noted) and add stuffing gradually to maintain shape. βœ— Not counting stitches after increases and decreases leads to uneven shaping; count your stitches at the end of each round, especially after rounds with multiple increases or decreases. βœ— Pulling your tension too tight when working FLO or HDC sections can distort the texture; keep a consistent, moderate tension and practice the stitch on scrap yarn if needed to match gauge. βœ— Overstuffing limbs or stuffing inconsistently creates lumpy or misshapen parts; stuff firmly but not overly tight and distribute stuffing evenly while shaping the piece.

Standing and Sitting Goofy Amigurumi Pattern

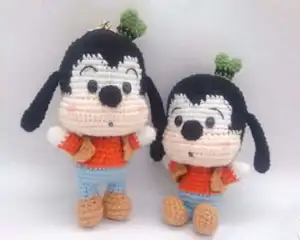
Make your own adorable Standing and Sitting Goofy with this complete crochet pattern. You will enjoy step-by-step rounds for head, ears, arms, legs, body, jacket, nose and hat with helpful assembly notes. The pattern uses 4-ply cotton yarn and small 1.8mm hook for a neat, detailed finish. Perfect for gifting or adding to your handmade toy collection.

Intermediate 5-7 Hours

Materials Needed for Standing and Sitting Goofy Amigurumi Pattern

β€” Main Fabric

  • 01
    4 Ply cotton yarn - Black (small amount for hair, ears and details)
  • 02
    4 Ply cotton yarn - White (small amount for face and hands)
  • 03
    4 Ply cotton yarn - Skin colour / light beige (for face and muzzle area)
  • 04
    4 Ply cotton yarn - Blue (for trousers/body parts)
  • 05
    4 Ply cotton yarn - Orange (for jacket/body details)
  • 06
    4 Ply cotton yarn - Brown (for shoes and jacket details)
  • 07
    4 Ply cotton yarn - Green (small amount for hat top)
  • 08
    4 Ply cotton yarn - Beige/Tan (for shoes and small details)
  • 09
    Note: Exact gram amounts are not specified in the original pattern; prepare small skeins (approximately 10-50g each) of each color to complete the toy.

β€” Tools Required

  • 01
    Crochet hook size 1.8mm
  • 02
    Oval Plastic Eyes 0.6x0.8 cm (or substitute as noted)
  • 03
    Nose 1.4 cm (optional: you can crochet nose with black yarn)
  • 04
    Scissors
  • 05
    Yarn needle for sewing parts together
  • 06
    Stitch markers or a piece of yarn to mark rounds
  • 07
    Polyester stuffing (cotton fill) - for stuffing head, body and limbs
  • 08
    Soft wire (optional for inserting into ears or limbs for posability)
  • 09
    Pink blush makeup powder or pink acrylic paint for cheeks (optional)

Progress Tracker

0% Complete

β€” Head :

Round 1 :

Magic Ring 6X (6)

Round 2 :

6V (12)

Round 3 :

6 (X, V) (18)

Round 4 :

6 (X, V, X) (24)

Round 5 :

6 (3X, V) (30)

Round 6 :

6 (2X, V, 2X) (36)

Round 7 :

6 (5X, V) (42)

Round 8 :

6 (3X, V, 3X) (48)

Round 9 :

48X (48)

Round 10 :

18X, 4X, 4X, 4X, 18X (48)

Round 11 :

17X, 6X, 2X, 6X, 17X (48)

Round 12-15 :

16X, 16X, 16X (48)

Round 16 :

17X, 14X, 17X (48)

Round 17 :

12X, A, 20X, A, 12X (46)

Round 18 :

12X, FLO X, FLO 3V, FLO 7 (X, V), FLO 3V, FLO X, 12X (59)

Round 19 :

12X, 35X, 12X (59)

Round 20 :

12X, X, 33T, X, 12X (59)

Round 21-22 :

12X, 35X, 12X (59)

Round 23 :

12X, X, 3A, 7 (X, A), 3A, X, 12X (46)

Round 24 :

X, 3 (X, A, X), 5 (X, A, X), X, A, X, 2 (X, A, X), X (35)

Round 25 :

X, 3 (X, A), 5 (X, A), X, A, 2 (X, A), X (24)

Round 26 :

6 (X, A, X) (18)

Info :

ON R24, Begin to cotton in.

β€” Ear (MAKE 2) :

Round 1 :

Magic Ring 5X (5)

Round 2 :

5V (10)

Round 3-5 :

10X (10)

Round 6 :

A, 3X, A, 3X (8)

Round 7-10 :

8X (8)

Round 11 :

A, 2X, A, 2X (6)

Round 12-14 :

6X (6)

Infos :

BLACK YARN. You don't have to cotton in the ears. You may insert soft wire.

β€” Arms (MAKE 2) :

Round 1 :

Magic Ring 6X (6)

Round 2 :

3 (X, V) (9)

Round 3 :

9X (9)

Round 4 :

4X, In one stitch: 3HDC, 4X (9)

Round 5 :

9X (9)

Round 6 :

A, 7X (8)

Round 7-8 :

8X (8)

Info :

For the arms, you don't have to cotton in too full. HDC= Half Double Crochet.

β€” Leg + Body (STANDING) :

Round 1 :

5CH, working on 2nd stitch: 3X, W, 2X, V (10)

Round 2 :

V, 2X, 3V, 2X, 2V (16)

Round 3-4 :

16X (16)

Round 5 :

4X, 4A, 4X (12)

Round 6 :

A, 2X, 2A, 2X, A (8)

Round 7-8 :

8X. Fasten Off first leg, Repeat R1-8 to make second leg, you don't have to fasten off second leg. (8)

Round 9 :

4CH, connect both leg, On Legs 8X+ On CH 4X+ On Legs 8X+ On CH 4X (24)

Round 10 :

6X, 4 (X, V), 6X, 2 (X, V) (30)

Round 11 :

30X (30)

Round 12 :

6 (2X, V, 2X) (36)

Round 13-14 :

36X (36)

Round 15 :

6 (2X, A, 2X) (30)

Round 16 :

6X, 4 (X, A), 6X, 2 (X, A) (24)

Round 17 :

24X (24)

Round 18 :

6 (X, A, X) (18)

Round 19-20 :

18X (18)

Info :

BLACK TEXT= BROWN YARN. BLUE TEXT= BLUE YARN. ORANGE TEXT= ORANGE YARN.

β€” Leg (SITTING) :

Round 1 :

5CH, working on 2nd stitch: 3X, W, 2X, V (10)

Round 2 :

V, 2X, 3V, 2X, 2V (16)

Round 3-4 :

16X (16)

Round 5 :

4X, 4A, 4X (12)

Round 6 :

A, 2X, 2A, 2X, A (8)

Round 7-8 :

8X (8)

Info :

BLACK TEXT= BROWN. BLUE TEXT = BLUE YARN.

β€” Body (SITTING) :

Round 1 :

Magic Ring 8X (8)

Round 2 :

8V (16)

Round 3 :

8 (X, V) (24)

Round 4 :

24X (24)

Round 5 :

X, V, 6X, 4 (X, V), 7X, V (30)

Round 6 :

30X (30)

Round 7 :

6 (2X, V, 2X) (36)

Round 8 :

36X (36)

Round 9 :

6 (2X, A, 2X) (30)

Round 10 :

X, A, 6X, 4 (X, A), 7X, A (24)

Round 11 :

24X (24)

Round 12 :

6 (X, A, X) (18)

Round 13-14 :

18X (18)

Info :

On R11, Begin to cotton fill. Once done, leave long tail for sewing.

β€” Jacket (WORK IN LINES) :

Round 1 :

25CH, working on 2nd stitch: 24X (24)

Round 2 :

1CH Flip over, 6 (3X, V) (30)

Round 3 :

1CH Flip over, 3X, 6CH, Empty 6 stitches , X, 10T, X, 6CH, Empty 6 stitches , 3X (30)

Round 4 :

1CH Flip over, 9X, TV, 10T, TV, 9X (32)
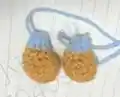
Info :

BROWN YARN.

β€” Nose (You may replace with 1.4cm plastic eyes or nose) :

Round 1 :

Magic Ring 6X (6)

Round 2 :

6V (12)

Info :

BLACK YARN. You may replace with 1.4cm plastic nose if preferred.

β€” Hat :

Round 1 :

Magic Ring 6X (6)

Round 2 :

6X. Fasten off the first one. Repeat R1-R2 to make a second one. (6)

Round 3 :

Insert hook into the first one to connect both pieces: 6X+6X (12)

Round 4 :

2 (2X, A, 2X) (10)

Round 5 :

10X (10)

Round 6 :

10X (10)

Infos :

GREEN TEXT= GREEN. BLACK TEXT= BLACK.

β€” Assembly & Finishing :

Info :

Position for the ears. Position sewing legs for the sitting Goofy. Distance between both legs around 4 or 5 stitches on the center.

Info :

You can join rounds with slip stitch or turn. A stitch marker or a piece of yarn to mark the ending of the round. It’s highly recommended that you read through the pattern completely before beginning to crochet.

Info :

Materials & Tools: There is no special yarn requirement for the pattern. You may work with the yarn you prefer. You can use the same pattern to make smaller or larger toy by using finer or bulkier yarn. Crochet hook suitable with your yarns. Pink blush makeup powder or pink acrylic paint for cheeks.

Info :

Contact Info: You are welcome to contact the designer if you have any questions about the pattern. Share photos of your finished doll.

Assembly Instructions

  • Position the ears on the head where the ear openings align with the head edge, and sew securely using whipstitch or ladder stitch so they hang naturally.
  • For the sitting Goofy, position the legs so the distance between both legs is around 4 or 5 stitches at the center, then sew the legs to the body firmly for stability.
  • Attach the head to the body by matching the neck opening to the top of the body, stuffing as needed, then sew around the opening with a yarn needle and matching yarn.
  • Sew the arms to the sides of the body at the appropriate rounds (align with the body round indicated in photos), positioning slightly forward and securing with several stitches for durability.
  • Attach the nose and then embroider or attach eyes before final facial details; place small accessories such as the jacket and hat after checking positioning in photos.

Important Notes

  • πŸ’‘Use a stitch marker or a piece of yarn to mark the end of each round to keep track of rounds and avoid losing your place.
  • πŸ’‘Begin stuffing at the rounds recommended (e.g., begin to cotton fill on R11 for the body and R24 for the head) and add stuffing gradually to shape evenly.
  • πŸ’‘Pin parts in place before sewing to ensure symmetry and correct positioning, and adjust placement until you are satisfied with the look.
  • πŸ’‘You can join rounds with a slip stitch or turn depending on preferred finish; both are acceptable and a matter of personal preference.

This delightful Standing and Sitting Goofy pattern helps you create a lovable handmade companion with charming details and two pose options. Whether you make the standing or sitting version (or both!), the pattern offers satisfying shaping and fun finishing touches. Try customizing colors or tiny accessories to make your Goofy truly unique. 🧢🧡

You ask,

we answer.

FAQs

What size will the finished piece be?

The finished Goofy measures roughly the size typical for 4-ply cotton amigurumi using a 1.8mm hook; exact height depends on yarn tension and stuffing but expect a small pocket-sized toy.

Can I use different yarn weights for this pattern?

Yes, you can use different yarn weights but the final size and stitch definition will change; choose an appropriate hook for the yarn you use and expect larger or smaller results.

Do I need prior crochet experience for this pattern?

This pattern is rated intermediate, so basic knowledge of magic ring, single crochet, increases, decreases and working in rounds is recommended for best results.

How long does this project typically take to complete?

Most crocheters complete this project in 5-7 hours, though time will vary based on experience level, customization and how many accessories or size variations you make.