About This Stanley the Strawberry Amigurumi Pattern
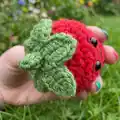
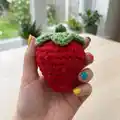
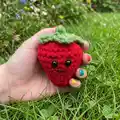
This pattern creates Stanley the Strawberry, an easy and tiny amigurumi measuring approximately 2.5" tall. You'll work in continuous rounds to shape a rounded strawberry body and add a decorative leafy top. The pattern features simple increases, invisible decreases, and a front-loop leaf round to create five leaves.

Ideal for using leftover worsted weight yarn, Stanley is quick to make and perfect for thoughtful handmade gifts. The instructions include eye placement tips, finishing notes, and stem/leaf placement guidance.
Why You'll Love This Stanley the Strawberry Amigurumi Pattern
I absolutely love this pattern because it transforms simple stitches into a charming character with very little time investment. I enjoy how compact the design is—each strawberry is a quick win that still looks polished and delightful. The leafy top is a small crochet flourish that adds tons of personality with minimal effort. Making a whole patch of these in different colors is so satisfying and makes wonderful gifts or market items.
Switch Things Up
I love customizing color palettes for this pattern; try pastel pinks and mint green for a soft, whimsical strawberry version.
You can make Stanley larger or smaller by changing yarn weight and hook size—bulky yarn with a larger hook makes a chunky plush, while a finer yarn creates minis perfect for keychains.
I often embroider freckles or a tiny nose to change the expression and give each strawberry its own personality.
Swap safety eyes for French knots or embroidered eyes for a fully child-safe option, especially if the toy is for very young children.
Change the leaf round to make more or fewer leaves by adjusting the repeat in round 14; add extra dc clusters for fuller leaves.
Make a set in graduated sizes by scaling the initial increases to create small, medium, and large strawberries for a decorative bowl display.
I sometimes attach a short chain or keyring to the stem to turn Stanley into a keychain or bag charm—just secure the loop well before final stuffing.
Try mixing yarn textures like a slightly fuzzy boucle for the body to create a cozy, tactile fruit toy with personality.
I like to add tiny felt accents like a leaf or heart sewn on as an applique for gifts and personalization.
For seasonal variations, use autumnal tones or bright neon colors to match holidays or themes, and experiment with embroidered faces for different moods.
Common Mistakes & How to Fix Them
✗ Skipping the stitch marker in continuous rounds can cause you to lose track of the beginning; place a marker at the start of each round and move it as you progress.
✗ Forgetting to stuff as you go makes shaping difficult and can create lumps; stuff gradually and adjust filling between rounds to achieve a smooth shape.
✗ Placing safety eyes too close or too far apart will change the expression; insert safety eyes between rounds 8 and 9 so they are approximately 1 stitch apart for the intended look.
✗ Pulling the yarn tail too tightly when closing the top can distort the leaves; weave the tail through the back loops of round 14 gently and pull gradually to close the opening evenly.
✗ Not counting stitches after increases or decreases may lead to mismatched rounds; count your stitches frequently, especially after rounds with invdec or repeated patterns.