About This Stripy Shell Stitches Crochet Hat Pattern
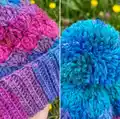
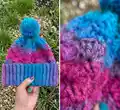
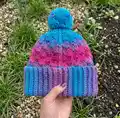
This pattern creates a stylish adult-sized hat featuring folded ribbing and a stripy shell stitch body using self-striping yarn. The texture is created by alternating shell rounds and simple rounds for a pretty scalloped look. It finishes with an optional pompom for a playful touch and a neat, folded brim for extra warmth.
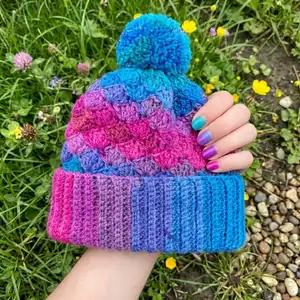
Worked in medium weight self-striping yarn with a 5 mm hook to achieve the pictured gauge and drape. Clear, easy-to-follow rounds and diagrams make this a great project for casual crocheters and gift makers.
Why You'll Love This Stripy Shell Stitches Crochet Hat Pattern
I absolutely love this pattern because the self-striping yarn does most of the color work for you, creating beautiful stripes without changing yarns. I enjoy how the shell stitch builds texture and interest with only a couple of simple round repeats. The folded rib makes the brim extra cozy and gives the hat a professional finish that I am proud to gift. It is a quick, satisfying make—perfect for those times when I want a fast handmade project with high-impact results.
Switch Things Up
I love customizing this hat by swapping colorways; try bold contrasting stripes or muted pastels for a different look.
I sometimes change the yarn weight and hook to make a chunky version using bulky yarn and a larger hook for a squishier, warmer hat.
I often add a lining for extra warmth by sewing a soft fleece circle inside the hat after finishing the crown.
I like to replace the pompom with a faux-fur topper for a dressier finish that still looks professional.
I sometimes shorten the ribbing and skip folding for a slouchy beanie style; simply work fewer rows before joining the ribbing.
I add embroidered initials or a small applique to personalize hats as gifts and make each one special and unique.
I also experiment with different shell sizes—use 3 dc shells instead of 5 dc for a subtler texture and a different stitch repeat.
For a child's size, I change to a lighter yarn and smaller hook and reduce the number of shell repeats to achieve a smaller circumference.
I like to alternate metallic or sparkly thread held with the main yarn for one contrasting round to add a festive shimmer.
I create coordinating sets by making a matching cowl or mitts in the same shell pattern and colorway to make a full winter set.
Common Mistakes & How to Fix Them
✗ Skipping the stitch that sits directly under the starting slip stitch can change the stitch count; always identify and work into the same space as the sl st for the first stitch.
✗ Not stretching the ribbing to the correct length before joining leads to a tight hat; stretch the ribbing slightly and measure to 19½" [49.5 cm] before joining.
✗ Failing to keep track of skipped stitches in shell rounds results in misplaced shells; use a stitch marker at the start of the round and count shells as you go.
✗ Fastening off too early during join steps will make seaming difficult; follow instructions that say 'Do not fasten off' and complete joining steps before fastening.
✗ Inconsistent tension between the ribbing and body causes uneven shape; maintain a steady tension and check gauge after completing the ribbing.