Make a whimsical Summer Horse amigurumi with detailed step-by-step instructions, mane and tail tutorials, and floral embellishments. This pattern guides you through shaping the head, body, legs, ears, mane, tail, and decorative roses and leaves. Perfect for creating a gift-ready plush with personality and charm.
Progress Tracker
0% Complete
— Head :
Round 3 :
(sc 2, 3 sc in next) x 4 (20)
Round 4 :
sc 3, 3 sc in next, (sc 4, 3 sc in next) x 3, sc (28)
Round 5 :
sc 4, 3 sc in next, (sc 6, 3 sc in next) x 3, sc 2 (36)
Round 6-10 :
sc around, 5 rnds (36)
Round 11 :
sc 24, (inc, sc 2) x 4 (40)
Round 13 :
sc 25, (inc, sc 2) x 4, sc 3 (44)
Round 15 :
sc 6, (inc, sc) x 5, inc, sc 12, inc x 3, sc 2, inc x 4, sc 6 (57)
Round 16-21 :
sc around, 6rnds (57)
Round 22 :
sc 40, (inc, sc 4) x 3, sc 2 (60)
Round 23-25 :
sc around, 3 rnds (60)
Round 26 :
(sc 3, dec) x 8, sc 15, dec, sc 3 (51)
Round 27 :
sc 30, dec, sc 6, dec, sc 9, dec (48)
Round 28 :
(sc 6, dec) x 6 (42)
Round 29 :
(sc 5, dec) x 6 (36)
Round 30 :
(sc 4, dec) x 6 (30)
Round 31 :
(sc 3, dec) x 6 (24)
Info :
Start Stuffing. I used hot glue to attach the eyes after I closed the head, if you'd rather use the safety backs for the eyes, you can follow the instructions for the eyes now.*see below
Round 32 :
(sc 2, dec) x 6 (18)
Round 33 :
(sc, dec) x 6 (12)
Info :
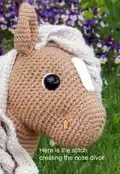
Eye Instructions: To make the divots for the eyes to sit in - Take a piece of yarn (I used crochet thread so you can see it better) and thread it through the head between rnds 17 & 18 and approx 25 sts apart. Thread the yarn back through the head so that you 'grab a stitch'. Make sure the tail comes out in a way so that you will be able to tie a knot around a stitch on the other side and pull on the yarn until you form the divots on both sides. Knot the ends a couple more times & hide the ends inside the head. I used hot glue to secure the eyes in the divots.
— Ears :
Round 2 :
(sc 2, inc) x 2 (8)
Round 3 :
(sc 3, inc) x 2 (10)
Round 5 :
(inc x 2, sc 3) x 2 (14)
Round 6 :
sc, inc x 2, sc 5, inc x 2, sc 4 (18)
Round 7 :
sc 2, inc x 2, sc 7, inc x 2, sc 5 (22)
Round 8-10 :
sc around, 3 rnds (22)
Round 11 :
sc 2, dec x 2, sc 7, dec x 2, sc 5 (18)
Round 12 :
sc, dec x 2, sc 5, dec x 2, sc 4 (14)
Info :
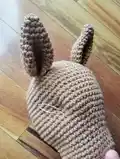
Sc 2 more times to get to the edge of the ear and ch 1, hold the bottom edges together, make 7 sc through both sides to close the opening. Finish off, leaving a long tail. Pinch the bottom of the ear together and make a few sts to secure. Sew the ears to the head at approx. rnds 25-27. *See photo on page 4 for reference.
— Nose Strip :
Info :
With Ivory~ Ch 9, starting in second ch from the hook-
Round 1-2 :
sc across, ch 1 & turn (8)
Info :
Finish Off, leaving a long tail. Sew the strip to the middle of the horse's nose.
— Neck :
Info :
Start with a long beginning tail, you will use this to sew the head to the neck. Ch 36, slst into the first ch to join, ch 1
Round 1-2 :
sc around, 2 rnds (36)
Round 3 :
sc 10, (inc, sc 2) x 6, sc 8 (42)
Round 4-5 :
sc around, 2 rnds (42)
Round 6 :
sc 18, (inc, sc 2) x 3, sc 15 (45)
Round 8 :
sc 17, inc, sc 3, (inc, sc 2) x 2, (inc, sc 3) x 2, sc 10 (50)
Round 9-12 :
sc around, 4 rnds (50)
Round 13 :
(sc 2, inc) x 4, sc 12, (inc, sc 2) x 4, sc 10, inc, sc 2, inc (60)
Round 15 :
sc 25, (dec, sc 2) x 5, sc 15 (55)
Info :
Finish Off, leaving a long tail.
— Body :
Round 3 :
(sc, inc) x 6 (18)
Round 4 :
(sc 2, inc) x 6 (24)
Round 5 :
(sc 3, inc) x 6 (30)
Round 6 :
(sc 4, inc) x 6 (36)
Round 7 :
(sc 5, inc) x 6 (42)
Round 8 :
(sc 6, inc) x 6 (48)
Round 9 :
(sc 7, inc) x 6 (54)
Round 10 :
(sc 8, inc) x 6 (60)
Round 11-38 :
sc around, 28 rnds (60)
Round 39 :
(sc 8, dec) x 6 (54)
Round 40 :
(sc 7, dec) x 6 (48)
Round 41 :
(sc 6, dec) x 6 (42)
Round 42 :
(sc 5, dec) x 6 (36)
Round 43 :
(sc 4, dec) x 6 (30)
Round 44 :
(sc 3, dec) x 6 (24)
Round 45 :
(sc 2, dec) x 6 (18)
Round 46 :
(sc, dec) x 6 (12)
Info :
Assembly: Place the front of the neck at approx. rnd 4 of the body, the back of the neck will reach to approx. rnd 23. Stuff the neck firmly, then sew the head to the top of the neck. I sewed the head at an angle so it looks like the horse is looking off to the side but you can sew it straight on, or however you like. Add additional stuffing before closing up the last few stitches to make sure the neck is nice and firm and can support the head.
— Legs :
Right Front Leg - Round 1 :
MR, sc 6 (6)
Right Front Leg - Round 2 :
inc x 6 (12)
Right Front Leg - Round 3 :
(sc, inc) x 6 (18)
Right Front Leg - Round 4 :
(sc 2, inc) x 6 (24)
Right Front Leg - Round 5 :
(sc 3, inc) x 6 (30)
Right Front Leg - Round 6 :
(sc 4, inc) x 6 (36)
Right Front Leg - Round 7 :
BLO, sc 10, (inc, sc 2) x 6, sc 8 (42)
Right Front Leg - Round 8-9 :
sc around, 2 rnds (42)
Right Front Leg - Round 10 :
sc 10, (dec, sc 2) x 6, sc 8 (36)
Right Front Leg - Round 11 :
sc around (36)
Right Front Leg - Round 12 :
sc 11, (dec, sc 2) x 4, sc 9 (32)
Right Front Leg - Round 13-14 :
sc around, 2 rnds (32)
Right Front Leg - Round 15 :
sc 12, (dec, sc 2) x 3, sc 8 (29)
Right Front Leg - Round 16 :
sc around (29)
Info :
Insert nylon with poly-pellets *see page 3
Right Front Leg - Round 17 :
sc 10, (dec, sc 2) x 3, sc 7 (26)
Right Front Leg - Round 18 :
sc around (26)
Right Front Leg - Round 19 :
sc 11, dec x4, sc 7 (22)
Right Front Leg - Round 20 :
sc around (22)
Info :
Change to Body Color
Right Front Leg - Round 21-24 :
sc around, 4 rnds (22)
Right Front Leg - Round 25 :
sc, inc x 2, sc 10, inc x 3, sc 6 (27)
Right Front Leg - Round 26-30 :
sc around, 5 rnds (27)
Right Front Leg - Round 31 :
sc 4, inc x 2, sc 11, inc x 3, sc 7 (32)
Right Front Leg - Round 32-37 :
sc around, 6 rnds (32)
Right Front Leg - Round 38 :
sc 5, ch 1 & turn, hdc in same st as ch & in the next 16 (17) ch 1 & turn
Right Front Leg - Round 39 :
hdc 17, ch 1 & turn (17)
Right Front Leg - Round 40 :
hdc 3, dc 11, hdc 3 (17)
Info :
Finish Off , leaving a long tail. Make sure the leg is stuffed firmly so it can support the body.
Left Front Leg :
Follow the same instructions as the right front leg through rnd 37
Left Front Leg - Round 38 :
sc 10, hdc 17, ch 1 & turn
Left Front Leg - Round 39 :
hdc in same as ch & in the next 16, ch 1, turn (17)
Left Front Leg - Round 40 :
hdc 3, dc 11, hdc 3 (17)
Info :
Finish Off, leaving a long tail. Stuff firmly.
Right Rear Leg :
Follow the same instructions as right front leg through rnd 33
Right Rear Leg - Round 34 :
sc 6, inc x 2, sc 15, inc x 3, sc 6 (37)
Right Rear Leg - Round 35 :
sc around (37)
Right Rear Leg - Round 36 :
sc 8, inc x 3, sc 26 (40)
Right Rear Leg - Round 37 :
sc around (40)
Right Rear Leg - Round 38 :
sc 20, ch 1 & turn, hdc in same as ch & in next 24, ch 1, turn
Right Rear Leg - Round 39 :
hdc 25 (25) ch 2 & turn
Right Rear Leg - Round 40 :
dc in same as ch & in the next 17, hdc 7 (25) ch 1 & turn
Right Rear Leg - Round 41 :
sc 7, hdc 18 (25) ch 1 & turn
Right Rear Leg - Round 42 :
sc 6, hdc 12, sc 7 (25)
Info :
Finish Off, leaving a long tail. Stuff Firmly.
Left Rear Leg :
Follow the same instructions as the Right REAR Leg through rnd 37
Left Rear Leg - Round 38 :
sc 32, ch 1 & turn, hdc in same as ch & in next 24 (25) ch 1 & turn
Left Rear Leg - Round 39 :
hdc 25 (25) ch 1 & turn
Left Rear Leg - Round 40 :
hdc 7, dc 18 (25) ch 1 & turn
Left Rear Leg - Round 41 :
hdc 18, sc 7 (25) ch 1 & turn
Left Rear Leg - Round 42 :
sc 7, hdc 12, sc 6 (25)
Info :
Finish Off, leaving a long tail. Stuff Firmly.
Info :
Assembly: Sew the legs to the body, add stuffing before closing up the last few stitches to insure the bottom of the legs are firm. Add some lighter stuffing to fill in the flap area, making sure the stuffing doesn't pull gaps in the hdc/dc stitches.
— Mane & Tail :
Info :
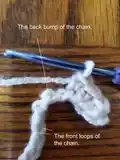
The mane and tail are made up of 2 strips that are joined together at the top, forming what we will refer to as a 'Section'. Each strip begins with a starting ch. You will start by working in the 2nd chain from the hook and sc into the back bumps of the starting ch *See page 3. You will work a total of 3 rows of sc, then, without finishing off, begin a new starting ch for the second strip. After working 3 rows of sc on the second strip, you ch 1, fold the strips together and sc across the top to join, forming a Section.
Info :
I will write out the instructions for the first Section, then you will repeat the same technique for each section, changing only the length of the chains.
Front mane - Section 1 :
With Mane/Tail Color~ Ch 42, starting in 2nd ch from the hook & working in back bump- 1-2 - sc across, Ch 1 & turn (41) 3 - sc across Ch 36 1-2 - sc across, ch 1 & turn (35) 3 - sc across Ch 1 and fold the 2 strips together, sc across to join. Finish Off, leaving a long tail. This section will go next to the inside of the left ear.
Front mane - Section 2 :
Strip 1: ch 21; Strip 2: ch 31. This goes next to Section 1, in the middle.
Front mane - Section 3 :
Strip 1: ch 42; Strip 2: ch 26. This section is sewn directly behind Section 2 and lays over the top of Section 2.
Info :
Now, we will make a single strip that is 31 ch long. This piece goes next to the right ear and is angled so it lays across the other sections.
Side mane :
Next, we will make the part of the mane that goes down the back of the horse's head and neck. For this piece I made 5 continuous sections. I made 2 strips and joined them together but instead of finishing off, I made the next starting ch, making my next 2 strips and joined those 2 strips together and so on. You will have 5 sections total that are all connected. Then I just single crocheted across the top of all five sections for a cleaner look and to make the piece easier to attach. Every strip will start with a ch of 58.
Tail :
For the tail we will make 2 continuous sections (total of 4 strips). After single crocheting across the top of the 2nd section, ch 1, fold one section over the top of the other and sc across the top to join. (you'll have 4 strips stacked one on top of the other).
Tail - Section 1 :
Strip 1: Ch 55; Strip 2: ch 61
Tail - Section 2 :
Strip 1: ch 57; Strip 2: ch 64
Info :
Fold the 2 sections together and sc across the top (there will be 4 strips layered). Finish off, leaving a long tail. Repeat these instructions 2 more times so that you have a total of 3 pieces with 2 sections each. Sew the first piece to approx. rnd 38 of the horse's body. Sew the next 2 pieces directly above the first.
— Flowers & Leaves :
Info :
I made 3 roses in each color and 3 rosebuds in each color. I also made 7 leaves. You can make as many flowers and leaves as you wish, adding some to the tail as well if you like.
Rose :
Ch 27, 3hdc in 2nd ch from the hook, slst, (3hdc in next st, slst) x 12
Info :
Finish off, leaving a long tail. Roll the petals into a rose shape and secure with a few stitches through the bottom.
Rosebud :
ch 18, dc in 3rd ch from the hook & in the next 15.
Info :
Finish off, leaving a long tail. Roll up and secure with a few stitches through the bottom.
Leaf :
Leave a long starting tail for sewing the leaves to the roses: Ch 8, starting in 2nd ch from the hook, slst, sc, hdc, dc 3, 5 dc in next st, (Now begin working down the opposite side of the ch) dc 3, hdc, sc, slst, ch 2, slst into the first slst on side 1. Finish Off.
Info :
Reference photos on the next page for placement of the flowers.
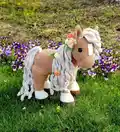
Create this charming Summer Horse to add a handcrafted friend to your home or to gift to someone special. The layered mane and delicate roses bring sweet personality and playful detail to each piece. Have fun customizing colors and floral arrangements to make your horse truly unique. 🧶🌸🧵