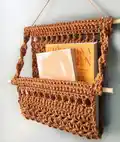
Make a stylish hanging boho book nook to organize your small books and display on the wall. This easy-to-follow pattern uses two-strand worsted cotton for structure and lovely texture. You will create a pocket and two coordinating arms that slide onto dowel rods for a neat, finished look. Perfect for gifting or adding rustic charm to any room.
Progress Tracker
0% Complete
— Pattern :
Info :
Level: Advanced Beginner
Info :
Finished Size: Approx. 12 inches wide and 11 inches long after completion, not including hanging string.
Infos :
Supplies: Yarn needle. Scissors. 2 12-inch by 5/16-inch dowel rods. 6mm crochet hook or hook needed to match gauge. Approximately 350 yds of worsted weight (#4) yarn. 2 skeins of I Love This Cotton in Antique Gold were used for the hanging basket pictured.
Infos :
Stitches and abbreviations: Ch (chain). Sk (skip). St (stitch/stitches). Sl st (slip stitch). Sp (space). Blo (back loop only). Sc (single crochet). Fsc (foundation single crochet). Dc (double crochet). Mini Bean stitch (bean) - insert hook into next stitch, yarn over, pull through, yarn over, insert hook into same stitch once more, yarn over and pull through. You should have 4 loops on hook. Yarn over and pull through all 4 loops. Chain 1 to complete the bean stitch.
Info :
Gauge: 5 1/2 stitches and 6 rows with two strands held together in sc equals 2-inch square.
Infos :
Pattern Notes: This pattern is worked in rows to create 3 separate pieces (the "pocket" and the 2 "arms") and is designed to require no seaming. Pictures are included for explanation and the construction of the final pieces. Ch 1 at the beginning of the row when turning does not count as a stitch. Ch 3 counts as a dc and ch 4 counts as dc + ch 1 throughout pattern. Stitch counts are in ( ) at the end of each row. After row 2, piece should measure 9 inches long. If it is longer, check your gauge or switch to a smaller hook. If the pocket is wider than 9 inches, it may not stay on the dowel rod unless you size up the dowel rod. The pocket width can be customized by foundation single crocheting any odd number to fit longer dowel rods, then continuing with the pattern as written (keeping in mind the stitch counts given below will no longer apply). If stitches are added to the pocket foundation row, I recommend increasing the foundation row of the "arms" by 1-2 stitches as well for support. The pocket can also be made longer by doing more pattern repeats, but keep in mind it could lose strength as weight and length are added.
— Pocket :
Info :
With two strands held together
Row 1 :
Fsc 25 (alternatively, ch 26, sc in second ch and across). (25 sc)
Row 2 :
Ch 1 and turn. Sc in same st and each st across. Piece should measure 9 inches long. (25 sc)
Row 3-5 :
Ch 1 and turn. Sc in same st and each st across. (25 sc)
Info :
*At this point, check that the piece will fit around your dowel rod (photo 1). If it is still short, add or subtract sc rows as needed, but make note of whether you need an even or odd number of rows for later.*
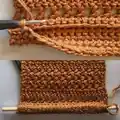
Row 6 :
Ch 1 and turn. Sc through both loops of row 5 and bottom loops of row 1 to create a tube (photos 2 and 3). This is the beginning tube. (25 sc)
Row 7 :
Ch 4 (counts as dc + ch 1) and turn. Sk same st and next st, dc in next st, *ch 1, sk 1, dc in next st* to end. (13 dc, 12 ch 1 sp)
Row 8 :
Ch 1 and turn. Sc in same st, sc in each st and ch sp across, sc in 3rd ch of ch 4 from previous row. (25 sc)
Row 9 :
Ch 1 and turn. Sc in same st, ch 1, sk 1, mini bean in next st, *sk 1 st, mini bean in next st* across until there are 2 stitches left, sk 1 st, sc in last st. (2 sc, 11 beans)
Row 10-13 :
Repeat row 9. (2 sc, 11 beans)
Row 14 :
Ch 3 (counts as dc) and turn. Sk same st, dc in next st and each st across. (25 dc)
Row 15 :
Ch 1 and turn. Sc in same st, ch 1, sk 1, mini bean in next st, *sk 1 st, mini bean in next st* across until there are 2 stitches left, sk 1 st, sc in ch 3 from previous row. (2 sc, 11 beans)
Row 16-19 :
Repeat row 9. (2 sc, 11 beans)
Row 20 :
Repeat row 14. (25 dc)
Row 21 :
Repeat row 15. (2 sc, 11 beans)
Row 22-25 :
Repeat row 9. (2 sc, 11 beans)
Row 26 :
Repeat row 14. (25 dc)
Row 27 :
Repeat row 15. (2 sc, 11 beans)
Row 28-31 :
Repeat row 9. (2 sc, 11 beans)
Row 32 :
Repeat row 14. (25 dc)
Row 33 :
Ch 4 (counts as dc + ch 1) and turn. Sk same st and next st, dc in next st, *ch 1, sk 1, dc in next st* to end. (13 dc, 12 ch 1 sp)
Row 34 :
Ch 1 and turn. Sc in same st, sc in each st and ch sp across, sc in 3rd ch of ch 4 from previous row. (25 sc)
Info :
*If you used an odd number of rows to fit around your dowel rod, continue with the pattern as written. If you used an even number of rows, work row 35 in the front loops only instead of the back loops. This will keep your unused loops on the correct side for seaming.*
Row 35 :
Ch 1 and turn. Sc in same st in blo, sc in each st across in blo (you will be using the unused loops for row 40). (25 sc)
Row 36-39 :
Ch 1 and turn. Sc in same st and across. (25 sc)
Info :
*If you needed more or fewer rows for the beginning tube, do the same thing here for the end tube.*
Row 40 :
Using the unused loops from row 35, sl st through both loops of row 39 and the loops from row 35 across to create the end tube (photos 4 and 5). Tie off. Weave in all ends.
— Arms :
Info :
Arms (make two): With two strands held together
Row 1 :
Ch 3, sc in second ch and last ch. (2 sc)
Row 2-5 :
Ch 1 and turn. Sc in same st and last st. (2 sc)
Info :
*If you needed more or fewer rows for the beginning tube on the pocket, do the same thing here for both arms, but again, make note of whether you need an even or odd number of rows for later.*
Row 6 :
Ch 1 and turn. Sc through both loops of row 5 and bottom loops of row 1 to create a tube (photos 2 and 3). This is the beginning tube. (2 sc)
Row 7-18 :
Ch 1 and turn. Sc in same st and last st. (2 sc)
Info :
*If you used an odd number of rows to fit around your dowel rod, continue with the pattern as written. If you used an even number of rows, work row 19 in the front loops only instead of the back loops. This will keep your unused loops on the correct side for seaming.*
Row 19 :
Ch 1 and turn. Sc in same st in blo, sc in last st in blo (you will be using the unused loops for row 24). (2 sc)
Row 20-23 :
Ch 1 and turn. Sc in same st and last st. (2 sc)
Info :
*If you needed more or fewer rows for the beginning tube, do the same thing here for the end tube.*
Row 24 :
Using the unused loops from row 19, sl st through both loops of row 23 and the loops from row 19 across to create the end tube (photos 4 and 5). Tie off. Weave in all ends.
Info :
Review photos 6-9 for final assembly!
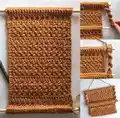
— Construction :
Beginning tube (this process is the same for the pocket and the arms) :
Photo 1: Check if your piece fits around your dowel rod. Photo 2: Sc the ends together to create a tube. *you do not have to do this around the dowel rod, but I found it helpful to show in the photos for clarification* Photo 3: Finished beginning tube!
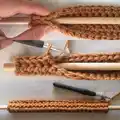
End tube (this process is the same for the pocket and the arms) :
Photo 4: Sl st in both loops of last row and unused loops from row 35 (or row 19 for the arms) across to create another tube. Photo 5: Finished end tube!
Final construction :
Photo 6: Slip the beginning tube of the pocket onto the first dowel rod, and the end tube on the bottom dowel rod with the sl st seam facing you. This way, when you fold the pocket up, the seam will be hidden on the inside of the pocket. Photo 7: For both arms, slip the beginning tube onto the end of the top dowel rod, twist a couple of times leaving the sl st seam facing in, and fold the pocket up to meet the arms. Photo 8: Slip the bottom tube onto bottom dowel rod. Tie 12-inch piece of yarn to each end of your dowel rod as desired for hanging. Photo 9: and the hanging wall basket done!
This Boho Book Nook Pattern brings handmade charm to your walls with a sturdy cotton pocket that holds small books and mail. Customize the size and color to match your decor and create a cozy nook anywhere in your home. Perfect for gifting or adding a thoughtful handmade accent to living spaces. 🧶✨