🧢 Beautiful ✨ Detailed πŸ’ Adorable

The Bowling Llama Amigurumi Pattern

The Bowling Llama Amigurumi Pattern
4.8β˜… Rating
5-7 Hours Time Needed
1.8K Made This
βœ‚οΈ

Intermediate Level

Ideal for those with basic crochet experience, featuring slightly more advanced stitches and techniques to expand your skills.

⏱️

Weekend Treat

Takes 5-7 hours, making it an enjoyable project to finish over a couple of days.

🧸

Cute Companion

An adorable friend to cherish, handcrafted with love to bring comfort and joy for years to come.

About This The Bowling Llama Amigurumi Pattern

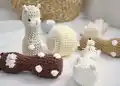
This pattern creates a sweet, no-sew Bowling Llama amigurumi worked with chunky velvet yarn for a plush, tactile finish. The design integrates ears, snout and legs so you dont sew separate body parts. The pattern teaches bobble stitch spots and simple color changes to make a playful set.

The Bowling Llama Amigurumi Pattern crochet pattern - detailed view of completed project

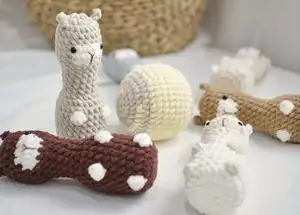
Includes full round-by-round instructions, tips for stuffing and finishing, and video links for tricky techniques. Finished toy measures approximately 15cm (~5.9in).

Why You'll Love This The Bowling Llama Amigurumi Pattern

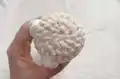
I absolutely love this pattern because it combines soft, tactile yarn with simple shaping to create an irresistibly cute toy. I enjoy how the no-sew construction keeps the project quick and satisfying while still producing a polished result. The bobble stitch spots add playful texture that makes each llama feel unique. I also love that it includes a matching bowling ball so you can make a whole set to display or gift.

The Bowling Llama Amigurumi Pattern step 1 - construction progress The Bowling Llama Amigurumi Pattern step 2 - assembly progress The Bowling Llama Amigurumi Pattern step 3 - details and accessories The Bowling Llama Amigurumi Pattern step 4 - final assembly and finishing

Switch Things Up

I love how easy it is to customize this pattern by swapping colors; try pastel palettes for a nursery set or bright hues for playful toys.

I sometimes change the yarn weight and hook to make a mini keychain version or a larger, cuddlier llama; adjust stuffing accordingly.

I often replace safety eyes with embroidered eyes for baby-safe toys, which gives a softer, handmade look.

I like to add tiny crocheted scarves or felt accessories to give each llama its own personality and seasonal flair.

You can vary the bobble spots color-by-color to create patterned llamas or make a whole set with alternating spot colors.

I recommend experimenting with different stitch textures like puff or cluster stitches for unique body surfaces.

Try adding a small ribbon or bell to the base for a gentle sound when moved; it makes a lovely gift detail.

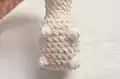
If you want a standing llama, insert a small flattened pad (from plastic or a milk bottle) into the base as suggested to keep it upright.

I sometimes embroider tiny expressions (smiles, winks) to change the llamas personalityβ€”test placement before securing permanently.

For a more playful set, crochet multiple llamas and one bowling ball in coordinating colors and gift them as a complete handmade game.

Common Mistakes & How to Fix Them

βœ— Skipping the invisible decrease technique can leave noticeable gaps or lumps; practice and use the invisible decrease method as suggested to hide decreases and smooth shaping. βœ— Not stuffing gradually will create lumps or uneven shaping; stuff a little at a time and shape as you go to maintain smooth curves and even firmness.
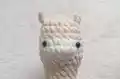
 βœ— Placing safety eyes before counting rounds carefully can misalign the face; count stitches between rounds 6 and 7 and place eyes 8 stitches apart as directed to ensure symmetry. βœ— Using too loose tension on chunky yarn causes holes where stuffing can peek through; maintain a firm, consistent tension so stitches sit close together and stuffing stays hidden. βœ— Forgetting to weave in the tail through front loops can cause the opening to gap; follow the instruction to weave the yarn tail through the front loop of each remaining stitch and pull tight to close.

The Bowling Llama Amigurumi Pattern

Make a charming, no-sew Bowling Llama using chunky velvet yarn and simple stitches. This pattern guides you through an adorable amigurumi with integrated legs, ears, and snout β€” perfect for a playful crochet project. Youll learn bobble stitch accents and color changes to create a sweet bowling set. Great for gifting or a cozy handmade toy collection.

Intermediate 5-7 Hours

Materials Needed for The Bowling Llama Amigurumi Pattern

β€” Main Fabric

  • 01
    Chunky yarn size 4-5mm (examples: Himalaya Velvet, Himalaya Dolphin Baby) - main colors used: cream (main body), white (snout and spots), gray, yellow, brown - small skeins as needed for each toy (approx 50-100g each depending on color usage)

β€” Tools Required

  • 01
    Crochet hook size 4mm
  • 02
    6mm toy safety eyes (2 pieces per llama)
  • 03
    Needle for sewing / yarn needle
  • 04
    Toy stuffing (fiberfill)
  • 05
    Stitch marker
  • 06
    Scissors
  • 07
    Powder blush for nose and cheeks (optional for finishing)
  • 08
    Small pad (2cm radius) made from plastic or milk bottle (optional to flatten bottom)

Progress Tracker

0% Complete

β€” Head & Body :

Info :

As this Llama is crocheted as a no-sew project, the legs, nose, and ears are integrated into the body and head, without separate parts. The ears are in round 2, the snout in rounds 6-8, and the legs in rounds 12 and 23.

Info :

Start in cream yarn. (Note: Use cream yarn in black word, white yarn in pink word)

Round 1 :

8sc in MR [8]

Round 2 :

2inc, (ch 4, skip 2 ch from the hook, slst in next 2 ch), inc in next st of the base, 3inc, (ch 4, skip 2 ch from the hook, slst in next 2 ch), inc in next st of the base, inc [16]

Round 3 :

(3sc, inc) x 4 [20]

Round 4 :

20sc [20]

Round 5 :

20sc [20]

Round 6 :

8sc, 4inc, 8sc [24]

Round 7 :

8sc, 8sc, 8sc [24]

Round 8 :

8sc, 4dec, 8sc [20]

Round 9 :

20sc [20]

Round 10 :

sc, dec3, (2sc, dec) x 4, sc [15]

Round 11 - 14 :

(4 rounds): 15sc [15]

Info :

Stuff the head firmly with fiberfill.

Round 15 :

(2sc, inc) x 5 [20]

Round 16 :

(4sc, inc) x 4 [24]

Round 17 :

24sc [24]

Round 18 :

11sc, bo4, 4sc, bo4, 7sc [24]

Round 19 - 22 :

(4 rounds): 24sc [24]

Round 23 :

11sc, bo4, 5sc, bo4, 6sc [24]

Round 24 :

24sc [24]

Round 25 :

(sc, dec) x 8 [16]

Info :

Stuff the body firmly with fiberfill.

Info :

Optional: You can insert a pad, 2cm in radius, made from plastic or a milk bottle, inside the llama to flatten its bottom. This will enable your llama to stand upright on its own.

Round 26 :

8dec [8]

Info :

Fasten off, leaving the yarn tail. Using the yarn needle, weave the yarn tail through the front loop of each remaining stitch and pull it tight to close.

Infos :

- How to weave in the yarn end on a stuffed piece: https://youtu.be/amYifc37uSs Insert the 6mm safety eyes between pounds 6 and 7, 8 stitches apart. Embroider the nose with brown threads. Use powder blush for the nose and the cheeks.

Infos :

Video tutorials: - How to crochet the Llama's head (from rnd 1 to 3): https://youtu.be/l8HahbG62SI - How to embroider the Llama's face: https://youtu.be/cqKbExxDB-8

β€” Bowling Ball :

Info :

Start in gray yarn. (Note: Use yellow yarn in orange word, gray yarn in black word)

Round 1 :

8sc in MR [8]

Round 2 :

8inc [16]

Round 3 :

(sc, inc) x 2, (sc, inc) x 6 [24]

Round 4 :

(2sc, inc) x 3, (2sc, inc) x 3, (2sc, inc) x 2 [32]

Round 5 :

32sc [32]

Round 6 :

(3sc, inc) x 8 [40]

Round 7 - 12 :

40sc [40]

Round 13 :

(3sc, dec) x 8 [32]

Round 14 :

32sc [32]

Round 15 :

(2sc, dec) x 2 + (2sc, dec) x 3 + (2sc, dec) x 3 [24]

Round 16 :

(sc, dec) x 6 + (sc, dec) x 2 [16]

Info :

Stuff the ball firmly with fiberfill.

Round 17 :

8dec [8]

Info :

Fasten off, leaving the yarn tail. Using the yarn needle, weave the yarn tail through the front loop of each remaining stitch and pull it tight to close.

Info :

- How to weave in the yarn end on a stuffed piece: https://youtu.be/amYifc37uSs

Assembly Instructions

  • Insert the 6mm safety eyes between rounds 6 and 7, spaced 8 stitches apart, then secure according to the safety eye manufacturers instructions.
  • Embroider the nose with brown thread centered on the snout area (snout is created in rounds 6-8); use powder blush for subtle color on the nose and cheeks.
  • Stuff the head and body firmly with fiberfill as indicated (stuff head before continuing at round 11-14 and stuff body before closing at round 25).
  • Weave the yarn tail through the front loop of each remaining stitch after the final decreases and pull tight to close; fasten off and hide the tail inside the body with a yarn needle.
  • Optional: insert a small pad (approx 2cm radius) made from plastic or a cut milk bottle inside the bottom of the llama to flatten the base so it stands upright.

Important Notes

  • πŸ’‘Make the invisible decrease stitches to have a better results (follow invisible decrease method for smoother shaping).
  • πŸ’‘Add toy stuffing according to instruction of each part; stuff head and body firmly but gradually for correct shaping.
  • πŸ’‘Stitches should be close together so that when the finished toy is stuffed, the stuffing doesn't come out through gaps in the stitches.
  • πŸ’‘The pattern includes color change techniques, bobble stitch technique and the X stitch technique for single crochet stitch; practice these techniques to match the sample.
  • πŸ’‘Finished size: the finished toy is approximately 15cm (~ 5.9 inch) high.

Thanks for crocheting the Bowling Llama β€” you did an amazing job bringing this little friend to life! Make more in different colors to create a full bowling set or give one as a handmade gift. Enjoy the soft texture and charming bobble spots β€” happy hooking and playful displays! 🧢🎳

You ask,

we answer.

FAQs

What size will the finished piece be?

The finished amigurumi measures approximately 15cm (~5.9 inches) high when using the recommended chunky yarn and 4mm hook.

Can I use different yarn weights for this pattern?

Yes, you can use different yarn weights, but this will change the final size; choose an appropriate hook for your yarn and note that tension affects the toy density.

Do I need prior crochet experience for this pattern?

This pattern is rated intermediate and includes bobble stitches and color changes, so basic crochet knowledge and familiarity with increases/decreases is recommended.

How long does this project typically take to complete?

Most crocheters complete this project in 5-7 hours, though time may vary depending on experience and whether you make a full bowling set.