🧢 Beautiful ✨ Detailed πŸ’ Adorable

The Festive Lights Amigurumi Pattern

The Festive Lights Amigurumi Pattern
4.4β˜… Rating
5-7 Hours Time Needed
1.3K Made This
βœ‚οΈ

Beginner Friendly Level

Perfect for those just starting their crochet journey, with clear instructions and simple techniques

⏱️

Weekend Treat

Takes 5-7 hours, making it an enjoyable project to finish over a couple of days.

🎁

Tiny Treasure

Small, sweet, and gift-worthy creations that fit perfectly in the palm of your hand with detailed charm.

About This The Festive Lights Amigurumi Pattern

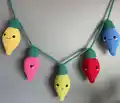
This pattern creates a set of plush crochet lightbulbs with screw-top caps and snug sockets to form a festive garland. The design uses bulky Bernat Blanket yarn (size 6) and a 6 mm hook for quick, squishy bulbs that are fun to personalize. You will work in continuous rounds and finish with optional facial features for charm.

The Festive Lights Amigurumi Pattern crochet pattern - detailed view of completed project

Perfect for gifting or seasonal decor, each bulb is stuffed, capped, and fitted into a crocheted socket for a secure, playful finish. Make as many bulbs and sockets as you like to create a custom length garland.

Why You'll Love This The Festive Lights Amigurumi Pattern

I absolutely love this pattern because it turns simple stitches into a festive, tactile decoration that feels handmade and heartwarming. I enjoy how quick each bulb works up thanks to the chunky yarn and clear round-by-round instructions. The design lets me play with colors and faces, making every string unique and cheerful. I also appreciate how the snug sockets hold the bulbs securely while still allowing a bit of playful twist to shimmy the bulb in place.

The Festive Lights Amigurumi Pattern step 1 - construction progress The Festive Lights Amigurumi Pattern step 2 - assembly progress The Festive Lights Amigurumi Pattern step 3 - details and accessories The Festive Lights Amigurumi Pattern step 4 - final assembly and finishing

Switch Things Up

I love how easy it is to customize these bulbs by swapping colours; try pastels for a soft nursery garland or neon shades for a playful party banner.

You can change the size by using a different yarn weight and hook: bulky yarn gives you a chunky bulb, while DK or worsted weight makes a smaller, more delicate bulb.

I often add embroidered mouths, freckles, or tiny eyebrows to give each bulb a unique expression that makes them feel like characters.

Want a more rustic look? Use neutral or variegated yarns for the bulb and a brown or cream socket to create a cozy, homey vibe.

If you prefer keychain charms, make the bulbs with thinner yarn and a smaller hook, then add a keyring instead of chaining sockets.

Try adding a small bell or bead inside before stuffing for a subtle jingle when the garland moves.

I sometimes stitch tiny felt accents or a crocheted bow to the top of each cap for a seasonal variation like Christmas or Valentine themes.

For a safer child-friendly version, skip the safety eyes and embroider the eyes instead, ensuring no small parts are used.

Rotate the spacing between sockets by CHing a different number (try CH 10 or CH 40) to change how densely the bulbs hang on your cord.

I recommend testing one bulb and socket first to find the perfect tension for a snug but removable fit, then repeat that tension across all pieces for consistency.

Common Mistakes & How to Fix Them
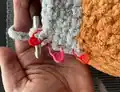
βœ— Skipping the stitch markers when working the cap front loops can make the screw coil placement confusing; place a secondary marker in the first front loop and another in the last front loop to mark the start and end of the coil.
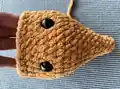
 βœ— Not placing safety eyes at the recommended rounds can throw off facial symmetry; place eyes between rounds 15 and 16 about five stitches apart for consistent positioning.
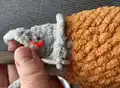
 βœ— Failing to stuff the tip early causes a misshapen bulb tip; start stuffing at the tip and add filling gradually to maintain the bulb shape and avoid lumps. βœ— Pulling your stitches too tight with bulky yarn makes the socket fit too snug or too loose; adjust your tension slightly and make a test socket to ensure the bulb twists into the socket comfortably. βœ— Forgetting to change colour cleanly for the cap leaves a messy join; switch to the cap colour at the end of round 22 and carry the yarn or fasten off neatly before working the front loop coil.

The Festive Lights Amigurumi Pattern

Make a charming string of crochet lightbulb amigurumi to brighten your home or gift to someone special. This pattern walks you through creating cute, plush bulbs with cozy screw caps and snug sockets using bulky Bernat Blanket yarn. You'll enjoy quick shaping, simple rounds, and playful finishing touches to give each bulb personality. Perfect for decorating a nursery, mantel, or doorway with handmade cheer.

Beginner Friendly 5-7 Hours

Materials Needed for The Festive Lights Amigurumi Pattern

β€” Main Fabric

  • 01
    Bernat Blanket Yarn (Size 6 / Super Bulky) - Main Part of Bulb: approx. 48g per bulb (colour as desired)
  • 02
    Bernat Blanket Yarn (Size 6 / Super Bulky) - Top/Cap of Bulb: approx. 10g per bulb (cap colour)
  • 03
    Bernat Blanket Yarn (Size 6 / Super Bulky) - Socket: approx. 13g per socket (socket colour)
  • 04
    Extra yarn for embroidery details and cheeks (small amounts)
  • 05
    Assorted colours of bulky yarn if making multiple bulbs (approx. 48g each main colour)

β€” Tools Required

  • 01
    Crochet hook size 6 mm (J)
  • 02
    Scissors
  • 03
    Yarn needle (tapestry needle) for sewing and weaving ends
  • 04
    Stitch markers (several colours recommended)
  • 05
    Safety eyes 16 mm (black) or preferred size
  • 06
    Polyester stuffing (fiberfill)
  • 07
    Sewing needle for embroidery (optional)

Progress Tracker

0% Complete

β€” Lightbulb :

Info :

Using the Bulb Colour:

Round 1 :

MR 6 SC [6]

Round 2 :

(SC, INC) x 3 [9]

Round 3 :

SC around [9]

Round 4 :

(2 SC, INC) x 3 [12]

Round 5 :

SC around [12]

Round 6 :

(SC, INC) x 6 [18]

Round 7 :

SC around [18]

Round 8 :

(2 SC, INC) x 6 [24]

Round 9 :

SC around [24]

Round 10 :

(3 SC, INC) x 6 [30]

Round 11 :

SC around [30]

Round 12 :

(4 SC, INC) x 6 [36]

Round 13-16 :

(4 Rounds) - SC around [36]

Round 17 :

(4 SC, DEC) x 6 [30]

Round 18-19 :

(2 Rounds) - SC around [30]

Info :

* If placing safety eyes, place between rows 15 and 16 about 5 stitches apart. *

Info :

* Start Stuffing, making sure to fill the tip of your bulb and work the fill evenly around your bulb. *

Round 20 :

(3 SC, DEC) x 6 [24]

Round 21 :

SC around [24]

Round 22 :

(2 SC, DEC) x 6 [18]

Info :

** Switch to Cap Colour for Bulb**

β€” Cap :

Info :

Using the Cap Colour for Bulb:

Round 23 :

IN BLO SC, place a secondary stitch marker colour in front loop of this stitch to leave behind as you continue around. This will be the start of your screw later. Continue around IN BLO SC [18]

Round 24 :

IN BLO SC around [18]

Round 25 :

IN BLO SC around, in very last stitch place another stitch marker in the front loop, marking it as the end of your screw.

Round 26 :

IN BLO DEC x 9 around [9]

Info :

Fasten off, leaving tail, but do not close opening yet.

Info :

Using the same yarn colour for the cap of your bulb, go back to the first front loop that was marked with a stitch marker. SLST your yarn and continue around SLSTing in every front loop until you reach the last stitch marker. Remove last stitch marker, place one more SLST and fasten off weaving in both ends of the coil you just created.

Info :

Continue stuffing your bulb, making sure the bulb and cap are on the firmer side. Close up opening and weave in tail.

Info :

Now you can give your light bulbs some personality and faces by adding cheeks, mouth, eyebrows, whatever you would like. You can also leave them as they are with or without eyes.

β€” Socket and Cord :

Info :

Using the socket and cord colour:

Round 1 :

MR 9 SC [9]

Round 2 :

INC x 9 around [18]

Round 3 :

IN BLO SC around [18]

Round 4-8 :

(5 Rounds) - SC around [18]

Info :

SLST, then Fasten off, weaving in your tail ends. Make as many that is required for joining all your lights together.

Info :

** NOTE: If you find the light bulb is a little loose or tight, adjust tension to make sure you have a fit that allows the bulb to be twisted in. **

Info :

To chain the sockets together, start by CHing 30, then taking a socket, SC through the top on one side of the MR, where the first row was made. Move to the other side of the MR, opposite of the SC you just made, place another SC through the top of your socket. This will keep your lightbulb even while hanging. CH 20 and repeat the process of attaching sockets until you have reached the last one, making sure to keep even distance between your bulbs. After attaching the last socket, CH 30 so you have extra length on ends and fasten off. You can weave in your ends or leave them to help hang your lights.

Info :

Place your bulbs in the sockets. They will be a very snug fit, which is what you want to make sure the lightbulb does not fall out easily. Turning the bulb helps the light shimmy in its socket, which is the fun aspect of the festive lights.

Assembly Instructions

  • If using safety eyes, place them between rounds 15 and 16 about 5 stitches apart before finishing round 16 and continuing to close the bulb.
  • Stuff the bulb starting from the tip and work the fill evenly around the bulb, making the bulb and cap slightly firm before closing the opening.
  • Switch to the cap colour after round 22; mark the first front loop (round 23) and the last front loop (round 25) to create the screw coil, then SLST across the front loops to form the visible cap coil.
  • Make a socket for each bulb and chain sockets together by CH 30 to start, SC the socket onto the MR top on one side, move to opposite side and SC again, CH 20 between sockets as you attach each one; after last socket CH 30 for extra length and fasten off.
  • Place each finished bulb into its socket and twist slightly to secure; weave in all ends and add embroidered cheeks or mouth as desired for personality.

Important Notes

  • πŸ’‘Please read through the pattern before starting to ensure you understand the order of sections and colour changes.
  • πŸ’‘This pattern is worked in a continuous round; use stitch markers to mark the beginning of each round.
  • πŸ’‘Make sure to make all pieces using the same type of yarn and hook size for consistent sizing and fit.
  • πŸ’‘Yarn, tension, and hook size may slightly change the look and fit of your lightbulb in its socket; make a test socket if unsure.
  • πŸ’‘If you need visual aid for certain stitches, YouTube is a great source of tutorial videos for techniques like invisible decreases and working in the back loop only.

This festive lightbulb garland brings a handmade glow to any room and makes a lovely gift for friends and family. 🌟 Add smiles with tiny embroidered faces or keep them simple and colorful for bright seasonal decor. Create a string of bulbs in different colours to match your space or celebrations. 🧢✨

You ask,

we answer.

FAQs

What size will the finished piece be?

Each finished lightbulb measures approximately 10-12 cm tall when using Bernat Blanket yarn (size 6) and a 6 mm hook; overall garland length depends on how many bulbs and spacing you choose.

Can I use different yarn weights for this pattern?

Yes, you can use different yarn weights, but this will change the final size and how snugly the bulb fits the socket; adjust hook size accordingly and consider making a test socket to verify fit.

Do I need prior crochet experience for this pattern?

This pattern is beginner friendly, but familiarity with basic amigurumi techniques like magic ring, single crochet, increases, decreases, and working in the back loop will help you complete it smoothly.

How long does this project typically take to complete?

Most crocheters complete a small garland in about 5-7 hours depending on how many bulbs you make and whether you add facial details; individual bulbs work up quickly with bulky yarn.

Where should I place the safety eyes and how far apart?

If using safety eyes, place them between rounds 15 and 16 about five stitches apart for symmetrical placement; attach before stuffing too firmly so they sit correctly.