🧢 Beautiful ✨ Detailed πŸ’ Adorable

The Finley Blanket Pattern

The Finley Blanket Pattern
4.5β˜… Rating
12-15 Hours Time Needed
2.3K Made This
βœ‚οΈ

Beginner Friendly Level

Perfect for those just starting their crochet journey, with clear instructions and simple techniques

⏱️

Multi-Day Project

A rewarding 12+ hour journeyβ€”perfect for dedicated crafters who love detailed work.

πŸ€—

Soft Hug

Gentle, plush, and full of warmth, creating a sense of comfort and coziness wherever they find a home.

About This The Finley Blanket Pattern

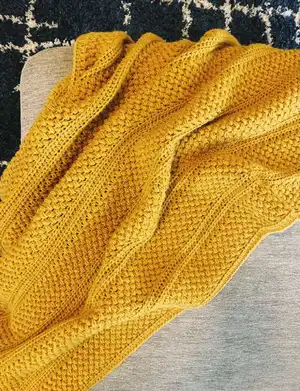
This pattern creates The Finley Blanket, a lengthwise throw featuring alternating bean stitch and half double crochet panels for modern vertical texture. The finished blanket measures approximately 45" x 53" and works up quickly using medium (worsted) weight yarn. Clear step-by-step rows and photo guidance make the stitch sequence easy to follow.

The Finley Blanket Pattern crochet pattern - detailed view of completed project

The pattern includes foundation instructions, row-by-row directions through row 117, and a simple border. A video tutorial link is referenced for the bean stitch to help you master the key texture.

Why You'll Love This The Finley Blanket Pattern

I absolutely love this pattern because it takes two simple stitches and combines them to create a striking textured throw that looks designer-made. I love how the blanket is worked lengthwise so you get vertical stripes that highlight the bean stitch panels. I enjoy the rhythm of the repeating rows β€” it is relaxing and satisfying to watch the blanket grow. I also appreciate that it uses common worsted weight yarn so it is accessible and forgiving for newer crocheters.

The Finley Blanket Pattern step 1 - construction progress The Finley Blanket Pattern step 2 - assembly progress The Finley Blanket Pattern step 3 - details and accessories The Finley Blanket Pattern step 4 - final assembly and finishing

Switch Things Up

I love experimenting with color when I make this blanket; try alternating colors every 8 rows to create bold vertical stripes.

I sometimes use a variegated worsted yarn for the bean stitch panels to add subtle depth and visual interest.

To make a larger or smaller blanket I change the number of foundation chains (always chain an odd number) and add or remove full 8-row repeats for consistent pattern flow.

If you want a squishier throw, I like to use a bulky yarn and a larger hook; the bean stitch becomes more pronounced and the blanket works up faster.

For a lighter, daintier version switch to a DK weight yarn and a smaller hook, which creates a finer, airier texture perfect for spring.

I often add a contrast-color border by working one or two rounds of sc or hdc in a coordinating shade to frame the blanket and make it pop.

I also enjoy mixing in a different stitch for a single panel β€” replacing one set of rows with a crossover or lattice stitch for a custom look.

Adding an embroidered initial or small appliqued motif to a corner is a sweet personalization for gifting or baby blankets.

I sometimes block the finished blanket lightly to even out stitches and help the bean stitch settle into a neat, consistent pattern.

If you want extra structure, consider edging with a denser stitch like crab stitch or reverse single crochet for a crisp finished edge.

Common Mistakes & How to Fix Them

βœ— Counting chains incorrectly when starting the foundation row; always chain an odd number and count carefully so your stitch multiple and final stitch count (169 sts) is correct. βœ— Assuming ch 2 counts as a stitch at the end of turning rows; remember that ch 2 does not count as a stitch in this pattern so finish rows exactly as written.
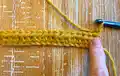
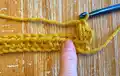
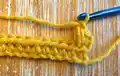
 βœ— Skipping the chain-1 that secures the bean stitch at the end of a row; always ch 1 to secure your final bean stitch so the pattern spacing remains consistent. βœ— Failing to work the bean stitch into the correct back bump or ch-1 space can distort the vertical stripes; reference the photo tutorial and place each bean stitch into the specified hdc or ch-1 space.

The Finley Blanket Pattern

Make a cozy, textured throw with The Finley Blanket Pattern β€” worked lengthwise to create vertical stripes and beautiful surface texture. This pattern guides you through the bean stitch and half double crochet to build a warm 45" x 53" blanket using worsted weight yarn. Youll love the modern look and the easy-to-follow photos and instructions that help you every step of the way.

Beginner Friendly 12-15 Hours

Materials Needed for The Finley Blanket Pattern

β€” Main Fabric

  • 01
    Worsted weight yarn (Category 4) - Lion Brand Pound of Love, approx. 3,060 yards total
  • 02
    Lion Brand Pound of Love (3 skeins) - Color: Maize
  • 03
    This pattern uses approximately 2 1/2 skeins of Lion Brand Pound of Love (you will use half of the third skein)

β€” Tools Required

  • 01
    Crochet hook J/6.0 mm (US J)
  • 02
    Scissors
  • 03
    Tapestry needle for weaving ends

Progress Tracker

0% Complete

β€” Notes :

Infos :

Finished size measures 45" wide x 53" long. This blanket is worked lengthwise. To change the length, chain any odd number. To change the width, simply add more rows. ch 2 does not count as stitch. 2hdc means 2 hdcs in same stitch. Video tutorial for the bean stitch HERE. This pattern uses 2 1/2 skeins of Lion Brand's Pound of Love yarn, so you will have some yarn leftover (save it for a scrapghan or granny squares!).

β€” Materials :

Hook(s) :

J/ 6.0 mm crochet hook

Yarn :

Weight 4 β€’ approx. 3,060 yds. Lion Brand Pound of Love (3 skeins). Color: Maize. (This pattern only uses half of the third skein)

Notions :

Scissors. Tapestry needle.

β€” Abbreviations :

Infos :

ch chain. rep repeat. yo yarn over. hdc half double crochet. sk skip. sp space. st(s) stitch(es).

β€” Special Stitches :

hdc :

Yarn over, insert hook into stitch, yarn over, pull up a loop, yarn over, pull through all three loops on hook

Bean Stitch :

1. Insert hook into stitch and pull up a loop (2 loops on hook). 2. Yarn over, insert hook into same stitch and pull up a loop (4 loops on hook). 3. Yarn over, insert hook into same stitch and pull up a loop (6 loops on hook). 4. Yarn over and pull through all 6 loops on hook. 5. Chain 1 to secure stitch. 6. Skip the next stitch and work steps 1 - 5 into the following stitch. Work bean stitch in every other stitch to end of row. Video tutorial for the bean stitch HERE.

β€” The Finley Blanket :

Foundation row :

Ch 171, hdc in 3rd back bump from hook, hdc across to end, ch 2, turn (169 sts)

Row 1 :

work bean st into 1st hdc, *sk next hdc, bean st into next hdc*, rep from * to * across row to last st, ch 1, turn (remember you ch 1 to secure the bean st, so technically you are chaining 2 at the end of the row) (169 sts - bean and ch 1 spaces count as stitch)

Row 2 :

sk first bean st, work bean st into ch-1 sp *sk bean st, work bean st into ch-1 sp*, rep from * to * across row working last bean st in last ch-1 sp on the end, ch 1, turn (169 sts - bean and ch 1-space count as stitches)

Rows 3 - 8 :

rep row 2

Row 9 :

hdc in 1st bean st, hdc in ch-1 sp *hdc in bean st, hdc in ch-1 sp*, rep from * to * across to last bean st, do not hdc in last bean st, hdc in last ch-1 sp, ch 2, turn (169 sts)

Row 10 :

hdc in each st across to end of row, ch 2, turn (169 sts)

Rows 11 & 12 :

repeat row 10

Rows 13 - 20 :

rep rows 1 - 8

Rows 21 - 24 :

rep rows 9 - 12

Rows 25 - 32 :

rep rows 1 - 8

Rows 33 - 36 :

rep rows 9 - 12

Rows 37 - 44 :

rep rows 1 - 8

Rows 45 - 48 :

rep rows 9 - 12

Rows 49 - 56 :

rep rows 1 - 8

Rows 57 - 60 :

rep rows 9 - 12

Rows 61 - 68 :

rep rows 1 - 8

Rows 69 - 72 :

rep rows 9 - 12

Rows 73 - 80 :

rep rows 1 - 8

Rows 81 - 84 :

rep rows 9 - 12

Rows 85 - 92 :

rep rows 1 - 8

Rows 93 - 96 :

rep rows 9 - 12

Rows 97 - 104 :

rep rows 1 - 8

Rows 105 - 108 :

rep rows 9 - 12

Rows 109 - 116 :

rep rows 1 - 8

Row 117 :

rep row 9; do not ch-2, only ch-1

Info :

Do not fasten off, continue with same yarn for border

β€” Border :

Side 1 :

2hdc in first side st, working hdcs evenly along the side of the bean sts and hdc sts, ending with 2hdc in last st

Side 2 :

2hdc in first st, working hdcs in each hdc st, ending with 2hdc in last st

Side 3 :

rep side 1

Side 4 :

rep side 2

Info :

sl st to first hdc from side 1

Info :

Fasten off; weave in all ends

Assembly Instructions

  • Do not fasten off at the end of Row 117; continue with the same yarn to work the border as instructed.
  • Work Side 1 of the border by placing 2hdc in the first side stitch and working hdcs evenly along the side of the bean stitches and hdc stitches, ending with 2hdc in the last stitch.
  • Work Side 2 by placing 2hdc in the first stitch and working hdcs in each hdc stitch along that side, ending with 2hdc in the last stitch; repeat Side 1 and Side 2 for Sides 3 and 4 respectively.
  • After completing Side 4, sl st to the first hdc from Side 1 to join the border round, then fasten off and weave in all ends securely with a tapestry needle.

Important Notes

  • πŸ’‘Chain an odd number for the foundation to preserve the stitch multiple and achieve the correct width for the pattern.
  • πŸ’‘ch 2 does not count as a stitch in this pattern, so follow turning instructions carefully when starting rows.
  • πŸ’‘Use the video tutorial referenced for the bean stitch if youre unsure how to form each textured bean; practicing on a swatch helps.

The Finley Blanket Pattern gives you a modern, textured throw that feels like a warm hug every time you wrap up. Its lengthwise construction produces elegant vertical panels and gorgeous stitch definition. Perfect for gifts, cozy nights, and adding handmade charm to your living space. 🧢 Cozy up and enjoy the process! 🧡

You ask,

we answer.

FAQs

What size will the finished piece be?

The finished blanket measures approximately 45" wide x 53" long using the recommended yarn and hook size.

How much yarn do I need for the blanket?

The pattern calls for approximately 3,060 yards total (Lion Brand Pound of Love, 3 skeins); the pattern uses about 2 1/2 skeins, leaving some yarn leftover.

Do I need to know the bean stitch before starting?

A video tutorial is referenced in the pattern for the bean stitch, so while prior knowledge helps, the instructions and video make it easy to learn as you go.

Can I change the size of the blanket?

Yes. To change the length chain any odd number for the foundation; to change the width, add or subtract rows following the stitch pattern sequence.