🧶 Beautiful ✨ Detailed 💝 Adorable

The Magic of Autumn Pine Cone Amigurumi Pattern

The Magic of Autumn Pine Cone Amigurumi Pattern
3.9★ Rating
5-7 Hours Time Needed
2.3K Made This
✂️

Intermediate Level

Ideal for those with basic crochet experience, featuring slightly more advanced stitches and techniques to expand your skills.

⏱️

Weekend Treat

Takes 5-7 hours, making it an enjoyable project to finish over a couple of days.

🧸

Cute Companion

An adorable friend to cherish, handcrafted with love to bring comfort and joy for years to come.

About This The Magic of Autumn Pine Cone Amigurumi Pattern

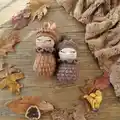
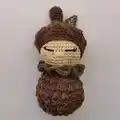
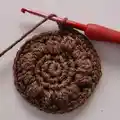
This pattern teaches you how to crochet a whimsical pine cone amigurumi complete with hat, collar and leaf details. It includes round-by-round instructions, a step-by-step bobble stitch tutorial and assembly photos to guide you. The finished toy measures about 14 cm and is worked mostly in continuous rounds for smooth shaping.

The Magic of Autumn Pine Cone Amigurumi Pattern crochet pattern - detailed view of completed project

You will learn textured bobble stitch techniques and simple embroidery for facial features. The pattern uses Scheepjes Catona and recommends a 2.5 mm hook for a neat finish.

Why You'll Love This The Magic of Autumn Pine Cone Amigurumi Pattern

I absolutely love this pattern because it captures a tiny bit of autumn magic in a small, huggable toy. I enjoyed designing the bumpy pine cone texture using the bobble stitch and watching the character come to life with a tiny hat and leaf. I love that it is small enough to finish in a weekend but rich with simple techniques that teach texture and shaping. I hope it inspires you to make a whole forest of tiny companions for gifts and decor.

The Magic of Autumn Pine Cone Amigurumi Pattern step 1 - construction progress The Magic of Autumn Pine Cone Amigurumi Pattern step 2 - assembly progress The Magic of Autumn Pine Cone Amigurumi Pattern step 3 - details and accessories The Magic of Autumn Pine Cone Amigurumi Pattern step 4 - final assembly and finishing

Switch Things Up

I love how easy it is to customize this pattern by changing colors; try soft pastels for a springtime version or deep greens for a forest palette.

You can make a mini keychain version by using finer yarn and a smaller hook, then attaching a keyring before stuffing fully.

If you want a chunkier, cuddlier pine cone, swap to a bulky yarn and a larger hook to increase size quickly.

Try different bobble stitch heights: repeating the bobble sequence more times will create a puffier, more pronounced scale effect.

I often add tiny felt accessories like a scarf or mini acorn to make a whole set of seasonal characters for gifting.

For a more realistic leaf, embroider veins with metallic or golden thread as shown, or use contrasting greens for a bicolored leaf.

I sometimes embroider different facial expressions — a smile, sleepy eyes, or curious eyebrows — to give each pine cone its own personality.

Consider making a family set with varying sizes and colors and display them in a bowl or garland for handmade seasonal decor.

If making for children, secure all embroidered parts firmly and avoid small parts; you can reinforce attachments with extra stitches inside the piece.

I also like to experiment with yarn textures: cotton gives a neat finish while wool adds softness and slight fuzz for a cozy look.

Common Mistakes & How to Fix Them

✗ Skipping the stitch marker and losing the round start leads to miscounted stitches; use a marker at the beginning of every round to keep accurate counts. ✗ Overstuffing the head and body creates bulges and distorts the texture; stuff gradually and evenly, checking shape frequently to maintain a smooth finish. ✗ Tightening your tension too much while making bobble stitches will make them stiff and uneven; relax your tension and practice bobbles on a sample before working on the body. ✗ Forgetting to leave a long sewing tail when fastening off will make attachment difficult; always leave enough yarn for sewing and hide ends after assembly. ✗ Joining rounds with a slip stitch when the pattern says continuous rounds will create visible seams; work in continuous rounds and use a marker to track the first stitch. ✗ Not embroidering the facial placement before sewing head and body together may result in misaligned features; embroider eyes and nose with reference to the indicated rounds before final attachment.

The Magic of Autumn Pine Cone Amigurumi Pattern

Bring a little enchanted forest into your home with this charming pine cone amigurumi pattern. You will crochet a cozy, textured pine cone character with a removable hat, collar and tiny leaf details. The pattern is full of clear round-by-round instructions, helpful photos and a bobble stitch tutorial to achieve the textured pine cone look. Perfect as a handmade gift or seasonal decor to brighten your space.

Intermediate 5-7 Hours

Materials Needed for The Magic of Autumn Pine Cone Amigurumi Pattern

— Main Fabric

  • 01
    Scheepjes Catona n° 404 - 1 x 25 grams (color for face/skin)
  • 02
    Scheepjes Catona n° 507 - 1 x 50 grams (main brown for body/hat)
  • 03
    Scheepjes Catona n° 387 - 1 x 25 grams (green for leaf and collar)
  • 04
    Scheepjes Stone Washed n° 804 - 1 x 50 grams (variation: alternate face/skin color)
  • 05
    Scheepjes Catona n° 157 - 1 x 50 grams (variation: alternate body/hat color)
  • 06
    Scheepjes Catona n° 504 - 1 x 25 grams (variation: accent color)
  • 07
    Additional small amounts of cotton yarn for embroidering details and accents

— Tools Required

  • 01
    Crochet hook size 2.5mm
  • 02
    Yarn needle
  • 03
    Cotton yarn (Scheepjes Catona or similar)
  • 04
    Yarn for embroidering details (contrasting color)
  • 05
    Fiberfill for stuffing
  • 06
    Scissors
  • 07
    Stitch marker(s)
  • 08
    Golden thread for leaf veins (for assembly)
  • 09
    Blush or fabric paint (optional, for cheeks)

Progress Tracker

0% Complete

— Information :

Info :

Skill level: intermediate. Finished size: about 14cm. Attention, size will change if you use different yarn or hook.

Infos :

Each part is worked in continuous rounds (do not join rounds with a slip stitch) unless instructed otherwise in the pattern. Use a stitch marker to mark the beginning of each round. The color of the round/row will be indicated with a square just before the round/row instructions.

— How to make a bobble stitch :

Info :

Yarn over, insert the hook into stitch, pull up a loop, yarn over and pull through 2 loops only (like the beginning of one double crochet stitch): we have 2 loops on the hook.

Info :

Yarn over, insert the hook into the same stitch as before, pull up a loop, yarn over and pull through 2 loops only: we have 3 loops on the hook.

Info :

Yarn over, insert the hook into the same stitch as before, pull up a loop, yarn over and pull through 2 loops only: we have 4 loops on the hook.

Info :

Yarn over, insert the hook into the same stitch as before, pull up a loop, yarn over and pull through 2 loops only: we have 5 loops on the hook.

Info :

Yarn over, pull through all 5 loops at once. Single crochet in next stitch. Repeat the number of times indicated.

Info :

It is possible to vary the thickness of the bobble stitch. For example, to obtain more relief, we can repeat the work 5 times instead of 4 to have 6 loops on the hook.

— Head :

Info :

Work with white yarn:

Round 1 :

6sc in a magic ring (6)

Round 2 :

inc x 6 (12)

Round 3 :

(1sc, inc) x 6 (18)

Round 4 :

(2sc, inc) x 6 (24)

Round 5 :

(3sc, inc) x 6 (30)

Round 6 :

(4sc, inc) x 6 (36)

Round 7 :

(5sc, inc) x 6 (42)

Round 8 :

(6sc, inc) x 6 (48)

Round 9-15 :

Sc in all st [7 rounds] (48)

Round 16 :

(6sc, dec) x 6 (42)

Round 17 :

(5sc, dec) x 6 (36)

Round 18 :

(4sc, dec) x 6 (30)

Round 19 :

(3sc, dec) x 6 (24)

Info :

Fasten off and leaving enough yarn for sewing. Stuff firmly.

— Leaf :

Info :

Work with green yarn:

Round 1 :

4sc in a magic ring (4)

Round 2 :

(1sc, inc) x 2 (6)

Round 3 :

(2sc, inc) x 2 (8)

Round 4 :

(3sc, inc) x 2 (10)

Round 5 :

(4sc, inc) x 2 (12)

Round 6-8 :

Sc in all st [3 rounds] (12)

Round 9 :

(2sc, dec) x 3 (9)

Round 10 :

(1sc, dec) x 3 (6)

Info :

Fasten off and leaving enough yarn for sewing. Do not stuff.

— Collar :

Info :

Work in rows with green yarn: Ch27, start in the 2nd ch from the hook.

Round 1 :

26sc, ch2, turn (26)

Round 2 :

3Dc in all st, ch1, turn (78)

Round 3 :

1Hdc in all st (78)

Info :

Fasten off and leaving enough yarn for sewing.

— Body :

Info :

Work with brown yarn:

Round 1 :

6sc in a magic ring (6)

Round 2 :

inc x 6 (12)

Round 3 :

inc x 12 (24)

Round 4 :

(BS, 1sc) x 12 (24)

Round 5 :

(1sc, inc) x 12 (36)

Round 6 :

(BS, 1sc) x 18 (36)

Round 7 :

(2sc, inc) x 12 (48)

Round 8 :

(BS, 1sc) x 24 (48)

Round 9 :

Sc in the back loop of all st (48)

Round 10 :

(BS, 1sc) x 24 (48)

Round 11 :

(2sc, dec) x 12 (36)

Round 12 :

(BS, 1sc) x 18 (36)

Round 13 :

Sc in all st (36)

Round 14 :

(BS, 1sc) x 18 (36)

Round 15 :

(4sc, dec) x 6 (30)

Round 16 :

(BS, 1sc) x 15 (30)

Round 17 :

(3sc, dec) x 6 (24)

Round 18 :

(BS, 1sc) x 12 (24)

Round 19 :

Sc in all st (24)

Info :

Fasten off and hide the yarn. Stuff firmly.

— Stalk :

Info :

Work with brown yarn :

Round 1 :

6sc in a magic ring (6)

Round 2 :

inc x 6 (12)

Round 3 :

(3sc, inc) x 3 (15)

Round 4 :

Sc in the back loop of all st (15)

Round 5 :

Sc in all st (15)

Round 6 :

(3sc, dec) x 3 (12)

Round 7 :

Sc in all st (12)

Round 8 :

(2sc, dec) x 3 (9)

Round 9-11 :

Sc in all st [3 rounds] (9)

Info :

Fasten off and leaving enough yarn for sewing. Stuff firmly.

— Hat :

Info :

Work with brown yarn:

Round 1 :

6sc in a magic ring (6)

Round 2 :

inc x 6 (12)

Round 3 :

inc x 12 (24)

Round 4 :

(BS, 1sc) x 12 (24)

Round 5 :

(1sc, inc) x 12 (36)

Round 6 :

(BS, 1sc) x 18 (36)

Round 7 :

(2sc, inc) x 12 (48)

Round 8 :

(BS, 1sc) x 24 (48)

Round 9 :

(3sc, inc) x 12 (60)

Round 10 :

(BS, 1sc) x 30 (60)

Round 11 :

(3sc, dec) x 12 (48)

Round 12 :

(6sc, dec) x 6 (42)

Round 13 :

(5sc, dec) x 6 (36)

Round 14 :

(4sc, dec) x 6 (30)

Info :

Fasten off and hide the yarn.

— Assembling :

Info :

With golden thread, embroider the veins of the leaf.

Info :

Sew the stalk to the top of the hat.

Info :

Sew the leaf between the stalk and the hat.

Info :

Sew the head and body together.

Info :

Embroider the nose between round 14 and round 15, 3 sts long. Embroider the base of the eyes between round 13 and round 14, 3 sts long. Embroider the lashes one row above.

Info :

You can use blush to color the cheeks.

Info :

Attach the collar around the neck and put the hat on the head.

Assembly Instructions

  • With golden thread, embroider the veins of the leaf and sew the leaf between the stalk and the hat.
  • Sew the stalk to the top center of the hat, securing with small hidden stitches so it stands upright.
  • Sew the head to the top opening of the body, aligning the neck area and sewing firmly with the tail left from the head.
  • Attach the collar around the neck, then place the hat on the head and secure if needed with a few hidden stitches.
  • Embroider facial details: nose between rounds 14-15 (3 sts long), base of the eyes between rounds 13-14 (3 sts long), and lashes one row above; use photos as reference for placement.

Important Notes

  • 💡Work each part in continuous rounds unless the pattern explicitly instructs rows; do not join with slip stitches unless noted.
  • 💡Use a stitch marker to mark the beginning of each round for accurate stitch counting and easier shaping.
  • 💡Stuff firmly but not overly tight to keep the textured bobble pattern defined and prevent distortion of the shape.
  • 💡Hide yarn tails and weave ends securely after assembly to avoid loose threads and to maintain a neat finish.

Congratulations on creating your own little magic pine cone amigurumi! This sweet companion brings cozy autumn vibes to any room and is perfect as a handmade gift. Keep experimenting with colors and textures to create a whole family of tiny forest friends. 🧶🍂✨

You ask,

we answer.

FAQs

What size will the finished piece be?

The finished amigurumi measures about 14 cm tall using the recommended Scheepjes Catona yarn and a 2.5 mm hook.

Can I use different yarn weights for this pattern?

Yes, you can use different yarn weights, but the final size and texture will change; choose an appropriate hook for your yarn and adjust stuffing accordingly.

Do I need prior crochet experience for this pattern?

This pattern is rated intermediate; you should be comfortable with single crochet, increases and decreases, and working in continuous rounds, plus basic embroidery for the face.

How long does this project typically take to complete?

Most crocheters complete this project in 5-7 hours, though time may vary depending on experience, speed, and how many details you add.

How do I make the textured pine cone surface?

The textured surface is created primarily with the bobble stitch (BS) worked as instructed in the bobble stitch tutorial; practice on a small swatch to get consistent bobbles.